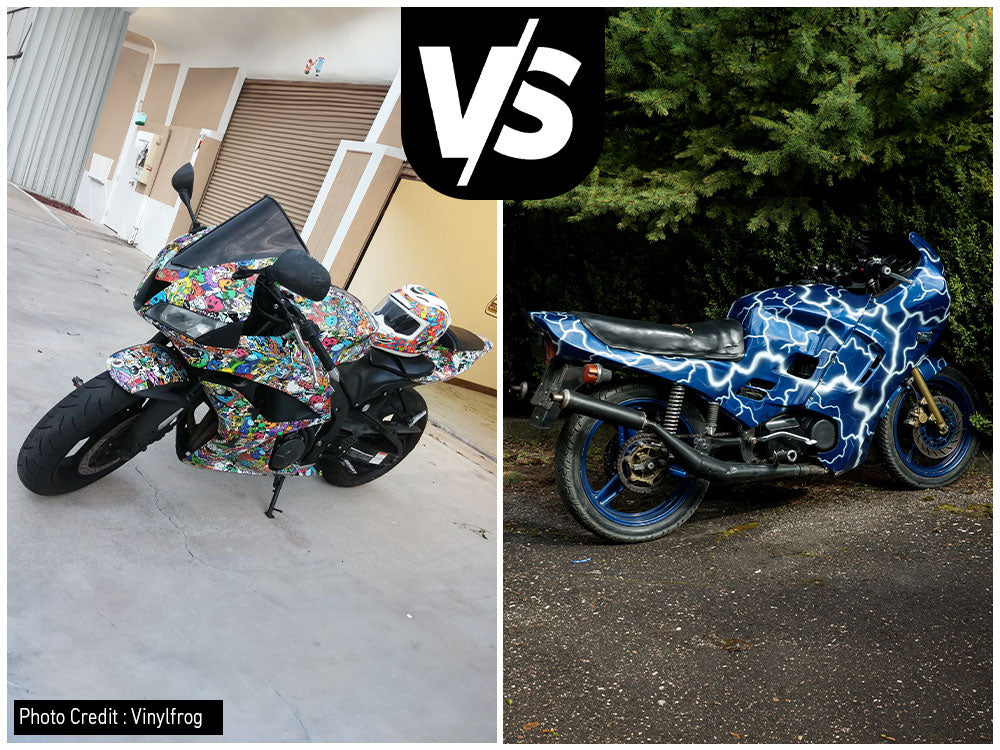
Are you looking to give your motorcycle a fresh, personalized look without spending a fortune? Applying a vinyl wrap might be the perfect solution for you.
It’s a cost-effective way to protect your bike’s paint and make it stand out on the road. But if you’ve never done it before, the process can seem tricky. Don’t worry—this guide will walk you through every step, making it easy for you to achieve professional-looking results.
By the end, you’ll know exactly how to transform your motorcycle with a sleek vinyl wrap that turns heads wherever you ride. Ready to get started? Let’s dive in!
Credit: www.vikingbags.com
Preparing The Motorcycle
Preparing the motorcycle is a key step for a smooth vinyl wrap application. This stage ensures the vinyl sticks well and looks perfect. Taking time here saves effort later.
Cleaning The Surface
Start by washing the motorcycle thoroughly. Remove all dirt, dust, and grease. Use a mild soap and water. Dry the surface completely with a clean cloth. Any residue can cause bubbles or peeling.
Removing Parts
Take off parts like mirrors, seats, or trim. This helps wrap vinyl around edges neatly. It also avoids wrinkles and gaps. Keep screws and small parts safe for reassembly.
Choosing The Right Vinyl
Select vinyl designed for motorcycles. Look for flexible, durable material. Matte, gloss, or textured finishes are options. Pick a color that fits your style. High-quality vinyl lasts longer and resists weather.
Gathering Essential Tools
Before starting your vinyl wrap project on a motorcycle, gather all the essential tools. Having the right tools ensures a smooth and clean application. It saves time and reduces mistakes. Prepare your workspace and check each item carefully. This step sets the foundation for a successful wrap.
Squeegee And Heat Gun
A squeegee helps smooth out air bubbles and wrinkles on the vinyl. Use one with a soft edge to avoid scratches. The heat gun softens the vinyl, making it easier to stretch over curves. Heat also helps the vinyl stick better to the surface. Control the heat to prevent damage to the paint or vinyl.
Cutting Tools
Sharp cutting tools are crucial for trimming excess vinyl. Use a utility knife or a craft knife with fresh blades. Replace blades often to ensure clean cuts. Precision in cutting helps avoid jagged edges and peeling later. Keep a cutting mat or firm surface underneath to protect your work area.
Safety Equipment
Protect yourself while working with tools and heat. Wear gloves to avoid cuts and burns. Eye protection guards against flying debris or accidental heat contact. Work in a well-ventilated area to avoid inhaling fumes. Safety ensures you complete the project without injury or accidents.
Measuring And Cutting Vinyl
Measuring and cutting vinyl is a key step in wrapping your motorcycle. It ensures the vinyl fits perfectly without wrinkles or bubbles. Careful measurement and cutting save time and prevent mistakes. Follow these steps to get clean, accurate cuts for a smooth wrap.
Taking Accurate Measurements
Start by cleaning the motorcycle surface. Use a tape measure to get exact dimensions of each part. Measure length, width, and curves carefully. Write down every measurement. Double-check to avoid errors. Accurate measurements make the vinyl wrap fit tight and smooth.
Creating Templates
Use paper or cardboard to make templates from your measurements. Cut the paper to match the shape of the motorcycle parts. Place the templates on the vinyl to trace the shapes. Templates help avoid cutting mistakes. They guide you to cut vinyl that fits perfectly.
Cutting With Precision
Use a sharp blade or vinyl cutter for clean edges. Cut slowly along the traced lines. Avoid rushing to prevent jagged cuts. Keep the vinyl flat and steady while cutting. Trim small excess areas for a perfect fit. Precise cutting makes the wrap look professional and neat.
Applying The Vinyl Wrap
Applying vinyl wrap to a motorcycle requires patience and care. This step is crucial for a smooth, clean finish. The vinyl must fit perfectly on the bike’s curves and edges. Follow each part carefully for the best results.
Positioning The Vinyl
Start by placing the vinyl wrap on the motorcycle. Align it with the edges and important shapes. Avoid stretching the vinyl too much at this stage. Use light pressure to keep it in place. Adjust the position until it looks right.
Using Heat For Flexibility
Use a heat gun or hairdryer to warm the vinyl. Heat makes the vinyl soft and easier to bend. Warm the wrap gently over curves and corners. This helps the vinyl stick better and avoid wrinkles. Keep the heat moving to prevent damage.
Smoothing Out Bubbles
Use a squeegee or a soft cloth to remove air bubbles. Start from the center and push outward. Work slowly to avoid tearing the wrap. If bubbles remain, heat the area again and smooth it out. Proper smoothing gives a clean, polished look.
Finishing Touches
Finishing touches give your motorcycle wrap a clean, professional look. This stage ensures the vinyl fits perfectly and lasts long. Careful attention to detail here prevents peeling and bubbling. Each step below helps seal the deal on your vinyl wrap project.
Trimming Excess Material
Use a sharp blade to cut away extra vinyl. Cut slowly to avoid damaging the bike’s paint. Keep the blade angle shallow for smooth edges. Leave a small margin near curves to prevent lifting. Trim excess carefully around bolts and seams.
Securing Edges
Press edges firmly with a squeegee or your fingers. Heat the edges slightly to make the vinyl stick better. Use a heat gun on low settings to avoid burns. Seal edges with a plastic roller for extra grip. Well-secured edges stop water from getting underneath.
Reassembling Motorcycle Parts
Put all removed parts back carefully. Check each piece fits without stressing the vinyl. Tighten screws and bolts just right—not too tight. Inspect the wrap after reassembly for any wrinkles. Your bike looks great and stays protected now.

Credit: raxtify.com
Maintenance Tips
Maintaining your motorcycle’s vinyl wrap keeps it looking fresh and new. Proper care extends the life of the wrap. Follow simple steps to protect your investment and keep your bike stylish.
Cleaning Wrapped Surfaces
Use a soft cloth or sponge with mild soap and water. Avoid harsh chemicals or abrasive cleaners that can damage the wrap. Rinse thoroughly to remove all soap residue. Dry with a clean, soft towel to prevent water spots. Clean your wrap regularly to stop dirt buildup and maintain shine.
Avoiding Damage
Park your motorcycle in shaded or covered areas to protect the wrap from sun damage. Keep sharp objects away to prevent scratches or cuts. Avoid pressure washers or high-pressure water near edges. Be careful when removing stickers or decals on the wrap. Gentle handling helps the wrap stay intact and vibrant.
Repairing Minor Issues
Small tears or bubbles can appear over time. Use a heat gun or hair dryer on low heat to smooth out bubbles. For tiny cuts, clear vinyl repair tape can help prevent the damage from growing. Always act quickly to fix small problems before they worsen. Regular checks keep your wrap in top shape.

Credit: www.acmegraphic.com
Frequently Asked Questions
How Do I Prepare My Motorcycle For Vinyl Wrap?
Clean your motorcycle thoroughly to remove dirt and grease. Remove any detachable parts for easier wrapping. Ensure the surface is dry and smooth for better vinyl adhesion.
What Tools Are Needed To Apply Vinyl Wrap On Motorcycles?
You need a heat gun, squeegee, utility knife, microfiber cloth, and gloves. These tools help in smooth application, cutting, and preventing air bubbles or wrinkles.
Can Vinyl Wrap Protect My Motorcycle Paint?
Yes, vinyl wrap acts as a protective layer. It guards against minor scratches, UV rays, and dirt. However, it is not a substitute for paint protection film.
How Long Does Vinyl Wrap Last On Motorcycles?
Typically, vinyl wrap lasts 5 to 7 years with proper care. Avoid harsh chemicals and frequent washing to extend its lifespan. Sun exposure may reduce longevity.
Conclusion
Applying vinyl wrap to your motorcycle is a fun and rewarding task. Take your time and work carefully on each part. Use the right tools and keep the surface clean. Small bubbles or wrinkles can be smoothed out with patience.
Practice on small areas before moving to large sections. A well-done wrap protects your bike and gives it a fresh look. Enjoy your new style and the sense of pride it brings. Keep your wrap clean to make it last longer.
Vinyl wrapping can change your bike’s look without much cost or damage.