
If you want your bike or car to stop smoothly and safely, keeping your disc brake rotors clean is key. Dirty rotors can cause squeaky brakes, reduce stopping power, and wear down your pads faster.
But don’t worry—cleaning them isn’t as hard as you might think. In this guide, you’ll learn simple, effective steps to get your rotors spotless and working like new again. Ready to improve your ride’s performance and safety? Let’s dive in and make those brakes shine!

Credit: www.youtube.com
Choosing The Right Cleaning Tools
Choosing the right cleaning tools makes rotor cleaning easier and safer. Using proper tools protects the disc brake rotors from damage. This ensures better performance and longer life for your brakes. Some tools clean well without scratching or leaving residue.
Essential Supplies For Rotor Cleaning
Start with a clean workspace and gather these supplies. Use a microfiber cloth to wipe dirt gently. A soft-bristle brush helps remove stuck debris. Isopropyl alcohol works well to clean rotors without harm. Avoid rough sponges or steel wool, which can scratch surfaces. Gloves protect your hands from chemicals and grime. Have clean water ready for rinsing after cleaning.
Safe Cleaners To Avoid Damage
Choose cleaners made for bike or automotive parts. Isopropyl alcohol is safe and evaporates quickly. Avoid oil-based cleaners that leave residue and attract dirt. Harsh chemicals like bleach or ammonia can corrode the rotor. Do not use WD-40 or similar lubricants on rotors. Use water-based bike cleaners for gentle but effective cleaning. Always rinse well to remove any cleaner traces.
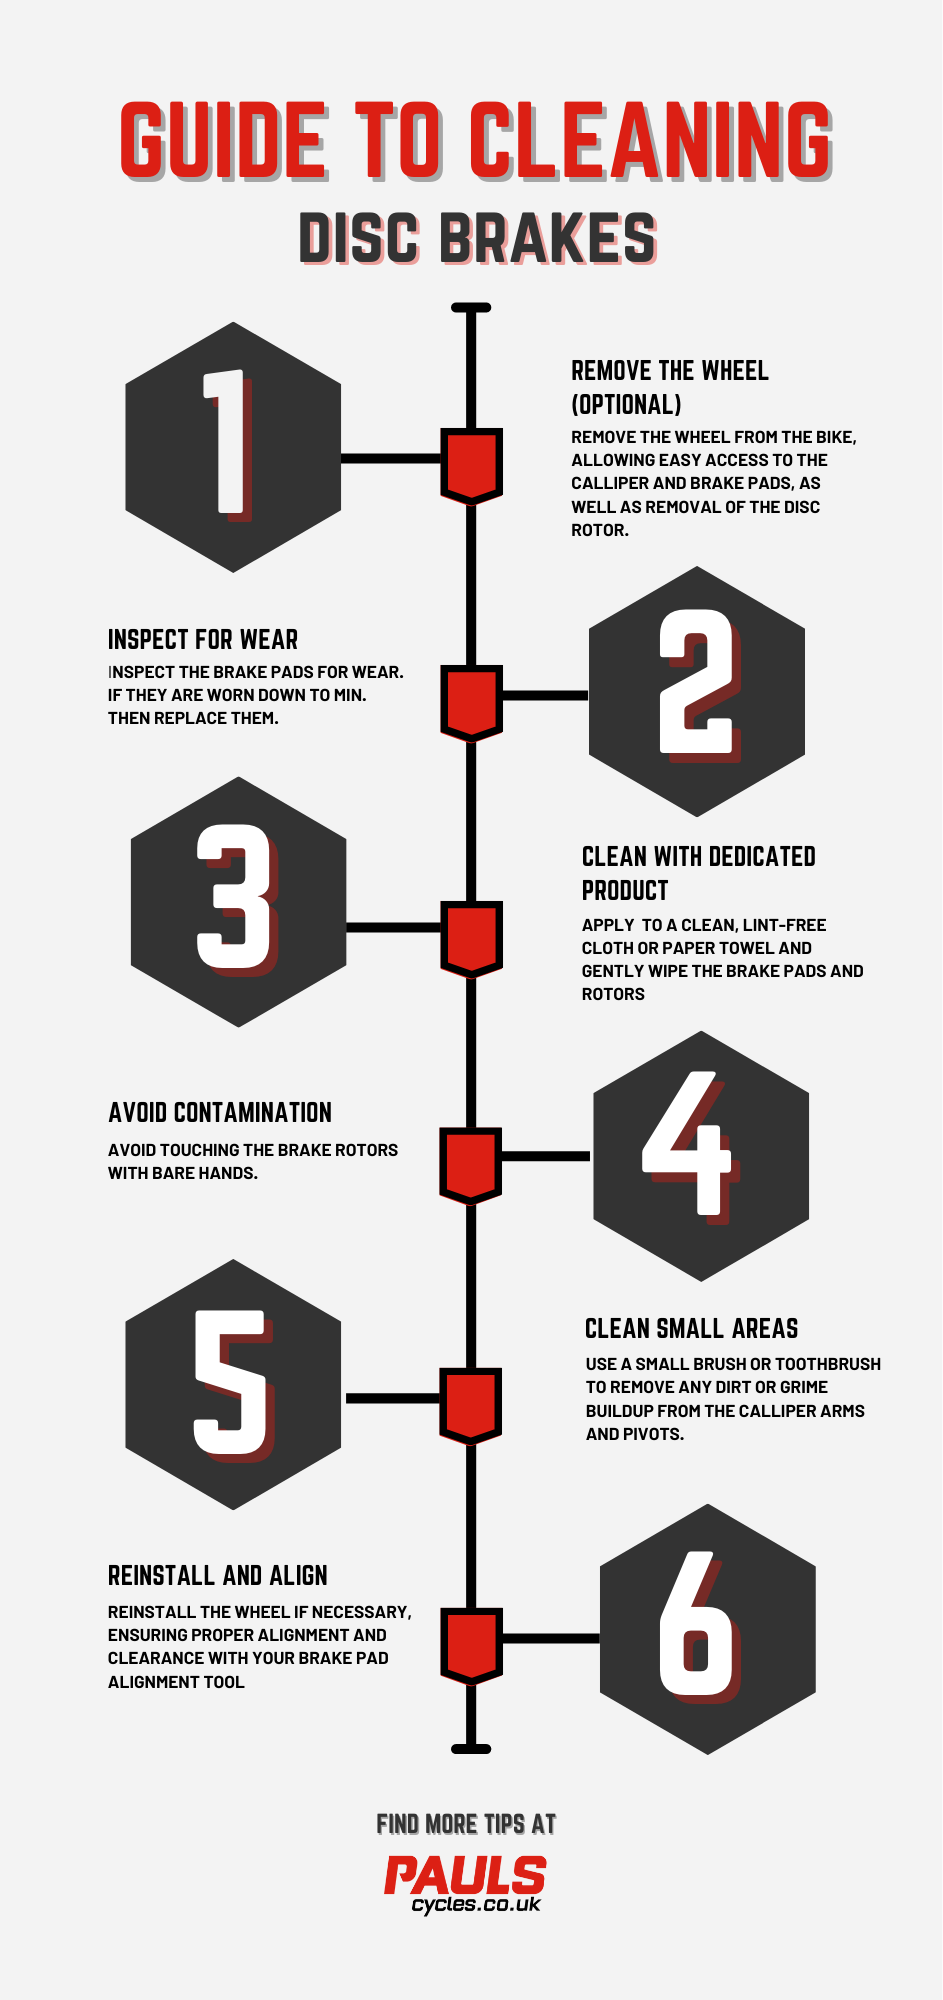
Credit: www.paulscycles.co.uk
Preparing Your Bike For Cleaning
Preparing your bike for cleaning is an important first step. It makes the process easier and safer. You need to get the bike ready before you start cleaning the disc brake rotors. This involves removing parts and making sure the bike stays still. Taking time now will save trouble later.
Removing The Wheel And Rotor
Start by flipping your bike upside down or placing it in a repair stand. This helps access the wheel and rotor easily. Use a wrench or quick-release lever to remove the wheel. Take care not to damage the rotor while removing the wheel. If you have a six-bolt rotor, use a Torx key to remove the rotor from the hub. Keep all bolts and small parts safe to avoid losing them.
Securing The Bike For Maintenance
Place your bike on a stable surface or use a repair stand. This keeps your bike steady during cleaning. Avoid resting the bike on the brakes or rotor. Use clamps or straps to hold the bike frame firmly. A steady bike prevents accidents and damage. Good support makes cleaning the rotors easier and safer.
Step-by-step Cleaning Process
Cleaning disc brake rotors is essential for bike safety and performance. Dirt and oil can reduce braking power. Following a clear cleaning process helps maintain smooth stops. This guide shows easy steps to clean rotors properly.
Initial Dirt And Debris Removal
Start by wiping the rotor with a dry cloth. Remove loose dirt and dust carefully. Use a soft brush to clear stuck debris. Avoid touching the rotor surface with bare hands. This step prepares the rotor for deeper cleaning.
Applying Cleaner And Scrubbing
Use a brake cleaner spray made for rotors. Spray evenly on both sides of the rotor. Let the cleaner sit for a minute to break grime. Gently scrub with a soft brush or pad. Focus on areas with oil or stubborn dirt.
Rinsing And Drying Techniques
Rinse the rotor with clean water to remove cleaner residue. Shake off excess water or use a dry cloth. Allow the rotor to air dry completely before use. Avoid wiping with oily or dirty rags. Dry rotors ensure better braking performance.

Credit: www.arloren.com
Addressing Common Rotor Issues
Disc brake rotors face common problems that reduce braking power. Dirt, rust, and glazing cause noise and poor stopping. Fixing these issues keeps brakes safe and smooth. This section explains how to clean and restore rotors easily.
Dealing With Glazed Rotors
Glazing happens when rotors get too hot and smooth out. This makes brakes less effective and noisy. To fix glazed rotors, use fine sandpaper to lightly sand the surface. Sand until the rotor looks dull and rough again.
After sanding, clean the rotor with brake cleaner spray. Wipe with a clean cloth to remove dust and oil. This restores the rotor’s grip and improves braking.
Removing Rust And Corrosion
Rust forms on rotors if the bike or car stays unused in wet places. Corrosion weakens the rotor and causes brake squeal. Remove rust by scrubbing with a wire brush or steel wool.
For heavy rust, apply rust remover or white vinegar. Let it sit a few minutes, then scrub again. Rinse well and dry the rotor completely before use.
Maintaining Brake Performance
Maintaining brake performance is key for safe riding. Clean rotors help brakes work well and last longer. Dirt, oil, and rust lower brake power and cause noises. Keeping rotors clean ensures smooth stops and better control.
Simple care prevents costly repairs. It keeps your bike safe on every ride. Follow easy steps to keep rotors in top shape.
Regular Cleaning Schedule
Clean rotors every few rides. More often if you ride in wet or muddy areas. Wipe rotors with a clean cloth and isopropyl alcohol. Avoid touching rotor surfaces with bare hands. Dirt and oil reduce brake grip. Consistent cleaning stops buildup of grime and rust.
Tips For Long-lasting Rotors
Use brake pads designed for your rotors. Check pads regularly for wear and replace early. Avoid hard braking to reduce rotor heat. Heat can warp rotors and reduce life. Store your bike indoors to prevent rust. Keep rotors dry after rides in rain. Regular checks find problems before they grow.
Safety Tips During Cleaning
Cleaning disc brake rotors is important for bike safety and performance. It requires care to avoid injury and damage. Follow these safety tips during cleaning to protect yourself and your bike parts.
Protecting Your Hands And Eyes
Wear gloves to keep your hands safe from sharp edges. Brake rotors can cut skin easily. Use safety glasses to shield your eyes from dust and cleaning sprays. Avoid touching your face during cleaning. Wash hands after finishing to remove any chemicals or dirt.
Avoiding Contamination Of Brake Pads
Keep brake pads away from cleaning fluids and grease. Oil or dirt on pads can reduce braking power. Use a clean cloth only on rotors, not on pads. Store brake pads in a clean, dry place during rotor cleaning. Check pads for dirt before reassembly to ensure safety.
Frequently Asked Questions
How Often Should You Clean Disc Brake Rotors?
Clean disc brake rotors every 3,000 to 6,000 miles or when you notice noise or reduced braking. Regular cleaning prevents buildup of dirt and brake dust, ensuring optimal braking performance and longer rotor life.
What Materials Are Safe To Clean Disc Brake Rotors?
Use isopropyl alcohol, brake cleaner spray, or mild soap with water. Avoid oily or greasy substances that can reduce braking efficiency and cause rotor contamination.
Can I Use Sandpaper To Clean Disc Brake Rotors?
Yes, fine-grit sandpaper can remove rust or glaze gently. Use light pressure and clean the rotor afterward to avoid residue that affects braking.
Why Do Disc Brake Rotors Need Cleaning?
Cleaning removes dirt, brake dust, and oil that reduce braking power. Clean rotors ensure better brake pad contact and safer, smoother stops.
Conclusion
Cleaning disc brake rotors keeps your bike safe and smooth. Regular cleaning stops dirt and grime build-up. Use simple tools and gentle cleaners for best results. Avoid harsh chemicals that can damage the rotor surface. Check rotors often to catch problems early.
Clean rotors help brakes work better and last longer. Keep your ride quiet and strong with clean rotors. A little care goes a long way. Give your bike the attention it deserves.


