
Are you looking to give your car’s interior a personal touch? Learning how to cross stitch a leather steering wheel cover is a simple and rewarding way to do just that.
Not only will this skill help you create a unique design, but it also adds grip and comfort while you drive. In this guide, you’ll discover easy steps and helpful tips to transform your steering wheel with stylish, hand-stitched details.
Stick with me, and by the end, you’ll be ready to start your own project that stands out every time you hit the road.
Credit: craftcustoms.com
Materials Needed
Gathering the right materials is the first step to cross stitch a leather steering wheel cover. Proper materials help make the project easier and the final product durable. Each item has a specific role in the stitching process. Choose carefully for the best results.
Choosing The Right Leather
Select leather that is thick and flexible. It should feel smooth but strong enough to handle stitching. Avoid very thin or stiff leather to prevent tearing. Cowhide is a popular choice for steering wheel covers. Make sure the leather piece is large enough to cover the wheel fully.
Selecting Thread And Needle
Use strong, waxed thread for durability. Polyester or nylon thread works well for leather projects. Choose a color that matches or contrasts with the leather, depending on your style. Pick needles designed for leather. They have sharp, triangular points to pierce the tough material easily.
Additional Tools
Prepare a thimble to protect your finger while stitching. Use a leather punch or awl to make holes before sewing. Scissors with sharp blades help cut thread and leather cleanly. A ruler or measuring tape ensures even spacing of stitches. Keep a lighter or thread sealer to finish thread ends and prevent fraying.

Credit: www.youtube.com
Preparing The Steering Wheel
Preparing the steering wheel is the first step in cross stitching a leather cover. It helps the thread stick better and makes the stitches look neat. Taking time now will save effort later. A clean and marked surface guides your needle and thread perfectly.
Careful preparation also protects the leather from damage. This way, your cover will last longer and look great. Let’s see how to clean and mark the steering wheel for stitching.
Cleaning The Surface
Start by wiping the steering wheel with a soft cloth. Use a mild leather cleaner or soap mixed with water. Avoid harsh chemicals that can harm the leather. Gently rub the surface to remove dirt and oils.
Dry the wheel completely before moving on. A dry surface helps the thread grip better. Clean leather also prevents mold and bad smells under the cover.
Marking Stitching Points
Use a fabric chalk or a pencil to mark where stitches will go. Space marks evenly around the wheel for a balanced look. Accurate marks make stitching easier and faster.
Mark both sides of the wheel if your cover has two parts. Double-check the marks before you start stitching. Clear guides reduce mistakes and improve the final design.
Basic Cross Stitch Techniques
Basic cross stitch techniques help create neat and strong stitches on leather. They make your steering wheel cover look beautiful and last longer. Understanding these steps is key to a successful project.
Start with simple methods to build confidence. These basics guide you through threading, stitching, and keeping even tension.
Threading The Needle
Choose a strong thread suitable for leather. Cut a piece about 18 inches long. Avoid long threads to prevent tangling.
Push the thread through the needle eye carefully. Use a needle with a sharp point for leather. Pull the thread until the ends meet. Tie a small knot at the thread’s end.
Creating The First Stitch
Find the starting point on the leather cover. Insert the needle from the back to the front side. Pull the thread through until the knot stops it.
Bring the needle back down a short distance from the first hole. This forms a small ‘X’ shape. Keep stitches close but not too tight.
Maintaining Even Tension
Pull the thread gently after each stitch. Avoid pulling too hard to stop leather from puckering. Keep the tension steady for a clean look.
Check stitches often to make sure they lie flat. Even tension improves the cover’s strength and style.

Credit: www.amazon.com
Stitching The Cover
Stitching the leather steering wheel cover is the key step to a neat and strong finish. This part needs patience and care. Each stitch holds the cover tightly and makes it look great. Follow simple steps to make the process smooth and effective.
Starting The Stitching Process
Begin by threading your needle with strong thread. Use a double length for extra strength. Tie a knot at the end of the thread. Find the starting point on the cover’s edge. Push the needle through the leather carefully. Make sure the first stitch is secure. Pull the thread tight but not too tight. Keep stitches even in size and distance.
Working Around Curves
Curves need special attention while stitching. Take smaller stitches to follow the shape. Do not pull the thread too hard. It may cause the leather to pucker. Use your fingers to guide the leather gently. Move slowly to keep the line smooth. Adjust the tension for each curve. This helps the cover fit perfectly on the wheel.
Finishing The Stitching
As you near the end, keep stitches consistent. Tie a strong knot at the last hole. Push the needle through a few stitches for extra hold. Cut off excess thread close to the knot. Press the stitches flat with your fingers. Check the cover for loose spots. Make any final adjustments for a clean look.
Securing And Finishing Touches
Securing and finishing touches make your leather steering wheel cover strong and neat. These final steps keep your work safe and looking good. Take time to finish carefully. It shows in the final result.
Tying Off The Thread
Pull the thread gently but firmly at the end. Make a small knot close to the leather. Double knot it for extra hold. Hide the knot by pushing the needle under nearby stitches. Cut the thread close to the knot. This stops it from coming undone.
Trimming Excess Material
Check the edges of your cover. Use sharp scissors to trim any loose threads or leather bits. Trim slowly to avoid cutting your stitches. Clean edges make the cover look neat and tidy. Avoid cutting too close to the stitches.
Applying Leather Conditioner
Choose a soft cloth and apply a small amount of leather conditioner. Rub the conditioner gently over the cover. This keeps the leather soft and prevents cracking. Let it dry fully before using the steering wheel. Conditioning helps the cover last longer and look new.
Tips For A Professional Look
Creating a leather steering wheel cover with cross stitch looks great when done right. Small details make a big difference. Follow these tips to give your project a professional finish. Focus on your stitch patterns, keep spacing even, and avoid common errors. These steps will help your cover look clean and neat.
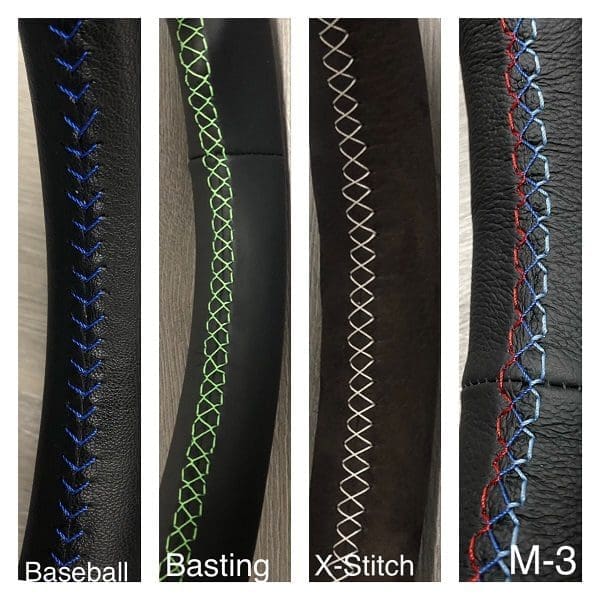
Choosing Stitch Patterns
Select simple stitch patterns for a clear, sharp look. Basic crosses or backstitches work well on leather. Avoid very complex designs that can clutter the surface. Pick patterns that match your car’s style and your skill level. Consistent patterns keep the cover neat and stylish.
Maintaining Consistent Spacing
Keep stitches evenly spaced for a smooth finish. Measure the space between stitches before you start. Use a ruler or a template to help guide you. Uneven stitches create a messy look and weaken the design. Take your time and check your work often.
Avoiding Common Mistakes
Do not pull the thread too tight; it can damage leather. Avoid stitching too close to the edge to prevent tears. Use strong, sharp needles made for leather. Keep your thread clean and untangled. Stop and fix any mistakes right away to save time later.
Frequently Asked Questions
What Materials Do I Need For Cross Stitching A Steering Wheel Cover?
You need leather steering wheel cover, embroidery needle, strong thread, scissors, and a cross stitch pattern. Choose durable thread for long-lasting results. A thimble can help push the needle through tough leather.
How Do I Prepare The Leather For Cross Stitching?
Clean the leather surface with a damp cloth and let it dry. Use a leather punch or awl to make evenly spaced holes. This step ensures easy stitching and prevents leather damage.
Can I Use Regular Embroidery Thread On Leather Steering Wheels?
Regular embroidery thread is not ideal as it may break or wear quickly. Use strong, waxed polyester or nylon thread designed for leather. This thread is durable and holds up well under constant friction.
How Long Does It Take To Cross Stitch A Steering Wheel Cover?
It typically takes 2 to 4 hours depending on your stitching speed and design complexity. Practice on scrap leather first to improve speed. Take breaks to avoid hand fatigue.
Conclusion
Cross stitching a leather steering wheel cover adds style and comfort to your car. It takes patience but feels rewarding. Each stitch makes the cover stronger and unique. Use the steps to guide your work carefully. Enjoy the process and the finished look.
This simple craft helps protect your steering wheel too. Try different thread colors to match your car’s interior. Keep practicing to improve your stitching skills. Your hands will get steady and confident with time. A handmade cover shows your care and creativity.
Give it a try and see the difference yourself.


