
Are you looking to give your 2017 Ridgeline a fresh, polished look? Installing body side molding is a simple and effective way to protect your truck from dings and scratches while boosting its style.
In this guide, you’ll find easy-to-follow steps that anyone can handle, even if you’re new to car upgrades. Keep reading, and you’ll have your Ridgeline looking sharp and guarded in no time. Let’s get started!
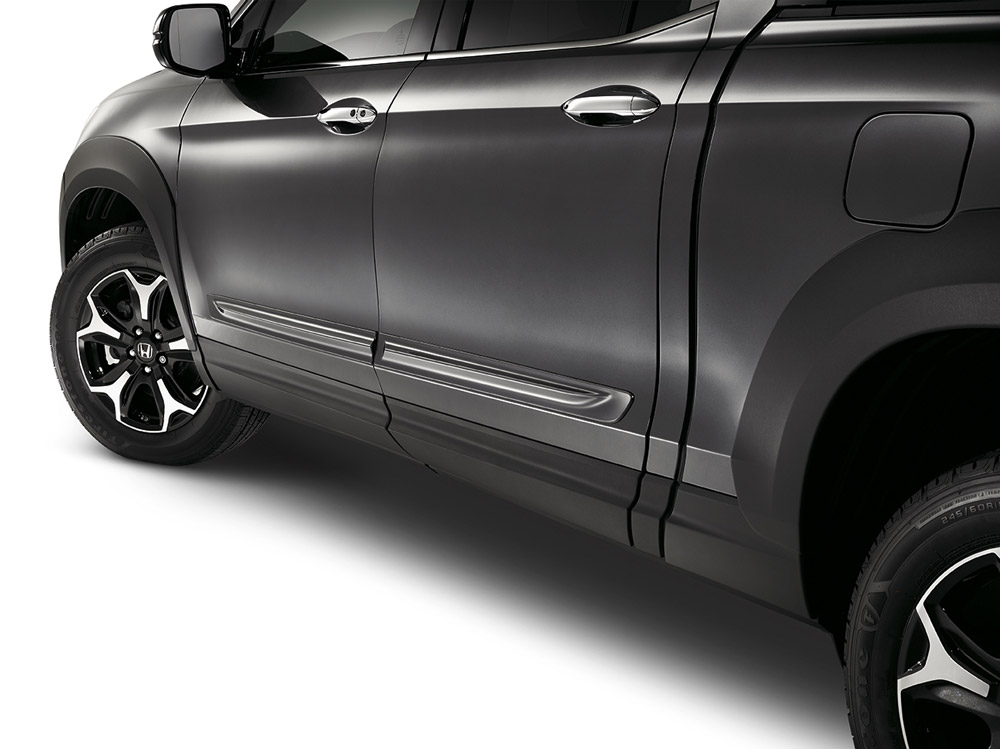
Credit: www.collegehillshonda.com
Tools And Materials Needed
Installing body side molding on your 2017 Ridgeline requires the right tools and materials. Having everything ready makes the job easier and faster. This section covers the essential tools, how to pick the right molding, and how to prepare your vehicle’s surface.
Required Tools
Gather these tools before you start. You will need a clean cloth to wipe the surface. Use a plastic trim removal tool to avoid scratches. A measuring tape helps place the molding correctly. Have a heat gun or hairdryer to soften the adhesive. Use masking tape to hold the molding in place during installation. Lastly, a rubbing alcohol solution cleans the surface well.
Choosing The Right Molding
Select molding designed for the 2017 Ridgeline. It should fit the door shape perfectly. Choose molding made of durable, weather-resistant material. Look for pre-cut molding for easy installation. Check the adhesive type; a strong automotive-grade tape works best. Avoid cheap materials that can peel or crack quickly.
Preparing The Surface
Clean the area where the molding will attach. Remove dirt, grease, and wax with rubbing alcohol. Dry the surface completely before applying molding. Avoid touching the surface after cleaning to keep it clean. Use the heat gun briefly to warm the area. This step improves adhesive bonding and ensures long-lasting hold.
Preparing The Vehicle
Preparing your 2017 Ridgeline for body side molding installation is key. This step helps the molding stick well and look good. Clean, clear surfaces make the process easier and the results better. Follow these steps carefully to get your vehicle ready.
Cleaning The Side Panels
Start by washing the side panels with soap and water. Remove dirt, dust, and grease. Use a clean cloth to wipe the surface dry. Next, use rubbing alcohol to clean off any leftover oils. This ensures the molding will stick firmly.
Removing Old Molding
Check if your Ridgeline has old molding. If yes, remove it gently. Use a plastic scraper to lift the edges carefully. Avoid scratching the paint. Remove any leftover adhesive with adhesive remover. Clean the area again after removing the old molding.
Dry Fitting The New Molding
Before applying adhesive, place the new molding on the side panel. Align it properly to check the fit. Make small adjustments to ensure it matches the vehicle’s lines. This step helps avoid mistakes during final installation. Remove the molding after confirming the fit.
Installation Steps
Installing body side molding on a 2017 Ridgeline improves its look and protects the doors. The process is straightforward with clear steps. Follow these steps carefully to get the best result. Each step ensures the molding fits well and stays secure.
Aligning The Molding
Start by cleaning the area where the molding will go. Dirt or grease can stop the adhesive from sticking. Hold the molding next to the truck’s side to check the fit. Make sure it lines up with the door edges and curves. Adjust the molding until it sits perfectly. Mark the position lightly with a pencil or tape. This guide helps during final placement.
Applying Adhesive Or Clips
Use the adhesive or clips that come with the molding. If using adhesive, apply it evenly on the back of the molding. Avoid putting too much. Too much adhesive can cause a messy finish. For clips, attach them to the correct spots on the molding. Follow the instructions for clip spacing. Proper adhesion or clip use prevents the molding from falling off.
Securing The Molding In Place
Press the molding firmly against the truck side. Hold it in place for at least 30 seconds. This helps the adhesive bond strongly. If using clips, press until you hear a snap. Check the entire length to ensure no gaps or loose spots. Use tape to hold the molding if needed. Let the adhesive dry fully before driving the vehicle.
Finishing Touches
Finishing touches make your Ridgeline’s body side molding look perfect. These final steps ensure the molding fits well and stays secure. Taking time here helps avoid problems later. Let’s look at the key tasks to finish the job right.
Checking For Proper Fit
After placing the molding, check how it sits on the truck. Make sure it aligns evenly along the body. The edges should match the truck’s curves without gaps. Press gently to confirm it sticks well. Adjust if you see any misalignment before the adhesive sets.
Cleaning Excess Adhesive
Look closely for any glue that squeezed out during installation. Use a clean cloth with a little rubbing alcohol to wipe off excess adhesive. Remove it carefully to avoid damaging the paint. Clean edges give a neat, professional appearance. This step keeps the molding and truck looking sharp.
Curing Time And Final Inspection
Allow the adhesive to cure fully before driving or washing the truck. Follow the adhesive manufacturer’s recommended curing time. This ensures the molding bonds strongly to the body. After curing, inspect the molding for any loose spots or areas needing touch-up. A thorough final check guarantees a lasting fit.
Maintenance Tips
Maintaining body side molding on your 2017 Ridgeline keeps it looking new and protects your truck. Proper care helps avoid damage and extends the molding’s life. Follow these tips to keep your molding in great shape.
Cleaning And Care
Wash the molding regularly with mild soap and water. Use a soft cloth or sponge to avoid scratches. Rinse thoroughly to remove all soap. Dry the molding with a clean towel. Avoid harsh chemicals that can damage the surface.
Preventing Damage
Avoid parking too close to other vehicles or objects. This reduces the risk of dents and scratches. Use caution when loading or unloading near the molding. Consider adding a protective film for extra defense. Check for loose molding and fix it promptly.
When To Replace Molding
Replace the molding if it cracks, peels, or loses its shape. Faded or discolored molding should also be changed. Look for signs of rust under the molding. Damaged molding affects your truck’s appearance and protection. Timely replacement keeps your Ridgeline looking sharp.

Credit: www.youtube.com

Credit: www.bernardiparts.com
Frequently Asked Questions
How Do I Prepare My Ridgeline 2017 For Molding Installation?
Clean the surface thoroughly with soap and water. Dry the area completely. Remove any old adhesive or dirt for better molding adhesion.
What Tools Are Needed To Install Body Side Molding?
You will need a cleaning cloth, adhesive promoter, masking tape, and the body side molding kit. A plastic trim tool helps with precise placement.
How Long Does It Take To Install Body Side Molding?
Installation typically takes 30 to 45 minutes. Allow extra time for surface preparation and adhesive curing if necessary.
Can I Install Body Side Molding Myself Safely?
Yes, the process is straightforward and safe. Follow the instructions carefully to avoid damaging the vehicle’s paint or molding.
Conclusion
Installing body side molding on your Ridgeline 2017 is simple and quick. Follow each step carefully for the best fit. Take your time to clean the surface before applying the molding. Use the right tools to avoid damage. This small upgrade protects your truck and adds style.
A neat installation makes your Ridgeline look sharper and cleaner. Now, enjoy the improved look and protection. Keep these tips in mind for future projects. Easy and effective—just what you need.


