
Have you ever spent time waxing your car, only to find stubborn, dried wax spots that just won’t come off? It’s frustrating, right?
Those leftover patches can ruin the shine you worked so hard to achieve. But don’t worry—removing dried car wax doesn’t have to be a headache. You’ll discover simple, effective ways to get your car’s surface smooth and spotless again. Keep reading, and you’ll learn how to make your car look as good as new, without damaging the paint or wasting time.
Your car deserves that flawless finish, and you’re just a few easy steps away from it.
Tools And Materials Needed
Removing dried car wax needs the right tools and materials. Using proper items makes the job easier and protects your car’s paint. Gather everything before starting. This saves time and avoids frustration.
Microfiber Cloths
Soft microfiber cloths are gentle on the car’s surface. They help remove wax without scratching the paint. Avoid rough fabrics that can damage the finish.
Wax Remover Or Cleaner
Choose a wax remover made for cars. These products break down old wax safely. They prepare the surface for a fresh wax layer.
Plastic Scraper
A plastic scraper helps lift thick wax spots. It is safe for the paint if used carefully. Metal tools can cause scratches, so avoid them.
Bucket Of Warm Water
Warm water helps soften dried wax. It also rinses away dirt and cleaner residues. Use a clean bucket to keep the water fresh.
Car Wash Soap
Use a mild car wash soap to clean the surface first. This removes dirt and grime before wax removal. Avoid household soaps that can strip the paint.
Gloves
Protect your hands with gloves. Some wax removers contain chemicals that can irritate skin. Wearing gloves keeps your hands safe and clean.
Credit: www.tidalwaveautospa.com
Signs Of Dried Wax On Your Car
Dried wax on your car can cause several issues. It does not shine like fresh wax. Instead, it looks dull and rough. Identifying dried wax early helps keep your car’s paint smooth and clean.
Some signs show that wax has dried and hardened on your car’s surface. Spotting these signs helps you act quickly. This section explains the main signs of dried wax.
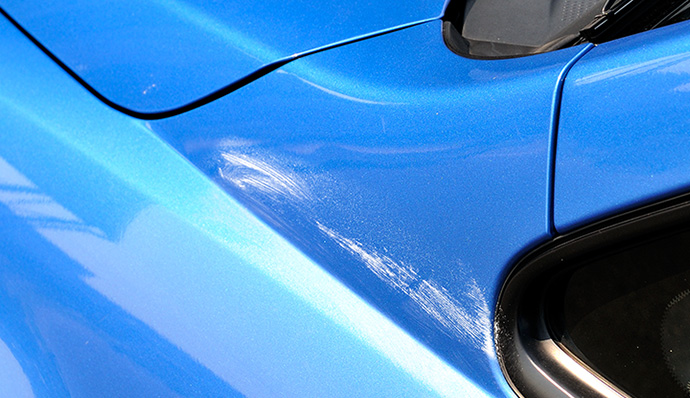
Uneven Or Patchy Appearance
Dried wax often looks uneven on the car. Some spots may appear cloudy or white. The shine is inconsistent across the paint. These patches stand out against the rest of the surface.
Sticky Or Gritty Feel
Running your hand over dried wax feels rough. It may feel sticky or gritty. The wax does not feel smooth or slick like fresh wax. This texture shows the wax has hardened improperly.
White Or Hazy Residue
White marks or haze may appear on your paint. This residue is a common sign of dried wax. It happens when wax dries too fast or is applied in thick layers. The residue dulls the car’s shine.
Wax Build-up In Crevices
Dried wax gathers in small gaps or edges. Look near door handles, trims, or seams. Wax clumps in these areas look crusty or flaky. This build-up traps dirt and affects the car’s look.
Preparing Your Car For Wax Removal
Preparing your car for wax removal is a key step. It helps protect your paint and makes the process easier. Taking time to get ready can save you from damage and frustration.
Start with a clean surface. Dirt and grime can scratch your car if not removed first. Clean your car thoroughly before you begin the wax removal.
Gather The Right Tools
Collect all necessary items like microfiber cloths, wax remover, and buckets. Having tools ready helps you work smoothly. Avoid using rough materials that can harm the paint.
Choose A Shaded Area
Work in a shaded spot to keep the wax remover from drying too fast. Direct sunlight can cause streaks and uneven removal. Shade keeps the surface cool and easier to work on.
Wash Your Car Thoroughly
Use soap and water to remove dirt and dust completely. Dry your car with a soft towel to avoid water spots. A clean car surface is essential for effective wax removal.
Inspect The Waxed Areas
Look closely at the wax spots that need removal. Identify thick or dried wax patches. This helps you focus your effort on problem areas only.

Credit: www.youtube.com
Step-by-step Wax Removal Process
Removing dried car wax can seem tricky. A careful step-by-step process makes it easier. Follow each step to restore your car’s shine safely.
Soften The Dried Wax
Start by warming the wax. Use a hairdryer on low heat. Keep it moving over the wax. This softens the hard wax without damaging paint.
Use A Clay Bar Or Wax Remover
Next, apply a clay bar or wax remover. Rub gently in small circular motions. The clay bar lifts wax and dirt. Wax remover breaks down the dried wax for easy removal.
Wipe Off Residue
Take a clean microfiber cloth. Wipe the softened wax and residue carefully. Avoid scrubbing hard to protect the paint. Use fresh sections of the cloth as needed.
Polish The Surface
Finish by polishing the car surface. Use a gentle car polish and a soft cloth. This step restores shine and smoothness. Your car looks clean and protected again.
Avoiding Damage During Wax Removal
Removing dried car wax can be tricky. Rushing or using the wrong tools may harm your car’s paint. Take care to protect the surface while cleaning. This section shares simple tips to avoid damage during wax removal.
Use Soft, Clean Cloths
Choose soft microfiber cloths. They prevent scratches on the paint. Avoid rough or dirty towels. Dirt can cause tiny scratches. Always use a fresh cloth for wiping.
Apply Gentle Pressure
Press lightly when removing wax. Hard rubbing can wear down the paint. Let the cloth do the work. Move in small circles to lift wax carefully.
Test Products On Small Area
Try wax removers on a hidden spot first. This checks for any adverse effects. If paint changes color or texture, stop using that product. Always follow the instructions on the label.
Work In Shade
Do not remove wax under direct sunlight. Heat can make wax harder to remove. It also dries cleaning agents too fast. Work in a shaded, cool area for best results.
Tips For Preventing Dried Wax Build-up
Preventing dried wax build-up saves time and keeps your car looking great. Regular care stops wax from hardening and sticking to the surface. Simple habits can protect your car’s paint and shine for longer.
Apply Wax In Thin Layers
Use a small amount of wax each time. Thin layers dry faster and peel off easily. Thick layers take longer to dry and can build up quickly.
Wax On A Cool Surface
Choose a shaded, cool spot to wax your car. Heat makes wax dry too fast and unevenly. Cool surfaces help wax spread smoothly and absorb better.
Remove Excess Wax Quickly
Wipe off leftover wax before it hardens. Use a soft cloth and gentle pressure. This keeps wax from drying in spots and creating tough patches.
Wash Your Car Before Waxing
Clean dirt and dust before applying wax. Dirt traps wax and causes rough spots. A clean surface ensures smooth wax application and better protection.
Use Quality Wax Products
Choose wax made for your car’s paint type. Good wax spreads evenly and resists drying too fast. Avoid cheap wax that can leave stubborn residue.
Credit: www.soft99.co.jp
Frequently Asked Questions
How Can I Safely Remove Dried Car Wax?
Use a microfiber cloth and a wax remover or rubbing alcohol. Apply gently in circular motions to avoid paint damage. Always test on a small area first to ensure safety.
What Household Items Remove Dried Car Wax Effectively?
You can use rubbing alcohol, white vinegar, or baking soda paste. Apply with a soft cloth and rub gently. These items help dissolve wax without harming your car’s paint.
How Long Should I Wait Before Removing Car Wax?
Wait until the wax is fully dried and hardened, usually 15-30 minutes. Removing wax too early can smear it, while waiting ensures easier and cleaner removal.
Can Dried Car Wax Damage My Car’s Paint?
If left too long, wax can attract dirt and grime, potentially causing minor scratches. Proper and timely removal helps maintain your car’s paint quality and shine.
Conclusion
Removing dried car wax does not have to be hard. Use gentle tools and cleaners to protect your paint. Take your time and work carefully for the best results. Clean wax helps your car look shiny and fresh again. Regular care keeps your car’s surface smooth and safe.
Keep these tips in mind next time wax dries on your car. A little effort goes a long way in car care.


