
If you need to remove the horn cover on your steering wheel, you might be wondering where to start. Maybe you want to fix a problem, replace the cover, or access the airbag safely.
Whatever your reason, doing this the right way is important to avoid damage or injury. In this guide, you’ll find clear, step-by-step instructions that anyone can follow. By the end, you’ll feel confident handling your steering wheel like a pro.
Keep reading to learn how to remove your horn cover quickly and safely.
Tools Needed
Removing the horn cover on a steering wheel requires specific tools. Having the right tools makes the job easier and safer. Using improper tools can damage the steering wheel or horn cover.
Gather all tools before starting. This helps avoid interruptions and frustration. Below are the essential tools needed for this task.
Screwdrivers
Screwdrivers are key for removing screws that hold the horn cover. A flat-head and a Phillips-head screwdriver are usually required. Choose the size that fits the screws perfectly.
Socket Wrench Set
A socket wrench set helps remove bolts under the horn cover. These bolts secure the cover tightly. Select the correct socket size to avoid stripping the bolts.
Trim Removal Tools
Trim removal tools protect the steering wheel surface. They help pry the horn cover without scratching or breaking plastic parts. Use plastic or nylon trim tools for best results.
Work Gloves
Work gloves protect your hands during the removal process. They improve grip on tools and parts. Gloves also prevent cuts from sharp edges inside the steering wheel.
Torque Wrench
A torque wrench ensures bolts are tightened to the right level after removal. Over-tightening can damage parts, while under-tightening can cause loose covers. This tool is important for safe reassembly.
Safety Precautions
Removing the horn cover on a steering wheel needs care. Safety comes first to avoid damage or injury. Taking the right steps keeps you safe and protects your car’s airbag system.
Disconnect The Car Battery
Always disconnect the car battery before starting. This stops accidental airbag deployment. Wait at least 10 minutes after disconnecting. This lets the system fully power down.
Use Proper Tools
Use the correct tools for the job. Avoid sharp or metal objects that can damage parts. Soft plastic pry tools work best to remove the cover.
Work In A Safe Space
Choose a flat, stable area to work on your vehicle. Keep the steering wheel straight. This prevents parts from shifting or falling during removal.
Handle Airbags With Care
Airbags are sensitive and dangerous if mishandled. Do not press or hit the horn cover hard. Treat all parts gently to avoid triggering the airbag.
Locate Horn Cover Screws
Locating the horn cover screws is the first step to remove the horn cover on your steering wheel. These screws hold the cover in place. Finding them makes the removal process easier and safer.
The screws might be hidden under small plastic caps or trim pieces. Sometimes, they are visible on the back of the steering wheel. Knowing where to look saves time and effort.
Check The Back Of The Steering Wheel
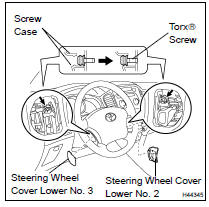
Turn the steering wheel to see its back side. Look closely for small screw heads. They are often Phillips or Torx screws. These screws keep the horn cover attached.
Remove Any Plastic Caps
Plastic caps may cover the screws. Use a flat tool to gently pry off the caps. Do not force them to avoid damage. Once removed, the screws will be visible.
Inspect Around The Horn Pad
Look around the horn pad edges. Some models hide screws under the pad itself. Carefully check for any slots or indentations. These indicate where screws or clips might be.
Use A Flashlight For Better Visibility
Shadows can hide screws. Use a flashlight to see clearly. Shine light around the horn cover edges. This helps spot any hidden screws or fasteners.

Credit: service.tesla.com
Disconnect The Battery
Disconnecting the battery is the first and most important step before removing the horn cover on your steering wheel. This step ensures safety by preventing accidental airbag deployment. It also stops electrical shorts while you work on the steering wheel.
Always take care to avoid injury or damage. A disconnected battery means the car’s electrical system is off. This makes it safe to touch wires and parts inside the steering wheel.
Locate The Car Battery
Open your car’s hood to find the battery. It usually sits near the front, close to the engine. Look for two cables attached to the battery terminals. One is positive (+), the other is negative (-).
Disconnect The Negative Terminal
Use a wrench to loosen the nut on the negative terminal. The negative terminal is marked with a minus sign (-) and often has a black cable. Remove the cable and move it away from the battery to prevent contact.
Wait Before Proceeding
After disconnecting, wait at least 10 minutes. This allows the car’s electrical system to fully shut down. Waiting lowers the risk of accidental airbag deployment while you work on the horn cover.
Remove Screws Carefully
Removing the screws on the horn cover is a crucial step. It requires attention and care. Screws hold the cover tightly in place. Removing them carelessly can cause damage. Take your time and follow the steps carefully.
Gather The Right Tools
Use a screwdriver that fits the screws perfectly. A wrong tool can strip the screws. Stripped screws are hard to remove later. Check if the screws are Phillips or flathead type.
Work In A Clean Area
Keep a clean workspace to avoid losing screws. Place a cloth or tray nearby. This will catch any screws that fall. Losing screws slows down the process.
Turn Screws Slowly And Steadily
Apply gentle pressure while turning screws. Quick or forceful turns may damage the cover. Slow turns help keep screws intact. Stop if you feel resistance and reassess.
Keep Screws Organized
Store the screws in a small container. Keep track of each screw’s position. This helps during reassembly. Mixing screws can cause fitting problems.
Detach Horn Cover
Detaching the horn cover on a steering wheel is a simple task. It lets you access the horn mechanism for repairs or cleaning. Follow clear steps to avoid damage.
Prepare The Steering Wheel
Park the car and turn off the engine. Disconnect the car battery. This stops the airbag from activating accidentally.
Locate The Horn Cover Clips Or Screws
Check behind the steering wheel for clips or screws holding the cover. Use a flashlight to see clearly. Some covers snap on, others use screws.
Remove The Horn Cover Carefully
Use a flat tool like a screwdriver to pry the cover gently. Work slowly around the edges. Avoid forcing it to prevent cracks or breaks.
Disconnect The Horn Wire
Once the cover is loose, find the horn wire connector. Press the clip and pull the wire out. Keep the wire safe for reassembly.
Handle Wiring Connections
Start by gently disconnecting the wiring connectors behind the horn cover. Handle wires carefully to avoid damage or loose connections. This step ensures safe removal and easy reinstallation of the horn cover.
Understanding The Wiring Connections
Inside the horn cover, wires connect the horn to the car’s power system. These wires carry the electric signal to make the horn sound. Handling these connections carefully is important to avoid damage.
Before disconnecting, note the wire colors and their positions. This helps when reassembling the steering wheel. Use a camera or draw a simple diagram for reference.
Disconnecting The Wiring Safely
First, turn off the car’s battery to prevent electric shocks. Then, gently unplug the wiring connectors. Avoid pulling on the wires directly to stop breakage.
Use a small tool or your fingers to press the clip on the connector. This releases the wire without damage. Keep the connectors clean and free from dirt or oil.
Handling Wiring During Reassembly
When putting the horn cover back, align the wiring connectors properly. Make sure each wire clicks into place. Loose connections can cause the horn to fail.
Double-check all wires before fully securing the horn cover. Test the horn after reassembly to confirm it works. Proper wiring ensures safety and function.
Credit: www.tohighlander.com
Inspect And Clean Components
Inspecting and cleaning the components under the horn cover is important. Dirt and dust can cause problems later. Taking time to check parts helps keep the steering wheel working well. It also makes sure everything is safe to use.
Cleaning parts carefully can stop damage and wear. This step is simple but useful. Use the right tools and gentle cleaning methods to protect parts.
Check The Wiring And Connectors
Look closely at all wires under the horn cover. Find any loose or broken wires. Make sure connectors fit tightly. Loose wires can stop the horn from working. Fix any damaged wires before putting the cover back.
Examine The Horn Pad And Springs
Look at the horn pad for cracks or damage. Check the springs that hold the pad in place. Broken springs can cause the horn pad to feel loose. Replace any parts that look old or worn out. This keeps the horn working smoothly.
Clean Dust And Debris Gently
Use a soft cloth or brush to remove dust. Avoid using water or strong cleaners. Dirt can block contacts and cause problems. Cleaning gently keeps parts safe and clean. A clean steering wheel feels better and lasts longer.
Reassemble Horn Cover
Reassembling the horn cover is an important step after removal. It ensures the horn works properly and looks neat. Take your time to align all parts carefully. Follow simple steps to put everything back together.
Align The Horn Cover Properly
Place the horn cover in the correct position on the steering wheel. Check that all clips and grooves match perfectly. Misalignment can cause the cover to fit loosely or not at all.
Reconnect The Wiring
Attach the horn wiring connector securely. Make sure it clicks into place. Loose connections may stop the horn from working.
Secure The Horn Cover
Press the horn cover firmly until you hear it snap. This sound means the cover is locked in place. Avoid pressing too hard to prevent damage.
Press the horn button gently. Listen for the horn sound. If it doesn’t work, check the wiring and cover alignment again.

Credit: www.youtube.com
Frequently Asked Questions
How Do I Safely Remove The Horn Cover On Steering Wheel?
First, disconnect the car battery to avoid accidental airbag deployment. Use a flat tool to gently pry the horn cover. Avoid excessive force to prevent damage. Follow your vehicle’s manual for specific instructions.
What Tools Are Needed To Remove A Steering Wheel Horn Cover?
Typically, a flathead screwdriver or plastic trim removal tool is required. Some models may need Torx or Phillips screwdrivers. Always check your car’s manual for the exact tools needed to avoid damage.
Can I Remove The Horn Cover Without Disconnecting The Battery?
No, always disconnect the battery first. This prevents accidental airbag deployment and electrical shorts. Safety is crucial when working on the steering wheel components.
How Long Does It Take To Remove A Horn Cover?
Removing a horn cover usually takes 5 to 15 minutes. Time varies based on your vehicle model and experience level. Taking your time ensures no damage occurs.
Conclusion
Removing the horn cover on your steering wheel is simple with the right steps. Take your time and stay careful to avoid damage. Use basic tools and follow safety tips closely. This task saves money and helps you learn car maintenance.
Always check your vehicle manual for specific instructions. Now, you can confidently handle this small repair yourself. Keep practicing, and car care will become easier.


