
Your steering wheel horn cover might seem like a small part, but knowing how to remove it can save you time and money when fixing or upgrading your car. Whether you need to replace a worn-out cover or access the horn mechanism, this simple task can feel tricky if you don’t know the right steps.
In this guide, you’ll discover easy, step-by-step instructions that anyone can follow—no special tools or skills needed. Keep reading, and you’ll gain the confidence to handle this job yourself, avoiding costly trips to the mechanic.
Tools Needed
Removing the steering wheel horn cover requires a few simple tools. Having the right tools saves time and prevents damage. You do not need many items to complete this task safely.
Flathead Screwdriver
A flathead screwdriver helps pry off the horn cover gently. Choose one with a thin blade. This tool fits easily between the cover and steering wheel.
Torx Or Phillips Screwdriver
Some horn covers are held by screws. Use a Torx or Phillips screwdriver to remove them. Check your vehicle’s manual to identify the correct type.
Socket Wrench
A socket wrench may be necessary for larger bolts behind the cover. It offers better grip and control. Use the right socket size to avoid stripping bolts.
Trim Removal Tool
A trim removal tool protects the steering wheel surface. It is softer than metal screwdrivers. Use it to avoid scratches when prying the cover.
Safety Gloves
Wearing safety gloves protects your hands. They improve grip and prevent cuts. Gloves also keep your hands clean from dust and grease.
Safety Precautions
Removing the steering wheel horn cover needs care and attention. Safety is the first step before starting any work on your car. A wrong move can cause injury or damage to the car’s airbag system. Follow these safety precautions closely to protect yourself and your vehicle.
Disconnect The Car Battery
Always disconnect the car battery before removing the horn cover. This stops the airbag from accidentally deploying. Use a wrench to remove the negative terminal first. Wait at least 10 minutes after disconnecting to let the system power down.
Wear Safety Gloves And Glasses
Protect your hands and eyes from sharp parts and small debris. Safety gloves prevent cuts from metal edges. Glasses guard against dust or particles flying toward your face during removal.
Work In A Well-lit Area
Good lighting helps you see screws and clips clearly. It reduces mistakes and prevents damage to delicate parts. Choose a clean, flat surface to place removed components safely.
Handle The Airbag Module With Care
The airbag is sensitive and can be dangerous if mishandled. Avoid dropping or striking the airbag module. Keep it facing upward and away from your body at all times.
Use The Right Tools
Use tools designed for automotive work. Wrong tools can strip screws or break clips. A proper screwdriver or trim removal tool makes the process smoother and safer.
Locate The Horn Cover
Locating the horn cover on your steering wheel is the first step to remove it safely. Knowing its exact position helps avoid damage to the steering wheel or horn mechanism. The horn cover usually sits right in the center of the steering wheel.
It is often a round or oval piece that stands out from the rest of the wheel. The cover may have a symbol, like a horn icon or the car brand’s logo. This makes it easier to spot quickly.
Look closely at the steering wheel’s center. Sometimes the cover blends with the wheel’s color, but you can feel its edges by touch. Gently run your fingers around the middle to find a slight gap or seam. This gap is where the horn cover meets the steering wheel.
Check The Vehicle Manual
Your car manual gives clear instructions and pictures on locating the horn cover. It may also show how to remove it safely. Manuals differ by car model, so this step is very useful.
Identify Any Screws Or Clips
Some horn covers are fixed with screws or clips. Look for small holes or slots along the cover’s edge. These hold the cover in place. Use a flashlight for better visibility.
Feel For Pressure Points
Press gently on different parts of the center area. Some covers pop out with light pressure. Others need a tool to pry them open. Knowing the pressure points helps remove the cover smoothly.
Disconnect The Battery
Disconnecting the battery is a vital first step before removing the steering wheel horn cover. It stops the airbag from accidentally activating and keeps you safe. This simple action also prevents electrical shorts while working on the steering wheel. Always handle the battery with care to avoid sparks or damage.
Locate The Battery Terminals
Open the car hood and find the battery. It usually sits near the engine. Look for the positive (+) and negative (-) terminals. The negative terminal connects to the car’s metal frame. This is the one to disconnect first for safety.
Use The Right Tools
Get a wrench or socket set that fits the battery terminal bolts. A 10mm wrench works for most cars. Loosen the bolt on the negative terminal carefully. Avoid touching both terminals together or the car body.
Disconnect The Negative Terminal
Remove the bolt and gently lift the negative cable off the battery post. Move it aside to stop contact. This step cuts power to the vehicle’s electrical system. It makes working on the horn cover safe and simple.
Wait Before Proceeding
Leave the battery disconnected for at least 10 minutes. This allows any stored energy to drain fully. It lowers the risk of accidental airbag deployment or electric shock. Patience here is key for safety.
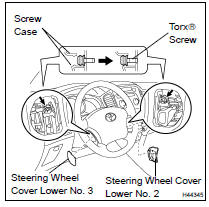
Remove Steering Wheel Screws
Removing the steering wheel screws is a key step in taking off the horn cover. These screws hold the cover tightly in place. Without removing them, the cover will not come off easily. This part requires care and the right tools to avoid damage.
Start by locating the screws on your steering wheel. They are usually on the back or inside the horn cover. Use a screwdriver that fits the screws well. A loose tool can strip the screws and cause problems.
Locate The Steering Wheel Screws
Look around the steering wheel for small screw heads. They may be hidden under plastic covers or trim pieces. Gently pry off any covers to find all screws. Count them to make sure you remove every one.
Choose The Right Screwdriver
Match your screwdriver to the screws. Most steering wheels use Phillips or flathead screws. Using the wrong type can damage the screw head. A good fit helps you turn screws easily and safely.
Remove Screws Carefully
Turn screws slowly and evenly. Do not force them. If a screw feels stuck, try wiggling the screwdriver gently. Keep all screws in a safe place. You will need them to reattach the horn cover later.
Credit: www.tohighlander.com
Detach The Horn Cover
Detaching the steering wheel horn cover is a simple step in many car repairs. It gives access to the horn mechanism and wiring underneath. This part often needs removal for maintenance or replacement.
Taking off the horn cover requires care. It is important to avoid damaging the cover or steering wheel.
Prepare Your Tools And Work Area
Gather a flathead screwdriver or a plastic trim tool. These tools help to pry the cover without scratching. Clear space around the steering wheel for easy movement.
Locate The Horn Cover Clips Or Screws
Check the horn cover edges. Find clips or screws holding it in place. Many covers snap on, while others use small screws.
Gently Pry Off The Horn Cover
Insert the tool between the cover and the steering wheel. Carefully lift or twist to release the clips. Work slowly around the cover to avoid breaking clips.
Disconnect The Horn Wiring
Once loose, pull the horn cover slightly away. Look for the horn wire connector on the back. Press the tab and pull the connector out gently.
Handle The Airbag Module
Handling the airbag module requires care and attention. The airbag stores energy and can deploy unexpectedly. This can cause injury or damage. Safety is the top priority during this step.
Before touching the airbag, disconnect the car battery. This cuts power and reduces risk. Wait at least 10 minutes to ensure full discharge. This simple step prevents accidental airbag deployment.
Open the car hood and locate the battery. Use a wrench to remove the negative terminal first. Then remove the positive terminal. Keep the cables away from the battery posts. This prevents sparks and accidents.
Locate The Airbag Module
The airbag module sits at the center of the steering wheel. It is the part with the horn cover. Look for small screws or clips holding it in place. Identify how it attaches to avoid damage.
Remove The Airbag Module
Use a screwdriver or a special tool for screws or clips. Gently pry the module from the steering wheel. Avoid pulling hard to prevent wire damage. Keep the airbag facing upward at all times.
Disconnect Airbag Wires
Behind the airbag module, find the wire connectors. Press the tabs or clips to release them. Do not pull on wires directly. Carefully detach the connectors to free the module.

Credit: www.youtube.com
Test The Horn Function
Testing the horn function ensures it works before removing the steering wheel horn cover. Press the horn button gently to check the sound. Confirming this helps avoid problems during cover removal.
Why Test The Horn Function?
Testing the horn function is an important step after removing the steering wheel horn cover. It ensures that the horn works correctly and is safe to use. A faulty horn can cause safety issues on the road. Checking the horn helps avoid surprises later.
How To Test The Horn Function
First, reconnect the horn wires carefully. Make sure all connections are secure. Press the horn pad gently. Listen for a clear, loud sound. If the horn does not sound, check the wiring again. Sometimes, a loose wire causes the problem.
Troubleshooting Horn Issues
If the horn is weak or silent, inspect the fuse. Replace it if blown. Check the battery voltage as well. Low battery power can affect the horn. Test the horn relay and replace it if needed. These simple checks fix most horn problems.
Reassemble Steering Components
Reassembling the steering components is a key step after removing the horn cover. This process restores the steering wheel to its original function and ensures safety. Careful attention is needed to avoid damage and to keep everything working properly.
Follow each step slowly and check your work as you go. A secure and correctly assembled steering wheel is crucial for safe driving.
Align The Steering Wheel Correctly
Place the steering wheel back onto the steering column. Match the marks or alignment tabs you made before removal. This keeps the wheel straight and prevents steering issues.
Reconnect The Horn Wiring
Attach the horn wire connectors carefully. Ensure they are secure and fit snugly. Loose connections can cause the horn to fail or short circuit.
Secure The Steering Wheel Nut
Tighten the large nut at the center of the steering wheel. Use a torque wrench if available to reach the right tightness. This holds the wheel firmly in place.
Reinstall The Horn Cover
Place the horn cover back over the steering wheel. Press it gently until it snaps into position. Check that it fits evenly and does not move.

Credit: service.tesla.com
Frequently Asked Questions
How Do I Safely Remove A Steering Wheel Horn Cover?
First, disconnect the car battery to avoid accidental airbag deployment. Then, locate screws or clips holding the cover. Use a screwdriver or plastic pry tool carefully to detach it without damage.
What Tools Are Needed To Remove The Horn Cover?
You typically need a flathead screwdriver, Phillips screwdriver, and a plastic pry tool. These tools help loosen screws and gently pry off the cover without scratching the steering wheel.
Can I Remove The Horn Cover Without Professional Help?
Yes, you can remove it yourself by following safety steps like disconnecting the battery. Use proper tools and work gently to avoid damage or airbag issues.
How Long Does It Take To Remove The Horn Cover?
Removing the steering wheel horn cover usually takes about 10 to 20 minutes. Time varies depending on your car model and tool availability.
Conclusion
Removing the steering wheel horn cover is simple with the right steps. Take care to disconnect the battery first for safety. Use basic tools and follow the guide carefully. Avoid forcing parts to prevent damage. This task saves time and money on repairs.
Stay patient and work slowly for best results. Now, you can access the horn or other parts easily. Try these tips next time you work on your car.


