
If your Echo trimmer isn’t running as smoothly as before, the fuel filter might be the reason. Replacing the fuel filter is a simple step that can save you time and money, preventing bigger problems down the road.
In this guide, you’ll learn exactly how to replace the fuel filter on your Echo trimmer quickly and safely. Keep reading to make sure your trimmer stays in top shape all season long.

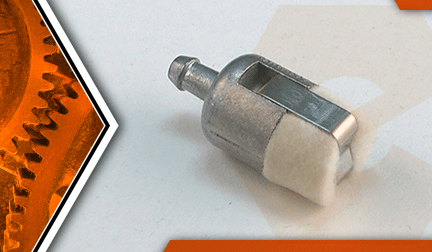
Credit: www.youtube.com
Tools And Materials Needed
Replacing the fuel filter on an Echo trimmer needs the right tools and materials. Having these ready saves time and makes the job easier. It also helps avoid damage to the trimmer or fuel system.
This section lists all the tools and materials needed. Each item plays a key role in the replacement process. Prepare them before starting the task.
Fuel Filter Replacement Kit
Use a kit made for Echo trimmers. It includes the correct filter and seals. This ensures a perfect fit and proper function.
Screwdrivers
A flathead and a Phillips screwdriver are necessary. They help remove covers and clamps. Choose sizes that fit the screws on your trimmer.
Pliers
Needle-nose pliers help remove old clamps and hold small parts. They give better grip and control during the process.
Clean Cloth Or Paper Towels
Use these to wipe away dirt and fuel spills. Keeping the work area clean prevents contamination of new parts.
Small Container For Fuel
A container catches fuel drained from the line. This prevents spills and makes disposal safe and easy.
Gloves
Wear gloves to protect your hands from fuel and dirt. They also improve grip on slippery parts.
Safety Precautions
Replacing the fuel filter on an Echo trimmer requires care. Safety comes first to avoid accidents or damage. Follow clear safety steps before you start the task. This section covers important safety rules to keep you safe and protect your trimmer.
Wear Protective Gear
Always wear gloves to protect your hands from fuel. Use safety glasses to shield your eyes from splashes. Wear long sleeves to avoid skin contact with fuel.
Work In A Well-ventilated Area
Fuel fumes can harm your health. Work outside or in a place with fresh air. Avoid closed spaces to reduce inhaling dangerous vapors.
Turn Off The Trimmer
Make sure the trimmer is off before starting. Remove the spark plug cap to prevent accidental starts. This step stops any sparks or fires.
Keep Fire Away
Fuel is highly flammable. Do not smoke or use open flames nearby. Keep a fire extinguisher close just in case.
Locating The Fuel Filter
Locating the fuel filter on your Echo trimmer is the first step in replacing it. The fuel filter keeps dirt and debris from entering the engine. Finding it is easy with the right guidance.
The fuel filter is usually inside the fuel tank or attached to the fuel line. Knowing its exact location helps avoid damage during removal.
Check The Fuel Tank
Remove the fuel tank cap carefully. Look inside the tank for a small, white or clear filter. It may be attached to the end of the fuel line inside the tank.
Follow The Fuel Line
Trace the fuel line from the tank to the carburetor. The fuel filter often sits along this line. It looks like a small, cylindrical piece made of plastic or mesh.
Consult The User Manual
The Echo trimmer manual shows exact fuel filter location. It includes pictures and instructions. This helps identify the filter quickly and correctly.
Removing The Old Fuel Filter
Removing the old fuel filter from your Echo trimmer is a key step in keeping your tool running smoothly. A clogged filter can reduce engine performance and cause starting problems. This section guides you through the safe and simple process of removing the old filter.
Draining The Fuel Tank
Start by emptying the fuel tank. This prevents spills and makes the job cleaner. Use a small container to catch the fuel. Tilt the trimmer carefully to pour out the gasoline. Wear gloves to protect your hands from fuel.
Detaching The Fuel Lines
Next, locate the fuel lines connected to the filter. These are usually small rubber tubes. Gently squeeze the clamps and slide them back. Pull the fuel lines off the filter slowly. Keep a rag nearby to catch any leftover fuel.
Installing The New Fuel Filter
Installing the new fuel filter on your Echo trimmer is a simple but important step. It keeps your engine running smoothly and prevents dirt from clogging the fuel system. Follow each step carefully to ensure the filter works well.
Positioning The Filter Correctly
Place the new fuel filter in the same position as the old one. The filter must fit snugly inside the fuel tank opening. Make sure the filter’s rubber end points down into the fuel. This allows fuel to flow properly through the filter.
Check that the filter does not touch the sides of the tank. Avoid bending or twisting the filter tube. A straight, secure position helps the trimmer run better.
Reconnecting The Fuel Lines
Attach the fuel lines carefully to the new filter. Push the fuel lines firmly onto the filter’s ends. The lines must fit tight to stop leaks and air from entering.
Secure the lines with clamps if needed. Check the lines for cracks or wear before reconnecting. Replace damaged lines to avoid fuel problems.
After reconnecting, test the trimmer to make sure fuel flows well. No leaks or weak engine running means a good installation.

Credit: meyer-sansboeuf.com
Testing The Trimmer
Testing the trimmer after replacing the fuel filter is important. It shows if the filter works well. A good test ensures the trimmer runs smoothly and safely.
Starting The Trimmer
First, place the trimmer on a flat surface. Hold the handle firmly. Pull the starter rope gently. Listen for any unusual sounds. The engine should start quickly without extra effort.
Checking The Engine Speed
Let the engine run for a few minutes. Watch if it stays steady. The speed should not drop or rise suddenly. A steady engine means the fuel filter is clean and clear.
Inspecting The Fuel Flow
Look for signs of fuel leaks near the filter. No fuel should drip or spill. Fuel must flow smoothly through the filter. This keeps the engine running without stopping.
Testing The Trimmer Under Load
Switch the trimmer to cutting mode carefully. Use it on some grass or weeds. The engine must not stall or hesitate. A smooth cut means the fuel filter works well.
Maintenance Tips
Proper maintenance keeps your Echo trimmer running smoothly. It prevents problems and extends the tool’s life. Simple steps can save you time and money.
Focusing on the fuel filter helps maintain engine health. Clean fuel means better performance and less wear.
Check The Fuel Filter Regularly
Inspect the fuel filter every few uses. Look for dirt, debris, or damage. Replace it if it looks clogged or worn out. A clean filter keeps fuel flowing freely.
Use Clean, Fresh Fuel
Always fill your trimmer with clean fuel. Avoid old or contaminated gasoline. Fresh fuel reduces the chance of clogging the filter. It also helps the engine run efficiently.
Store Your Trimmer Properly
Store the trimmer in a dry, cool place. Avoid places with high humidity or dust. Proper storage protects the fuel filter and other parts from damage.
Follow Replacement Intervals
Replace the fuel filter as recommended in the manual. Even if it looks fine, old filters lose effectiveness. Timely replacement ensures your trimmer works at its best.
Credit: www.ereplacementparts.com
Frequently Asked Questions
How Often Should I Replace The Fuel Filter On Echo Trimmers?
Replace the fuel filter every 25 hours of use or annually. Frequent replacement ensures better engine performance and fuel efficiency. Always check the filter if the trimmer runs rough or stalls.
What Tools Do I Need To Replace An Echo Trimmer Fuel Filter?
You only need basic tools like pliers and a flathead screwdriver. These help remove the fuel line clamps and the old filter safely. Always work in a well-ventilated area.
Can I Use Any Fuel Filter For Echo Trimmers?
No, always use a fuel filter designed specifically for Echo trimmers. Using the wrong filter can cause poor fuel flow and damage the engine. Check your model number before purchasing.
How Do I Safely Remove The Old Fuel Filter?
First, disconnect the spark plug to prevent accidental starts. Then, use pliers to remove fuel line clamps gently. Pull out the old filter carefully to avoid spilling fuel.
Conclusion
Replacing the fuel filter on your Echo trimmer keeps it running smooth. Clean fuel means better cutting and less engine trouble. Take your time and follow steps carefully for best results. Regular filter changes save money on repairs later. A simple task that helps your trimmer last longer.
Now, you can keep your yard looking great with ease. Try it yourself and see the difference. Easy to do, and worth every minute spent.


