
Are you looking to give your car’s interior a fresh, stylish look without spending a fortune? Vinyl wrapping your car’s interior might be the perfect solution.
It’s a cost-effective way to transform your dashboard, door panels, and other surfaces with vibrant colors or sleek finishes. But how do you get a smooth, professional result that lasts? In this guide, you’ll discover simple steps and expert tips to help you wrap your car’s interior like a pro.
Keep reading, and you’ll soon be enjoying a custom look that turns heads every time you get behind the wheel.
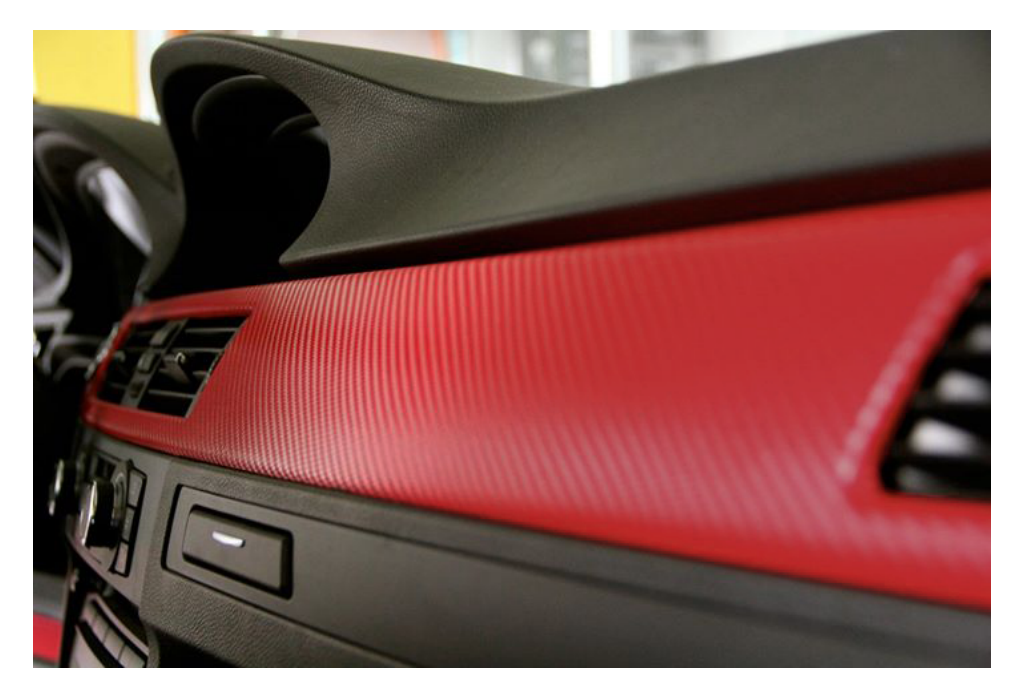
Credit: vvividshop.com
Choosing The Right Vinyl
Choosing the right vinyl is key for a successful car interior wrap. The vinyl must fit your style and last long. It also needs to be easy to clean and maintain. The right vinyl makes your car look good and feel comfortable.
Types Of Vinyl Materials
There are several types of vinyl for car interiors. Cast vinyl is thin and flexible. It works well on curved surfaces. Calendared vinyl is thicker and less flexible. It suits flat surfaces and budget projects. Textured vinyl adds a unique look. It can feel like leather or carbon fiber. Choose the type that fits your car’s shapes and your needs.
Colors And Finishes
Vinyl comes in many colors. Pick colors that match your style or car theme. Matte finishes hide fingerprints and scratches well. Glossy finishes give a shiny, new look. Satin finishes offer a balance between matte and glossy. Some vinyl has metallic or chrome effects. These catch light and add flair. Think about the look you want to create.
Durability And Maintenance
Durability is important for car interiors. Some vinyl resists heat, sunlight, and wear better. High-quality vinyl lasts longer and stays bright. Easy-to-clean vinyl saves time and effort. Use mild soap and water to clean. Avoid harsh chemicals that damage vinyl. Check the product details for care tips. Good maintenance keeps the vinyl fresh and strong.
Tools And Supplies Needed
Wrapping your car interior with vinyl requires specific tools and supplies. These items help you work smoothly and get a clean finish. Having the right tools also saves time and reduces mistakes.
Before starting, gather everything you need. This guide covers the essential wrapping tools, cleaning materials, and safety gear. Prepare well to make your project easier and better.
Essential Wrapping Tools
Start with a good quality vinyl wrap film. Choose the color and texture you want. A heat gun helps to stretch and mold the vinyl around curves. Use a squeegee to smooth the wrap and remove air bubbles. A sharp utility knife cuts the vinyl precisely. Tweezers or small pliers help to tuck vinyl into tight spots. Measuring tape or ruler ensures accurate cuts. A plastic scraper prevents damage to surfaces when working.
Cleaning And Preparation Materials
Clean surfaces before wrapping for better adhesion. Use isopropyl alcohol or a specialized cleaner. Microfiber cloths remove dust and dirt without scratching. A degreaser removes oils and residues. Avoid water or soap, as they leave traces. Let surfaces dry completely before applying vinyl. Proper cleaning makes the wrap last longer and look smooth.
Safety Equipment
Protect yourself during the wrapping process. Wear gloves to avoid cuts and keep the vinyl clean. Safety glasses shield your eyes from sharp tools and heat gun rays. Work in a well-ventilated area to avoid inhaling fumes. Keep a first aid kit nearby for small injuries. Safety ensures a smooth and worry-free wrapping experience.
Preparing The Interior Surface
Preparing the interior surface is the first step to a successful vinyl wrap. A clean and smooth surface helps the vinyl stick better. This step makes the wrap last longer and look great. Follow these simple tasks carefully to get the best results.
Cleaning And Degreasing
Start by cleaning the surface thoroughly. Use a mild soap and water to remove dust and dirt. Dry the area with a soft cloth. Next, apply a degreaser to remove oils and grease. Wipe the surface well to avoid any residue. A clean surface ensures strong adhesion for the vinyl.
Removing Old Adhesive
Old adhesive can cause bumps under the vinyl. Use an adhesive remover or rubbing alcohol to soften the glue. Gently scrape the residue with a plastic scraper. Avoid metal tools to prevent scratches. Clean the area again after removing all adhesive.
Sanding And Smoothing
Lightly sand rough spots or uneven areas with fine sandpaper. This step creates a smooth base for the vinyl. Be gentle to avoid damage to the surface. Wipe away dust with a clean cloth after sanding. A smooth surface helps the vinyl look flawless and stick well.
Measuring And Cutting Vinyl
Measuring and cutting vinyl is a key step in wrapping your car interior. It ensures the vinyl fits perfectly without wrinkles or gaps. Accurate measurements help avoid waste and save time. Cutting the vinyl correctly makes installation smooth and clean. Understanding these steps makes the process easier and more effective.
Taking Accurate Measurements
Start by cleaning the surface you want to wrap. Use a tape measure to get the exact length and width of each part. Measure twice to avoid mistakes. Note down the numbers clearly. Include any curves or edges in your measurements. Use a flexible measuring tape for rounded areas.
Cutting Techniques
Place the vinyl on a flat surface before cutting. Use a sharp utility knife or scissors for clean edges. Cut slightly outside your measured lines at first. This way, you keep room to adjust the vinyl later. Avoid jagged or rough cuts. A smooth cut helps the vinyl lay flat on surfaces.
Allowing For Stretch And Overlap
Vinyl stretches a bit when applied. Add extra material around edges to allow this stretch. Leave about two inches for overlap on each side. Overlapping helps cover seams and curves well. It also prevents gaps from showing under the vinyl. Plan extra space carefully for a neat finish.
Applying The Vinyl Wrap
Applying the vinyl wrap to your car interior needs care and patience. This step shapes the final look and feel. Proper technique helps avoid damage and ensures the wrap sticks well. Follow these key steps to apply vinyl wrap effectively.
Positioning The Vinyl
Place the vinyl wrap carefully over the surface. Align it so edges match the shape perfectly. Avoid stretching the vinyl too much at this stage. Use light pressure to hold it in place. Make sure the vinyl covers all corners and curves.
Heat Application For Flexibility
Use a heat gun or hair dryer to warm the vinyl. Heat softens the material, making it easier to mold. Keep the heat moving to avoid burning the wrap. Warm the vinyl evenly to prevent wrinkles. This step helps the vinyl follow curves smoothly.
Smoothing Out Bubbles And Wrinkles
Start from the center and push air bubbles outwards. Use a squeegee or soft cloth to smooth the surface. Work slowly to avoid tearing the vinyl. Small wrinkles can be fixed with gentle heat and pressure. Take your time to get a clean, smooth finish.
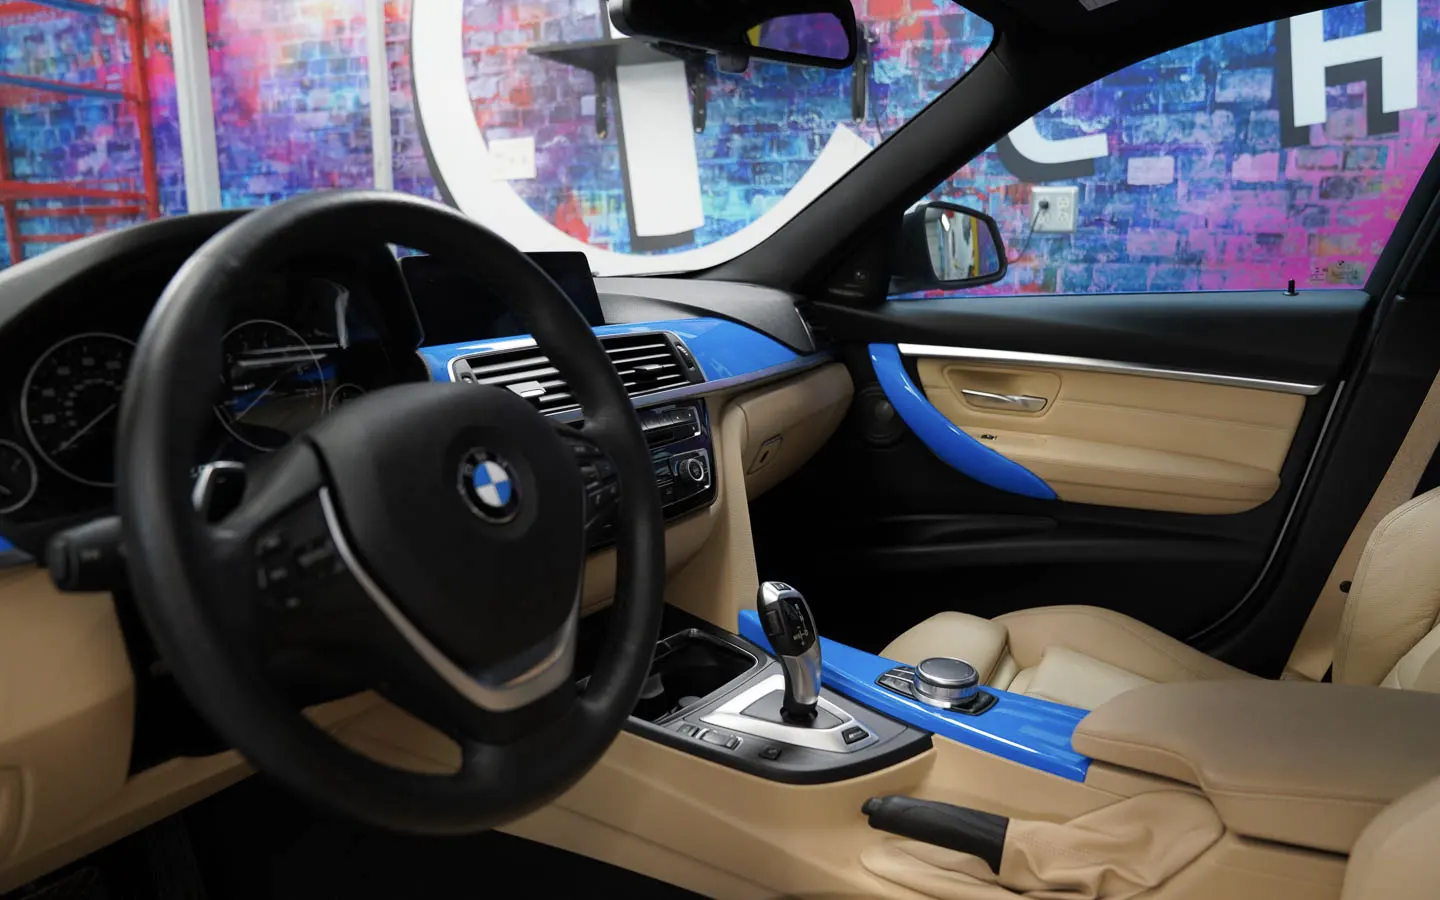
Credit: www.tintingchicago.com
Finishing Touches
Finishing touches are key for a smooth, clean vinyl wrap inside your car. These final steps help the vinyl last longer and look neat. Careful work now prevents peeling and bubbles later. Follow these tips to complete your vinyl wrap project like a pro.
Trimming Excess Vinyl
Cut the extra vinyl carefully with a sharp blade. Trim along the edges of panels and curves. Use small, controlled cuts to avoid damage. Leave a tiny margin to tuck under edges for a tight fit. Take your time to keep lines straight and clean.
Sealing Edges
Seal the vinyl edges with heat and pressure. Use a heat gun on low to warm the vinyl gently. Press edges down firmly with a squeegee or roller. This helps prevent lifting and moisture damage. Be careful not to overheat or burn the vinyl.
Reinstalling Interior Components
Put back all parts you removed earlier. Check that clips and screws fit correctly. Avoid forcing pieces to prevent cracking or breaking. Clean parts before reinstalling for a fresh, polished look. Test buttons and switches to ensure full function.
Common Mistakes To Avoid
Vinyl wrapping your car’s interior can give it a fresh new look. Many people make simple mistakes that hurt the final result. Avoiding these common errors will save time and frustration. It also helps your wrap last longer and look better.
Ignoring Surface Preparation
Cleaning the surface is the first step. Dirt, dust, and oils stop the vinyl from sticking well. Wiping down the area with alcohol or soap is important. Rough or uneven surfaces cause bubbles and wrinkles. Sanding or smoothing the surface can fix this. Skipping preparation leads to peeling and a poor finish.
Rushing The Application
Take your time applying the vinyl. Quick work creates air bubbles and creases. Stretching the vinyl too much can cause it to snap back or tear. Use gentle heat to help shape the vinyl around curves. Smooth out bubbles with a squeegee slowly. Patience results in a neat, clean wrap.
Using Low-quality Vinyl
Cheap vinyl may look good at first. It often fades or cracks after a short time. Poor quality vinyl can peel easily. Invest in vinyl designed for car interiors. This type lasts longer and resists heat and wear. A better vinyl saves money by avoiding early replacements.
Maintenance Tips For Longevity
Keeping your vinyl wrap looking fresh and new takes regular care. Proper maintenance helps the vinyl last longer and stay attractive. Small daily habits protect the wrap from damage and wear. Follow these tips to keep your car interior wrap in top shape.
Cleaning Wrapped Surfaces
Use a soft cloth or sponge to clean the vinyl. Avoid rough materials that can scratch the surface. Mild soap mixed with water works best for cleaning. Wipe gently and rinse with clean water afterward. Dry the surface with a soft towel to prevent water spots.
Avoiding Harsh Chemicals
Stay away from strong cleaners and solvents. Chemicals like alcohol or bleach can harm the vinyl. Check product labels before use. Use only products designed for vinyl or gentle household cleaners. This keeps the wrap flexible and prevents fading.
Repairing Minor Damages
Small scratches or bubbles can appear over time. Fix minor issues quickly to stop them from worsening. Use a vinyl repair kit or heat gun for small bubbles. For scratches, gently rub with a vinyl-safe polish. Regular checks help catch problems early.
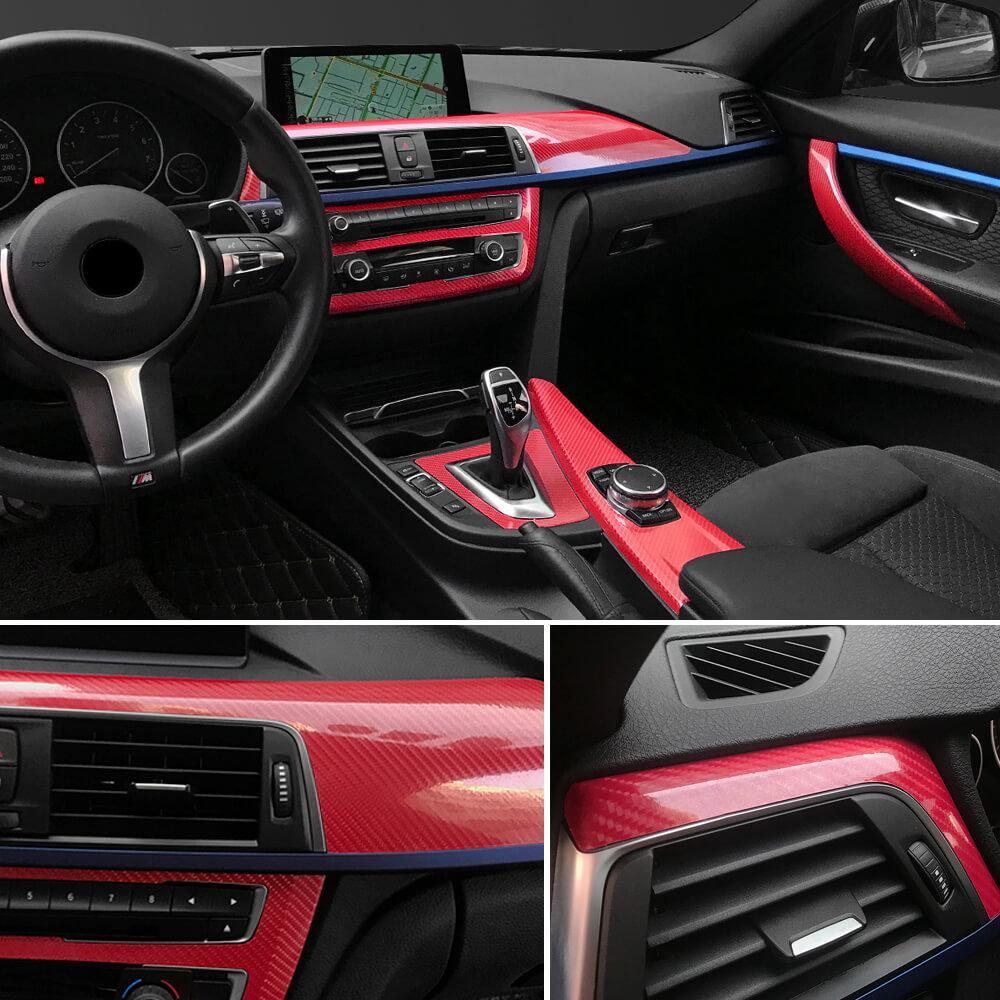
Credit: www.carlawrap.com
Frequently Asked Questions
What Tools Are Needed For Vinyl Wrapping Car Interiors?
You need a heat gun, squeegee, utility knife, and cleaning supplies. These tools help apply vinyl smoothly and avoid bubbles or wrinkles.
How Long Does Vinyl Wrapping A Car Interior Take?
Vinyl wrapping a car interior usually takes 4 to 6 hours. The time varies with the complexity of the interior and your experience level.
Can I Remove Vinyl Wrap Without Damaging Interior Surfaces?
Yes, vinyl wrap can be removed without damage if done carefully. Use heat to loosen adhesive and peel slowly to protect surfaces.
Is Vinyl Wrap Durable For Car Interior Surfaces?
Vinyl wraps are durable and resist scratches and stains. They protect surfaces but avoid sharp objects to maintain the wrap’s lifespan.
Conclusion
Vinyl wrapping your car interior can change its look fast. It protects surfaces and adds style without much cost. Take your time to clean and measure well. Work slowly to avoid bubbles and wrinkles. Small tools help with tight spots and curves.
Your car will feel fresh and unique after wrapping. Try different colors or textures for a personal touch. Enjoy the process and the new look you create!


