
Are you looking to give your motorcycle a fresh, eye-catching look without spending a fortune? Vinyl wrapping your motorcycle fairings is the perfect way to do just that.
It lets you customize your bike’s style, protect the original paint, and even change colors whenever you want. But if you’ve never tried it before, the process can seem tricky. Don’t worry—this guide will walk you through every step, making it easy for you to achieve professional-looking results on your own.
Ready to transform your ride and turn heads wherever you go? Let’s dive in!
Choosing The Right Vinyl
Choosing the right vinyl is key to a successful motorcycle fairing wrap. The right vinyl ensures a smooth application and long-lasting finish. It also protects the fairings from scratches and weather damage. Knowing the types, colors, and durability helps you pick the best option for your bike.
Types Of Vinyl Films
There are many types of vinyl films made for vehicle wraps. Cast vinyl is thin, flexible, and lasts longer. It conforms well to curves and edges. Calendered vinyl is thicker and less flexible. It is cheaper but suits flat surfaces better. For motorcycle fairings, cast vinyl is usually the best choice.
Color And Finish Options
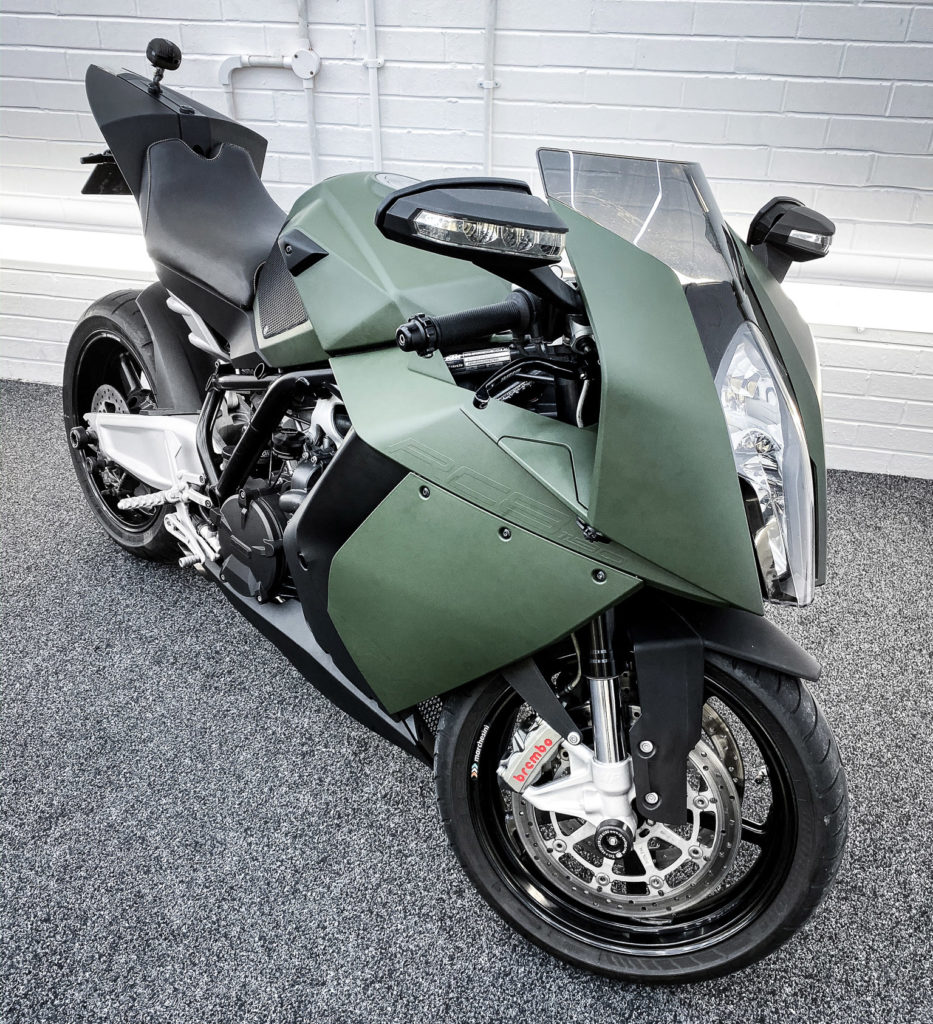
Vinyl comes in many colors and finishes. Matte, gloss, satin, and metallic are popular finishes. Matte gives a smooth, non-shiny look. Gloss adds shine and highlights curves. Satin is a mix of matte and gloss. Metallic finishes add sparkle and depth. Pick a color and finish that matches your style and bike design.
Durability And Weather Resistance
Vinyl must withstand sun, rain, and wind. Choose vinyl with UV protection to prevent fading. Look for waterproof and scratch-resistant types. Durable vinyl lasts longer and keeps the fairings safe. Some vinyl films have extra coatings for added protection. This keeps your wrap looking fresh for years.
Gathering Essential Tools
Before starting to vinyl wrap motorcycle fairings, gather all necessary tools. Having the right tools makes the process easier and more precise. Each tool plays a key role in achieving a smooth, professional finish. Prepare your workspace and check all supplies before you begin.
Cutting And Measuring Tools
Accurate cuts ensure the vinyl fits perfectly on fairings. Use a sharp utility knife or precision blade for clean edges. A metal ruler or measuring tape helps to measure fairing dimensions. Marking tools like pencils or masking tape guide your cuts. Take your time to measure twice and cut once.
Heat Guns And Squeegees
A heat gun softens the vinyl, making it easier to shape. Use low to medium heat to avoid damaging the vinyl or paint. Squeegees help remove air bubbles and smooth the vinyl on curves. Choose a felt-edged squeegee to prevent scratches. Work slowly, applying gentle pressure for the best results.
Cleaning Supplies
Clean surfaces are vital for vinyl to stick properly. Use isopropyl alcohol to remove dirt, grease, and oils. Microfiber cloths prevent scratching and leave no lint. Avoid using wax or silicone-based cleaners before wrapping. Clean fairings thoroughly and let them dry fully before applying vinyl.
Preparing Motorcycle Fairings
Preparing motorcycle fairings is the first step to a smooth vinyl wrap job. This phase ensures the vinyl sticks well and lasts long. Careful preparation helps avoid bubbles and wrinkles later.
Each task in this stage builds a clean, smooth surface perfect for wrapping. Proper preparation saves time and effort during application.
Removing Fairings Safely
Start by turning off the motorcycle and letting it cool down. Use the right tools like screwdrivers or hex keys. Keep all screws and bolts in a safe place. Remove fairings gently to avoid cracks or scratches. Handle plastic parts with care to prevent damage.
Cleaning And Degreasing
Clean fairings thoroughly using warm water and mild soap. Remove dirt, dust, and grease for better vinyl adhesion. Use a degreaser to eliminate oils and residues. Wipe surfaces with a lint-free cloth. Ensure the fairings dry completely before moving on.
Surface Inspection And Repair
Check fairings for scratches, cracks, or dents. Small flaws can show through the vinyl wrap. Fill minor scratches with plastic filler or sand smooth. Repair cracks with appropriate glue or replace damaged parts. A smooth surface makes the vinyl look flawless.

Credit: www.youtube.com
Measuring And Cutting Vinyl
Measuring and cutting vinyl is a key step in wrapping motorcycle fairings. It ensures a smooth fit and a clean look. Taking time to measure and cut well saves frustration later. Vinyl that is too small or uneven can cause bubbles and wrinkles. Precise work here sets the stage for a great finish.
Taking Accurate Measurements
Start by cleaning the fairing surface. Use a soft cloth to remove dust and grease. Use a flexible tape measure to follow curves and edges. Measure each section carefully. Write down the length and width for every part. Double-check measurements for accuracy. Remember, vinyl needs extra space to wrap edges.
Creating Cutting Templates
Use paper or cardboard to make cutting templates. Trace the shape of the fairing parts onto the paper. Cut the templates out with scissors. Place templates on the vinyl to plan cuts. This helps avoid mistakes and waste. Adjust templates for curves and overlaps. Templates make cutting faster and more precise.
Trimming Vinyl With Precision
Lay the vinyl flat on a clean surface. Pin the template onto the vinyl or use weights. Cut slowly along the template edge with a sharp blade or scissors. Keep your hand steady for straight cuts. Leave a small margin for folding over edges. Trim excess vinyl carefully after application. Precision cutting prevents wrinkles and poor adhesion.
Applying The Vinyl Wrap
Applying vinyl wrap on motorcycle fairings requires care and patience. This step changes the look of your bike and protects the surface. Follow each part carefully to get smooth, clean results.
Positioning The Vinyl
Lay the vinyl wrap over the fairing without removing the backing. Check the fit and shape. Make sure it covers all edges and corners. Adjust the wrap to avoid wrinkles or folds. Use light pressure to hold it in place.
Removing Backing And Initial Placement
Peel back a small corner of the vinyl backing. Stick the exposed edge to the fairing. Slowly pull the backing away while pressing the vinyl down. Work from the center outwards. Keep the wrap tight and aligned as you go.
Smoothing Out Air Bubbles
Use a soft squeegee or cloth to push out air bubbles. Start from the center and move to the edges. Apply firm, even pressure to avoid creases. Small bubbles can be removed with a pin. Take your time to get a flat finish.
Heat And Stretch Techniques
Heat and stretch techniques are key to a smooth vinyl wrap on motorcycle fairings. These methods help the vinyl fit tightly around curves and complex shapes. Using heat makes the vinyl more flexible and easier to shape. Stretching the vinyl while warm prevents wrinkles and bubbles. This section breaks down how to apply heat, avoid common wrapping problems, and set the vinyl for a long-lasting finish.
Using Heat To Conform To Curves
Use a heat gun or hairdryer on low setting. Warm the vinyl slowly to soften it. Soft vinyl bends easily around curves and edges. Keep the heat moving to avoid damage. Stretch the vinyl gently as you apply heat. This helps the vinyl take the shape of the fairing. Stop heating once the vinyl cools slightly but is still flexible.
Avoiding Wrinkles And Creases
Start from the center of the surface. Smooth the vinyl outward with a squeegee or cloth. Stretch gently to prevent folds. If wrinkles appear, reheat that area softly. Pull the vinyl taut but do not over-stretch. Work slowly around curves and corners. Careful handling reduces bubbles and creases for a clean finish.
Cooling And Setting The Vinyl
After shaping, allow the vinyl to cool naturally. Cooling locks the vinyl in place on the fairing. Avoid touching or moving the vinyl during this time. Use a cool air blower for faster setting if needed. Proper cooling ensures the vinyl stays tight and smooth. This step improves wrap durability and appearance.
Trimming Excess Vinyl
Trimming excess vinyl is a key step in wrapping motorcycle fairings. It helps shape the vinyl to fit perfectly. Proper trimming prevents wrinkles and lifts. It also gives the wrap a neat, professional look. Take your time to trim carefully for the best results.
Cutting Along Edges
Use a sharp blade for clean cuts. Follow the natural edges of the fairing closely. Cut slowly to avoid mistakes. Small, precise cuts work better than big ones. Leave a tiny margin to tuck the vinyl under edges.
Handling Seams And Overlaps
Seams need careful attention to stay smooth. Overlap vinyl slightly for better coverage. Press down the overlap firmly to avoid air bubbles. Use heat to soften the vinyl around seams. This helps the vinyl stick well and look smooth.
Ensuring Clean Finishes
Clean edges make the wrap look tidy. Trim any leftover vinyl with precision. Use a burnishing tool to press down edges firmly. Check all corners and curves for loose vinyl. Clean finishes protect the wrap and improve appearance.
Credit: mollicait.com.br
Reinstalling The Fairings
Reinstalling the fairings is the final step after wrapping your motorcycle panels. This part needs care to keep the wrap smooth and the bike looking great. Proper installation avoids scratches and damage to the new wrap.
Aligning And Securing Panels
Start by placing each fairing panel carefully on the bike. Check that holes for screws and clips line up perfectly. Use the original fasteners to hold panels in place. Tighten screws gently to avoid cracking the plastic. Make sure panels sit evenly without gaps.
Checking For Fit And Finish
Look closely at the edges of each panel. The wrap should not peel or lift near joints. Make small adjustments if needed for a tight fit. Check that all parts move freely without rubbing the wrap. Confirm the wrap looks smooth and clean from every angle.
Final Touches And Inspection
Clean the wrapped fairings with a soft cloth to remove dust. Avoid harsh cleaners that can damage the vinyl. Check all screws and clips are secure after a short ride. Fix any loose parts immediately. Enjoy your refreshed motorcycle with a fresh new look.
Maintaining Wrapped Fairings
Maintaining wrapped motorcycle fairings keeps them looking fresh and new. Proper care extends the vinyl’s life and protects your bike’s style. Simple steps help avoid damage and keep the wrap smooth and shiny.
Cleaning Tips
Use a soft cloth or sponge to clean the wrap gently. Avoid rough brushes that can scratch the surface. Wash with mild soap and water, not harsh chemicals. Rinse well to remove all soap. Dry with a microfiber towel to avoid streaks.
Avoiding Damage
Keep the bike away from sharp objects that can cut the wrap. Park in shaded areas to limit sun damage and fading. Avoid high-pressure water jets close to edges. Do not use abrasive cleaners or solvents. Handle fairings carefully during any maintenance.
Repairing Minor Issues
Small scratches or bubbles can be fixed easily. Use a heat gun on low heat to smooth bubbles gently. For minor cuts, apply vinyl repair tape under the damaged area. Replace sections only if damage is large or deep. Regular checks help catch problems early.

Credit: www.youtube.com
Frequently Asked Questions
What Tools Are Needed To Vinyl Wrap Motorcycle Fairings?
You need a heat gun, squeegee, utility knife, microfiber cloth, and vinyl wrap film. These tools help apply vinyl smoothly and avoid bubbles or wrinkles.
How Long Does Vinyl Wrapping Motorcycle Fairings Take?
Vinyl wrapping motorcycle fairings typically takes 2 to 4 hours. The time varies based on experience and fairing complexity.
Can Vinyl Wraps Protect Motorcycle Fairings From Damage?
Yes, vinyl wraps add a protective layer that guards against scratches and UV damage. They help keep fairings in good condition.
Is It Necessary To Remove Fairings Before Vinyl Wrapping?
Removing fairings is recommended for easy, precise application. It prevents dust and dirt from trapping under the vinyl.
Conclusion
Vinyl wrapping motorcycle fairings can refresh your bike’s look fast. Take your time to clean and prepare the surface well. Use gentle heat to help the vinyl stick and fit curves. Small bubbles? Smooth them out carefully with a soft cloth.
Practice makes perfect, so don’t rush the process. Enjoy customizing your ride with colors and designs you love. This simple step can make your motorcycle stand out on the road. Try it yourself and see the difference vinyl wrap can bring.


