

If you own a Yamaha 150 outboard, you know how important it is to keep it running smoothly. One key part of that is the fuel filter.
Over time, it can get clogged with dirt and debris, causing your engine to lose power or even stall. But don’t worry—changing the fuel filter is easier than you might think. In this guide, you’ll learn step-by-step how to replace your Yamaha 150 outboard’s fuel filter quickly and safely.
By the end, you’ll feel confident keeping your engine in top shape and ready for your next adventure on the water. Keep reading to find out how!
Signs Of A Clogged Fuel Filter
The fuel filter in your Yamaha 150 outboard is vital for smooth engine performance. It stops dirt and debris from reaching the engine. Over time, the fuel filter can get clogged. This blockage can cause several noticeable problems. Recognizing these signs early helps prevent engine damage and costly repairs.
Engine Runs Rough Or Hesitates
A clogged fuel filter can cause the engine to run unevenly. You may feel it hesitate or stumble during acceleration. The engine might also lose power on the water. These issues happen because fuel flow is restricted.
Difficulty Starting The Engine
Hard starts can indicate a blocked fuel filter. The engine may crank but fail to start quickly. It struggles to get enough fuel to ignite. This problem appears more often after the boat sits unused.
Decreased Fuel Efficiency
You might notice your boat uses more fuel than usual. A dirty fuel filter forces the engine to work harder. This extra effort wastes fuel and lowers efficiency. Watching your fuel consumption helps spot this early.
Unusual Engine Sounds
A clogged filter can cause odd noises from the engine. Sounds like sputtering or coughing are common. These noises signal an irregular fuel supply. Pay attention to any new or strange sounds while running.
Engine Stalls Or Cuts Out
The engine may suddenly stop running during use. This stall happens because fuel cannot reach the engine smoothly. It can occur at idle or under load. Frequent stalling is a clear warning to check the fuel filter.
Tools And Materials Needed
Changing the fuel filter on a Yamaha 150 outboard needs the right tools and materials. Having them ready makes the job easier and faster. It helps prevent mistakes and keeps your engine running smoothly.
Gather everything before starting. This way, you work without interruptions. Let’s see the essential tools and materials for this task.
Basic Tools Required
You need a set of wrenches for loosening bolts. A screwdriver helps remove clamps and covers. Pliers are useful to handle hose clamps firmly. A clean container will catch fuel spillage safely.
Fuel Filter Replacement Parts
Use a new fuel filter designed for Yamaha 150 engines. Check the model number to match the filter exactly. Also, prepare new fuel hose clamps for secure fitting.
Safety Gear And Cleaning Supplies
Wear gloves to protect hands from fuel and dirt. Safety glasses shield eyes from splashes. Keep rags or paper towels handy to wipe spills. A small brush can clean dirt around the filter area.
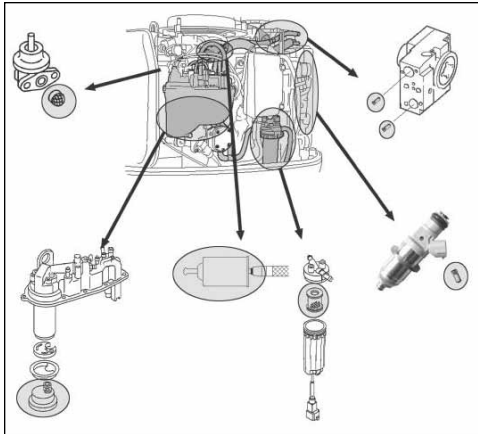
Locating The Fuel Filter
Locating the fuel filter on a Yamaha 150 outboard is the first step to changing it. Knowing its exact position saves time and effort. It helps avoid confusion during maintenance.
The fuel filter is usually near the engine or along the fuel line. It cleans fuel before it reaches the engine. This prevents dirt and debris from causing damage.
Check Near The Fuel Pump
The fuel filter often sits close to the fuel pump. The pump moves fuel from the tank to the engine. Follow the fuel line from the tank to find the pump. Look for a small, cylindrical part nearby. This is likely the fuel filter.
Inspect Along The Fuel Line
The fuel line runs from the tank to the engine. The filter can be on this line, sometimes inside a clear plastic housing. This housing makes it easy to see if the filter is dirty. Trace the fuel line carefully to locate this part.
Consult The Owner’s Manual
The owner’s manual provides exact locations and diagrams. It shows where the fuel filter sits on your specific model. Use it as a guide to find the filter quickly. This avoids unnecessary searching under the engine cover.
Credit: blog.simyamaha.com
Preparing The Outboard Motor
Preparing the Yamaha 150 outboard motor is the first key step before changing the fuel filter. Taking time to set up the motor properly makes the task easier and safer. Proper preparation helps avoid spills and damage to the engine parts.
Follow these steps carefully to get your outboard ready for the fuel filter change.
Turn Off The Engine And Disconnect The Battery
Always switch off the engine before starting work. This stops fuel flow and prevents accidents. Next, disconnect the battery cables. This step cuts power to the motor and protects against electric shock.
Locate The Fuel Filter And Clean The Area
Find the fuel filter on your Yamaha 150 outboard. It usually sits near the engine or fuel line. Clean the area around the filter to remove dirt and debris. A clean workspace stops dirt from entering the fuel system during replacement.
Prepare Tools And Materials Needed
Gather all tools before starting. You will need a wrench, screwdrivers, and a container to catch fuel. Also, have a new fuel filter ready. Organizing tools saves time and keeps the work smooth.
Relieve Fuel Pressure Safely
Fuel pressure can cause spills or injuries. Release pressure by loosening the fuel line carefully. Use a rag to catch any leaking fuel. This step reduces risk and keeps the area clean.
Removing The Old Fuel Filter
Removing the old fuel filter on your Yamaha 150 outboard is the first step in keeping your engine running smoothly. This process requires care to avoid fuel spills and damage to the fuel system. Follow the steps carefully to remove the old filter safely and prepare for the new one.
Relieving Fuel System Pressure
Start by turning off the engine and the fuel valve. This stops fuel from flowing. Next, loosen the fuel cap slowly to release pressure inside the tank. Use a rag to catch any small fuel drips. This step reduces fuel spray when disconnecting lines.
Disconnecting Fuel Lines
Locate the fuel lines connected to the filter. Use pliers to gently squeeze and slide the clamps away from the filter. Carefully pull the fuel lines off the filter’s connectors. Have a container ready to catch any fuel that may leak out. Avoid pulling too hard to prevent damage.
Taking Out The Filter
Check if the filter is held by screws or clips. Remove any fasteners using the right tools. Gently pull the filter out of its housing. Inspect the area for dirt or debris before installing the new filter. Dispose of the old filter according to local regulations.
Installing The New Fuel Filter
Installing the new fuel filter on your Yamaha 150 Outboard is a key step. It ensures clean fuel flows to the engine. This process helps your boat run smoothly and prevents engine problems. Follow each step carefully for the best results.
Positioning The New Filter
Hold the new fuel filter upright. Match the flow direction arrow with the fuel line. Place it where the old filter was removed. Make sure it fits snugly and aligns well. Proper positioning avoids leaks and keeps fuel flowing right.
Reconnecting Fuel Lines
Attach the fuel lines to the new filter. Push the hoses fully onto the filter’s inlet and outlet. Check that the clamps are ready to tighten. Secure connections prevent fuel leaks and maintain pressure. Double-check each line for a firm fit.
Securing The Filter
Use the clamp or bracket to hold the filter in place. Tighten screws or bolts without overdoing it. The filter should not move or wiggle. Firmly securing the filter avoids vibrations that cause damage. A steady filter lasts longer and works better.
Priming The Fuel System
Priming the fuel system is a key step after changing the fuel filter on your Yamaha 150 outboard. It helps remove air pockets and ensures fuel flows smoothly to the engine. Without proper priming, the engine may start roughly or not start at all.
This process makes the engine ready to run. It also protects the fuel pump and carburetor. Follow these steps carefully for best results.
Locate The Primer Bulb
Find the primer bulb on the fuel line between the fuel tank and engine. It is usually a round, rubber bulb. Check for cracks or leaks before starting.
Squeeze The Primer Bulb
Squeeze the bulb firmly several times. Fuel should move through the lines and into the engine. This action pushes air out of the system.
Watch For Firmness
The bulb will feel firm when the fuel fills the lines. Stop squeezing at this point. A soft bulb means more fuel is needed.
Check For Fuel Leaks
Inspect the fuel lines and filter for leaks. Tighten any loose clamps or fittings. Leaks can cause poor engine performance.
Start The Engine
Turn on the engine and listen. It should start smoothly and run without stalling. If it struggles, repeat the priming steps.

Credit: yamahaonlineparts.com
Checking For Leaks
Checking for leaks is a crucial step after changing the fuel filter on your Yamaha 150 outboard. Leaks can cause engine problems and fuel loss. They also pose safety risks. Carefully inspecting the fuel lines and connections ensures your engine runs smoothly and safely.
Leaks often appear as wet spots or fuel smell near the filter. Catching leaks early helps avoid bigger issues and costly repairs.
Visual Inspection Of Fuel Lines And Connections
Start by looking closely at all fuel lines and connections. Check for cracks, loose clamps, or wet spots. Make sure the fuel filter is seated tightly. Tighten any loose fittings with a wrench. Replace damaged fuel lines immediately.
Running The Engine To Spot Leaks
Turn on the engine and let it run for a few minutes. Watch carefully around the fuel filter area. Look for any signs of dripping fuel or wetness. A steady drip means a leak that needs fixing. Shut off the engine before making adjustments.
Using Paper Towels Or Rags
Place paper towels or rags under the fuel filter and lines. They help catch small leaks you might miss. Check the towels for wet spots after running the engine. Replace the towels if they become soaked. This simple step helps identify leaks quickly.
Fixing Minor Leaks
Small leaks often come from loose clamps or fittings. Tighten these with a screwdriver or wrench. If the fuel line is cracked, cut out the bad section. Replace it with a new piece of fuel hose. Secure all connections firmly to stop leaks.
Test Running The Engine
Test running the engine is a key step after changing the fuel filter on your Yamaha 150 outboard. It checks if the fuel flows properly and the engine runs smoothly. This step helps spot problems early and keeps your boat ready for the water.
Preparing The Engine For Test Run
Start by making sure the fuel valve is open. Check that the fuel lines are tight and there are no leaks. Confirm the battery is fully charged for a strong start. Remove any tools or debris from the engine area.
Starting The Engine
Turn the key and start the engine slowly. Listen for any unusual sounds. The engine should run without sputtering or stalling. Watch the gauges to ensure proper oil and temperature levels. Keep the engine at idle for a few minutes.
Checking For Fuel Leaks And Performance
Look under the engine for any fuel leaks. Smell for fuel odors around the fuel filter. The engine should respond quickly when you increase the throttle. Notice if the engine runs smoothly at different speeds. Stop the engine if you detect problems.
Maintenance Tips For Fuel Filters
Proper care of the fuel filter keeps your Yamaha 150 outboard running smoothly. Fuel filters stop dirt and water from reaching the engine. Clean fuel means better engine life and performance. Follow these tips to maintain your fuel filter effectively.
Check The Fuel Filter Regularly
Look at the fuel filter every month. Inspect for dirt, water, or damage. Replace the filter if it looks clogged or dirty. Regular checks prevent engine problems and fuel flow issues.
Use Clean Fuel
Always fill your tank with clean fuel. Dirty fuel clogs the filter faster. Avoid fuel from questionable sources. Clean fuel keeps the filter working longer and protects the engine.
Drain Water From The Filter
Water can collect in the fuel filter bowl. Drain it regularly to avoid engine damage. Use the drain valve under the filter to release water. This simple step keeps fuel pure and engine safe.
Replace The Fuel Filter On Schedule
Change the fuel filter according to Yamaha’s recommendation. Usually, every 100 hours or once a year. A fresh filter ensures proper fuel flow and stops engine stalling.
Keep The Area Around Filter Clean
Clean the area around the fuel filter before changing it. Dirt can enter the fuel system during replacement. Wipe the area with a clean cloth to avoid contamination.

Credit: www.youtube.com
Frequently Asked Questions
How Often Should I Change The Fuel Filter On Yamaha 150?
Change the fuel filter every 100 hours or once a year. Regular replacement prevents clogging and ensures smooth engine performance. Always check the owner’s manual for specific intervals.
What Tools Are Needed To Change Yamaha 150 Fuel Filter?
You’ll need a screwdriver, pliers, a new fuel filter, and a container to catch fuel. Having a clean workspace and gloves helps maintain safety during the process.
How To Identify A Clogged Fuel Filter On Yamaha 150?
Signs include engine hesitation, poor acceleration, and stalling. Reduced fuel flow causes these symptoms, indicating the fuel filter needs replacement to restore engine efficiency.
Can I Replace The Fuel Filter Myself Safely?
Yes, with basic mechanical skills and proper tools, you can safely replace it. Follow safety precautions like disconnecting the battery and working in a ventilated area.
Conclusion
Changing the fuel filter on your Yamaha 150 outboard keeps the engine running smooth. Clean fuel helps avoid engine problems and saves money. Follow the steps carefully to do the job right. Take your time and use the right tools for safety.
Regular checks and maintenance improve your boat’s performance. A clean fuel filter means better fuel flow and engine power. Now, you can enjoy your time on the water without worry. Simple care makes a big difference for your outboard motor.


