If you want to give your car a fresh, personalized look without spending a fortune, vinyl wrapping your car emblems is a smart move. It’s a simple way to change colors, add style, and protect your badges from scratches and fading.
You don’t need special tools or expert skills to do it yourself. In this guide, you’ll discover easy steps to wrap your car emblems perfectly, saving money and making your vehicle stand out. Ready to transform those small details into eye-catching highlights?
Let’s dive in!

Credit: www.rvinyl.com
Tools And Materials Needed
Before starting to vinyl wrap car emblems, gather all the tools and materials. Having the right supplies makes the job easier and gives better results. This section explains what you need to prepare for a smooth wrapping process.
Choosing The Right Vinyl Wrap
Pick vinyl wrap made for small, curved surfaces like emblems. Look for high-quality cast vinyl that stretches without tearing. Matte, gloss, or metallic finishes work well. Choose a color that matches your style and car design.
Thin vinyl sheets are easier to handle on tiny emblem details. Avoid thick or rigid vinyl; it may not conform well. Check if the vinyl has an air-release feature to prevent bubbles.
Essential Tools For Wrapping
Prepare a heat gun or hairdryer to soften the vinyl for bending. Use a squeegee or a soft cloth to press the vinyl smoothly on the emblem. A sharp craft knife or blade helps trim excess vinyl cleanly.
Have a pair of tweezers or small pliers to lift vinyl edges carefully. Isopropyl alcohol and a clean cloth are needed to clean the emblem surface before applying vinyl. Gloves protect the wrap from oils and dirt on your hands.
Preparing Your Workspace
Work in a clean, dust-free area with good lighting. A flat surface at waist height helps control the wrapping process. Avoid windy or humid places to prevent dirt sticking on the vinyl.
Keep all tools and materials close to avoid interruptions. A well-organized workspace helps you focus and finish faster. Make sure the temperature is between 60-80°F for best vinyl performance.
Preparing The Emblem
Preparing the emblem is the first step in a successful vinyl wrap project. This process ensures the vinyl sticks well and looks smooth. Taking time to prepare the emblem will improve the final result. Follow these simple steps to get the emblem ready.
Cleaning The Surface
Start by cleaning the emblem thoroughly. Use soap and water to remove dirt and grease. Dry it with a clean cloth. For stubborn grime, use rubbing alcohol on a soft cloth. This removes oils and helps the vinyl stick better. Make sure the surface is completely dry before moving on.
Removing The Emblem (optional)
Removing the emblem is optional but can make wrapping easier. Use a plastic pry tool to avoid damage. Heat the emblem slightly with a heat gun or hairdryer. This softens the adhesive. Gently lift the emblem off the car. If you leave it on, wrap carefully around edges.
Sanding And Smoothing
Lightly sand the emblem if it has rough spots or old adhesive. Use fine-grit sandpaper for a smooth finish. Wipe away dust with a damp cloth. A smooth surface helps the vinyl wrap lay flat. Avoid sanding too hard to prevent damage.
Cutting And Measuring Vinyl
Cutting and measuring vinyl accurately is key to a smooth car emblem wrap. Proper measurement ensures the vinyl fits perfectly without wrinkles or gaps. Cutting the vinyl correctly saves time and prevents waste. This section guides you through measuring and cutting vinyl for clean, professional results.
Measuring The Emblem Dimensions
Start by measuring the emblem’s height and width. Use a ruler or tape measure with millimeter marks. Note the measurements carefully on paper. Measure the emblem from edge to edge for the best fit. Double-check the numbers to avoid mistakes later.
Cutting The Vinyl Wrap
Lay the vinyl flat on a clean surface before cutting. Use a sharp craft knife or scissors for precise cuts. Cut slightly larger than the emblem size to allow for wrapping edges. Avoid cutting too close to prevent peeling. Trim excess vinyl after applying to get a neat finish.
Using Templates For Accuracy
Create a paper or cardboard template matching the emblem shape. Place the template over the vinyl and trace around it lightly. Templates help cut the vinyl more accurately and save material. Use templates especially for complex or rounded emblems. This method reduces errors and speeds up the process.
Credit: www.youtube.com
Applying The Vinyl Wrap
Applying the vinyl wrap on car emblems is a careful process. It needs patience and attention to detail. The goal is to cover the emblem smoothly without any bubbles or wrinkles. This part of the project can change the whole look of your car.
Positioning The Vinyl
Start by cutting the vinyl slightly larger than the emblem. Peel the backing off carefully. Hold the vinyl above the emblem. Align it so it covers the emblem fully. Place the vinyl gently on the emblem’s surface. Make sure it sits flat before pressing down.
Using Heat To Mold The Wrap
Use a heat gun or hair dryer to warm the vinyl. Heat makes the vinyl soft and flexible. Move the heat source evenly around the emblem. Do not stay too long in one spot to avoid damage. Heat helps the vinyl follow the emblem’s shape closely.
Smoothing Out Bubbles And Wrinkles
Use a squeegee or a soft cloth to smooth the vinyl. Start from the center and push outwards. This removes air bubbles and wrinkles. Work slowly and gently to avoid tearing the vinyl. If bubbles remain, lift the vinyl slightly and smooth again.
Finishing Touches
The finishing touches on your vinyl-wrapped car emblems make a big difference. They ensure a clean look and long-lasting finish. Take your time to get these steps right. This will help your car look sharp and professional.
Trimming Excess Vinyl
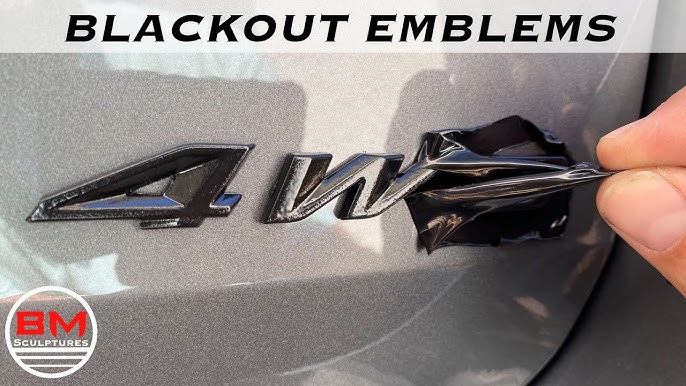
Use a sharp craft knife or razor blade to trim the extra vinyl. Cut close to the emblem edges without scratching the surface. Small, careful cuts prevent peeling later. Trim slowly for the best results.
Sealing The Edges
Heat the edges gently with a heat gun or hair dryer. This softens the vinyl for better adhesion. Press the edges down with a soft cloth or squeegee. Sealed edges stop dirt and water from getting underneath.
Reattaching The Emblem
Clean the emblem and car surface before reattaching. Use strong double-sided tape or the original clips. Press firmly to secure the emblem in place. Check that it sits evenly and does not move.
Maintenance Tips
Taking care of vinyl-wrapped car emblems keeps them looking fresh and new. Proper maintenance helps the wrap last longer. It also protects the emblem from damage and fading. Follow these simple tips to keep your wrapped emblems in great shape.
Cleaning Wrapped Emblems
Use a soft cloth and mild soap with water to clean the emblems. Avoid harsh chemicals and abrasive cleaners. Gently wipe the surface without scrubbing hard. Dry the emblem with a clean towel to prevent water spots. Clean regularly to remove dirt and grime buildup.
Avoiding Damage
Park your car away from direct sunlight when possible. UV rays can cause the vinyl to fade over time. Avoid using high-pressure washers near the emblems. They may peel or lift the wrap edges. Handle the emblems carefully during car washes or repairs. Do not scratch or rub the vinyl surface.
When To Replace The Wrap
Check the emblems for cracks, peeling, or discoloration often. Small tears can let dirt and moisture inside the wrap. Replace the wrap if it shows signs of wear or damage. Fresh wraps restore the look and protect the emblem. Replacing wraps every few years keeps your car stylish.

Credit: www.rvinyl.com
Frequently Asked Questions
What Materials Do I Need To Vinyl Wrap Car Emblems?
You need vinyl wrap film, a heat gun, a squeegee, a precision knife, and cleaning supplies. Clean the emblem first. Use the heat gun to make vinyl flexible. Apply carefully, smooth bubbles out, and trim excess vinyl for a perfect finish.
How Long Does Vinyl Wrapping Car Emblems Take?
Vinyl wrapping car emblems usually takes 30 to 60 minutes. Preparation like cleaning and cutting the vinyl affects the time. Skill level also matters; beginners may take longer. Proper application ensures durability and a neat appearance.
Can Vinyl Wrap Damage Car Emblems?
Vinyl wrap generally does not damage car emblems if applied and removed correctly. Use low heat and avoid sharp tools. Improper removal may peel paint or leave adhesive residue. Always follow manufacturer guidelines for safe application and removal.
Is Vinyl Wrapping Car Emblems Cost-effective?
Yes, vinyl wrapping car emblems is cost-effective compared to repainting or replacing. Vinyl is affordable, reusable, and easy to change. It allows customization without permanent changes, preserving the car’s resale value.
Conclusion
Vinyl wrapping car emblems is a simple way to change your car’s look. Take your time and follow each step carefully. Use good quality vinyl for best results. Clean the emblem well before starting. Smooth out bubbles to get a neat finish.
Practice makes the process easier and faster. Enjoy a fresh, unique style on your car. This small change can make a big difference. Try it yourself and see how it feels.