Are you wondering how to identify GM front brake rotors on your vehicle? Knowing exactly what you have under your wheels is crucial for safety and performance.
But with so many parts that look similar, it can be confusing. This guide will help you quickly spot the right rotors, save you time, and make sure your brakes work perfectly. Keep reading to discover simple tips and tricks that anyone can use—even if you’re not a car expert.
Your safety depends on it.

Credit: sudrecruiting.com
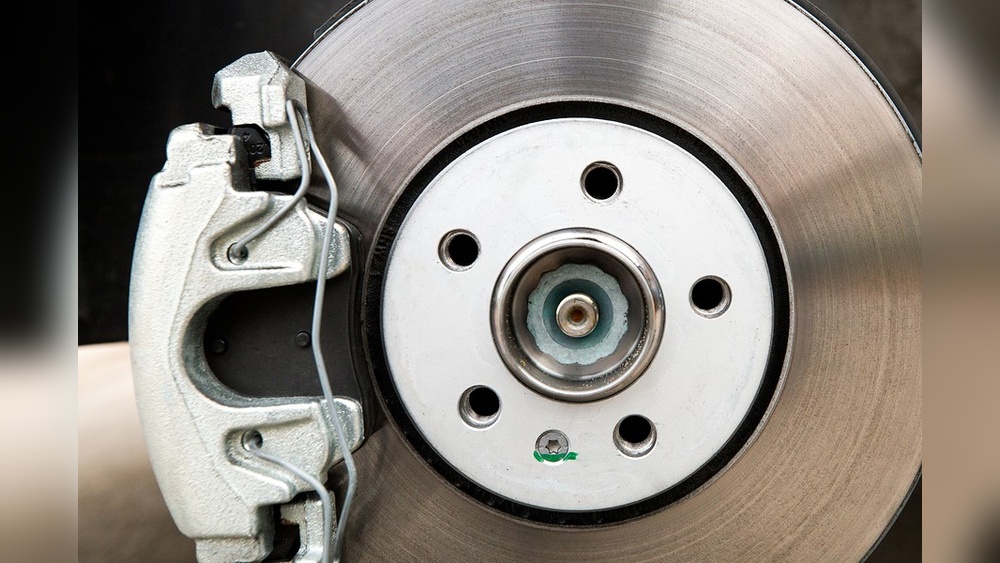
Signs Of Worn Gm Front Brake Rotors
Worn GM front brake rotors show clear signs that need attention. Detecting these signs early can keep your vehicle safe and reliable. Knowing what to watch for helps avoid costly repairs and dangerous driving conditions.
Visual Inspection Tips
Look closely at the rotor surface. Deep grooves or scoring marks mean wear. Rust spots or discoloration can show uneven heat. Check for cracks or warping. Any damage means the rotor should be replaced.
Common Noise Indicators
Squealing or grinding sounds when braking often point to worn rotors. A metallic scraping noise means the rotor surface is rough. Listen carefully during slow stops. Persistent noises signal rotor problems.
Vibration And Steering Feedback
Feel for vibrations in the brake pedal or steering wheel. Shaking during braking means the rotors may be warped. Steering pull to one side can also indicate rotor wear. These signs reduce control and require quick action.
Key Features Of Gm Front Brake Rotors
Identifying GM front brake rotors starts with knowing their key features. These features help you spot the right parts for your vehicle. Each rotor has specific traits that affect its performance and durability.
Understanding these traits makes maintenance and replacement easier. The material, size, and surface design all play important roles. These factors also impact how well your brakes work.
Material Types And Their Benefits
GM front brake rotors mainly use cast iron or composite materials. Cast iron is strong and handles heat well. It lasts longer and resists warping during heavy braking. Composite rotors mix materials to reduce weight. They improve fuel efficiency and reduce wear on other parts. Choosing the right material depends on driving habits and vehicle type.
Size And Thickness Specifications
Correct rotor size ensures proper fit and function. GM rotors have specific diameter and thickness measurements. The diameter matches the wheel size and caliper design. Thickness affects heat absorption and brake performance. Thinner rotors cool faster but wear out sooner. Always check the manufacturer’s specs to match your vehicle.
Surface Patterns And Coatings
Surface patterns include drilled holes or slots. These patterns help remove heat and brake dust. They improve braking under wet or heavy conditions. Some rotors have protective coatings to prevent rust. Coatings extend rotor life and keep performance steady. Choosing the right surface depends on your driving needs.
Tools Needed For Rotor Identification
Identifying GM front brake rotors requires the right tools. These tools help measure and check the rotor’s size and condition. Proper tools ensure accurate identification and better brake maintenance. Without them, you might misjudge the rotor type or size, leading to wrong replacements.
Using A Micrometer
A micrometer measures rotor thickness precisely. It shows if the rotor is still within safe limits. Place it on the rotor edge for the best reading. Micrometers are small but very accurate tools.
Brake Rotor Measuring Gauges
These gauges check rotor runout and thickness variation. They help find warping or uneven wear. Using a gauge gives a clear picture of rotor health. It is vital for smooth brake performance.
Other Helpful Tools
Basic tools like calipers and dial indicators assist rotor checks. Calipers measure diameter and height easily. Dial indicators detect rotor wobble during rotation. These tools support better rotor identification and brake safety.

Credit: www.ebay.com
Step-by-step Rotor Inspection Process
Inspecting GM front brake rotors helps ensure safe driving. This step-by-step process guides you through checking the rotors carefully. Follow these clear steps to spot any issues early. Proper inspection extends rotor life and improves brake performance.
Removing The Wheel And Caliper
Start by loosening the lug nuts on the wheel. Use a jack to lift the vehicle safely. Remove the wheel to expose the brake rotor. Next, unbolt the brake caliper carefully. Hang the caliper using a hook or rope to avoid stress on the brake line. This step frees the rotor for inspection.
Measuring Rotor Thickness
Use a micrometer or caliper tool to measure rotor thickness. Check the measurement against the manufacturer’s minimum thickness. If the rotor is thinner than the limit, it needs replacement. Measure at several points around the rotor for accuracy. Even small variations can affect braking.
Checking For Warping And Cracks
Look closely for any visible cracks on the rotor surface. Small cracks can grow and cause brake failure. Spin the rotor slowly to check for wobbling or warping. Warped rotors cause vibrations during braking. If you notice uneven surfaces or deep grooves, the rotor may need machining or replacement.
Comparing Oem Vs Aftermarket Rotors
Choosing the right front brake rotors for your GM vehicle matters a lot. OEM and aftermarket rotors serve the same purpose but differ in many ways. Comparing these two helps you decide what fits your needs best. Understanding the benefits and drawbacks can save money and improve safety.
Benefits Of Oem Rotors
OEM rotors come from the vehicle’s original manufacturer. They match the car’s exact specifications. This ensures proper fit and reliable performance. OEM parts often last longer due to strict quality control. They maintain the vehicle’s brake system balance well. Using OEM rotors can keep the warranty intact. These rotors work smoothly with other original parts.
Aftermarket Options And Quality
Aftermarket rotors come from various brands and factories. Quality varies widely between manufacturers. Some offer high-performance rotors designed for specific needs. Others produce budget-friendly options with basic features. Choosing well-known brands can reduce risks of poor quality. Check reviews and product details before buying. Aftermarket rotors may have different coatings or designs. These differences affect heat dissipation and wear rate.
Cost Vs Performance Considerations
OEM rotors tend to cost more than aftermarket ones. The price reflects their guaranteed fit and finish. Aftermarket rotors offer choices for different budgets. Cheaper rotors may wear out faster or cause noise. Higher-priced aftermarket options can match or exceed OEM performance. Consider how often you drive and the driving style. Performance needs affect which rotors provide better value. Spending a bit more can improve safety and comfort.
Maintenance Tips To Extend Rotor Life
Maintaining GM front brake rotors properly helps extend their life. Taking care of rotors saves money and ensures safe driving. Simple steps can reduce wear and avoid common problems. Focus on brake pads, bedding-in, and inspections to keep rotors working well.
Brake Pad Selection
Choose brake pads that match your rotor type. Using the wrong pads can cause damage. Look for pads made for GM vehicles or similar rotors. Avoid cheap pads that wear out quickly. Good pads help rotors last longer and perform better.
Proper Bedding-in Techniques
New rotors and pads need to be bedded in before full use. Bedding-in means breaking in the parts slowly. Drive gently and avoid hard braking for the first 200 miles. This process creates an even surface and reduces rotor warping. Proper bedding improves braking and rotor life.
Regular Inspection Intervals
Check rotors and pads regularly for damage or wear. Look for cracks, grooves, or rust on the rotor surface. Measure rotor thickness to see if it meets GM standards. Inspect brake pads for uneven wear. Replace parts promptly to avoid bigger problems and keep brakes safe.
Credit: lugnut4x4.com
Frequently Asked Questions
How Can I Tell If Gm Front Brake Rotors Are Worn?
Worn GM front brake rotors show grooves, cracks, or rust. You may also feel vibrations when braking, indicating rotor issues.
What Are The Signs Of Damaged Gm Front Brake Rotors?
Damaged GM front brake rotors cause squealing, grinding noises, and reduced braking efficiency. Visual inspection reveals uneven wear or warping.
How Do I Measure Gm Front Brake Rotor Thickness?
Use a micrometer to measure rotor thickness at multiple points. Compare measurements to GM’s minimum thickness specifications to ensure safety.
Can I Identify Gm Rotors By Part Numbers?
Yes, GM front brake rotors have part numbers stamped on them. Check the rotor edge or hub area for identification.
Conclusion
Identifying GM front brake rotors is easier than it seems. Check the rotor size, part numbers, and vehicle model. Look for visible markings on the rotor surface. Measure thickness and diameter with simple tools. Knowing these details helps find the right replacement parts.
Proper identification keeps your brakes safe and effective. Take your time and double-check information. This ensures your vehicle runs smoothly and stops well. Simple steps make a big difference in brake maintenance. Stay confident in handling your GM brake rotors.