
Have you ever wanted to give your car, laptop, or even furniture a fresh, new look without spending a fortune? Applying a vinyl wrap is a simple and cost-effective way to transform your belongings instantly.
But how do you apply vinyl wrap so it looks smooth and professional? If you’ve ever struggled with bubbles, wrinkles, or misaligned edges, this guide is for you. Keep reading, and you’ll discover easy steps and insider tips that will help you wrap like a pro, saving you time, money, and frustration.
Ready to make your surfaces stand out? Let’s dive in!
Credit: www.apexcustoms.com
Choosing The Right Vinyl
Choosing the right vinyl is a key step in applying a vinyl wrap. The vinyl you pick affects how the wrap looks and lasts. It also makes the application process easier or harder. Knowing the different types, colors, and quality factors helps you make the best choice.
Types Of Vinyl Wraps
There are many types of vinyl wraps. Cast vinyl is thin and flexible. It molds well around curves and lasts long. Calendered vinyl is thicker and less flexible. It is cheaper but better for flat surfaces. Some vinyl has air-release technology. It helps avoid bubbles during application. Choose a type that fits your project shape and budget.
Selecting Colors And Finishes
Vinyl wraps come in many colors and finishes. Matte finishes give a flat, smooth look. Glossy finishes shine and reflect light. Satin finishes are between matte and glossy. Metallic and chrome wraps add a shiny metal look. Pick colors that match your style or brand. Think about how the finish affects the final look.
Quality And Durability Factors
Good quality vinyl lasts longer and resists damage. Look for vinyl with UV protection to avoid fading. Waterproof and scratch-resistant vinyl holds up well outside. Thicker vinyl wraps usually last longer but can be harder to apply. Check reviews and brand reputation before buying. High-quality vinyl saves money by lasting longer.
Preparing The Surface
Preparing the surface is the first and most important step for applying a vinyl wrap. A clean and smooth surface helps the vinyl stick better. Dirt, grease, and old materials can cause bubbles and peeling. Taking time to prepare ensures a long-lasting wrap.
Cleaning And Degreasing
Start by washing the surface with soap and water. Remove all dirt and dust. Next, use a degreaser to get rid of oils and grease. These substances stop the vinyl from sticking well. Wipe the area with a clean cloth until it is dry and shiny.
Removing Old Wraps And Decals
Old wraps or decals must be removed before applying new vinyl. Peel them off slowly to avoid damage. Use a heat gun or hairdryer to soften the adhesive. This makes removal easier. Clean any leftover glue with adhesive remover. This step prevents bumps under the new wrap.
Fixing Surface Imperfections
Check for scratches, dents, or rust on the surface. Small damages can cause the vinyl to bubble or tear. Use sandpaper to smooth rough spots. Fill dents with body filler and let it dry. Sand the filler until flat. A smooth surface makes the wrap look perfect and last longer.
Essential Tools And Materials
Applying vinyl wrap needs specific tools and materials. These help you get smooth, clean results. Using the right tools makes the job easier and faster. It also protects your wrap from damage. Below are the essential tools for a successful vinyl wrap application.
Squeegees And Heat Guns
Squeegees push air bubbles out from under the vinyl. They help the wrap stick firmly to the surface. Use soft or felt-edged squeegees to avoid scratching. Heat guns warm the vinyl, making it flexible. Warm vinyl stretches easily around curves and corners. Heat also activates the adhesive for better bonding.
Cutting Tools And Tape
Sharp cutting tools trim excess vinyl cleanly. A utility knife or craft knife works well. Replace blades often for precise cuts. Masking tape holds vinyl in place before final application. It also helps mark areas for cutting. Use tape to create straight lines and guides.
Safety Gear And Work Area Setup
Wear gloves to protect your hands from cuts and heat. Safety glasses shield your eyes from flying debris. Set up a clean, flat workspace with good lighting. Avoid dust and dirt to keep the wrap clean. A tidy area helps you work faster and better.
Applying The Vinyl Wrap
Applying vinyl wrap takes patience and the right steps. It helps protect surfaces and changes how things look. The process requires careful work to avoid bubbles and wrinkles. Follow each step carefully for best results.
Measuring And Cutting The Vinyl
Start by measuring the surface you want to cover. Use a tape measure for accuracy. Add a few extra inches to your measurement. This extra space helps during application. Cut the vinyl with a sharp blade or scissors. Cut slowly to keep straight edges.
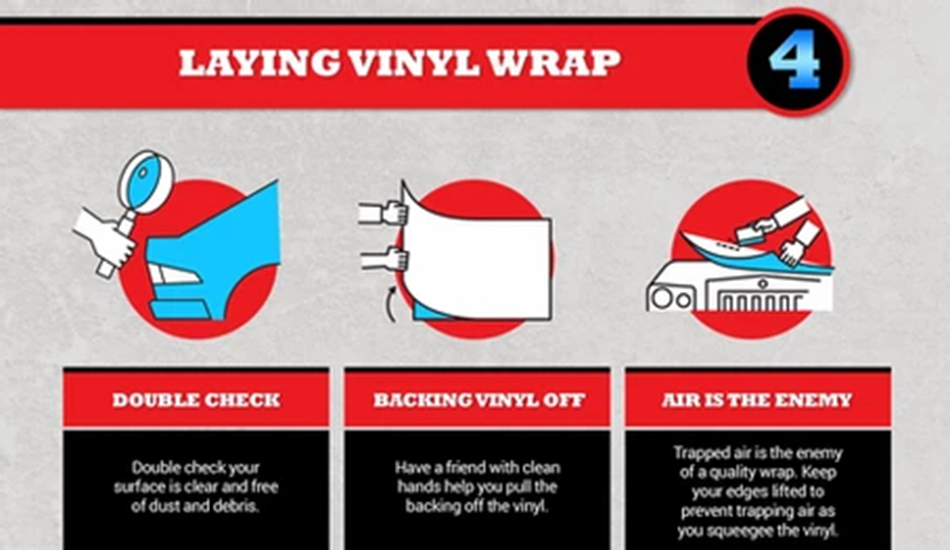
Positioning And Aligning The Wrap
Lay the vinyl on the surface without removing the backing. Move it around to find the best position. Check that edges line up with the surface edges. Use small pieces of tape to hold the vinyl in place. Adjust the position until it looks right.
Handling Curves And Edges
Vinyl can be tricky on curves and edges. Stretch the vinyl gently over rounded areas. Avoid pulling too hard to prevent tears. Use a squeegee to smooth the vinyl around edges. Work slowly to keep the wrap even and tight.
Using Heat For Stretching And Adhering
A heat gun helps stretch vinyl on difficult areas. Warm the vinyl slightly to make it flexible. Do not overheat, or the vinyl can melt. Use heat to press vinyl into corners and curves. Heat also helps the adhesive stick better to surfaces.
Avoiding Common Mistakes
Applying vinyl wrap can be tricky for beginners. Mistakes happen and can ruin the look. Knowing common errors helps you avoid them. This saves time and money. Follow simple steps to get smooth, clean results.
Preventing Bubbles And Wrinkles
Bubbles and wrinkles spoil the smooth finish. Work slowly to press the vinyl down. Use a squeegee to push air out. Start from the center and move outward. Heat the vinyl slightly to make it flexible. Avoid stretching the wrap too much. Take breaks to smooth out any bumps.
Dealing With Dust And Debris
Dust and dirt cause bumps under the vinyl. Clean the surface well before applying. Use a cloth and mild cleaner. Avoid applying wrap in windy or dusty places. Check the area for small particles. Remove any dust with a sticky tape or cloth. Clean hands help keep the vinyl clean too.
Correcting Misalignment
Misalignment makes the wrap look sloppy. Measure carefully before placing the vinyl. Peel back a little at a time. Align edges with the surface lines. Adjust the vinyl gently if it shifts. Avoid pulling hard, which can stretch the film. Use light pressure to fix small mistakes. Patience prevents big alignment errors.
Finishing Touches
The final stage of applying a vinyl wrap is crucial. It shapes the look and durability of your wrap. Finishing touches make your work neat and long-lasting.
These steps help the vinyl stay strong and smooth. They prevent peeling and damage over time. Attention to detail here is key.
Trimming Excess Vinyl
Cut off extra vinyl carefully. Use a sharp blade for clean edges. Work slowly to avoid cutting the surface below.
Trim close to the edges but leave a little margin. This margin helps with sealing edges later. Be patient and precise.
Sealing Edges
Seal all edges to stop dirt and water from getting under. Use a heat gun or warm air to soften the vinyl edges. Press edges down firmly with a squeegee or your fingers.
Check every corner and curve. Proper sealing keeps the wrap tight and prevents peeling. This step improves the wrap’s lifespan.
Curing And Maintenance Tips
Let the vinyl cure for at least 24 hours. Avoid washing your vehicle during this time. Heat and pressure help the vinyl stick well.
Clean the wrap with mild soap and water. Avoid harsh chemicals or abrasive cloths. Regular care keeps the vinyl looking fresh and strong.
Troubleshooting Issues
Applying vinyl wrap is a precise job. Sometimes, small problems appear after application. These issues can affect the look and durability of the wrap. Knowing how to fix them helps keep the wrap fresh and smooth. Below are common problems and easy ways to solve them.
Fixing Air Bubbles Post-application
Air bubbles often form under the vinyl after application. They make the surface uneven and ugly. Use a pin to gently prick the bubble. Then, press the air out with a squeegee or cloth. Work from the center toward the edges. This method prevents damage and smooths the vinyl quickly.
Repairing Tears And Peeling
Tears can happen if the vinyl stretches too much or hits a sharp edge. Small tears can be fixed with vinyl adhesive. Apply a thin layer under the torn part and press it down firmly. For peeling edges, heat the area slightly with a heat gun. Press the edge back and hold it until it sticks well.
When To Seek Professional Help
Some problems need expert skills. Large bubbles, deep tears, or poor adhesion might need a pro. A professional can remove the wrap without damage and reapply it correctly. If fixes do not work or the wrap looks bad, it is time to get help. This saves time and avoids more damage.

Credit: www.wikihow.com

Credit: www.wikihow.com
Frequently Asked Questions
How Do You Prepare The Surface For Vinyl Wrap?
Clean the surface thoroughly using soap and water. Remove all dirt, grease, and wax. Dry it completely to ensure proper adhesion of the vinyl wrap.
What Tools Do You Need To Apply Vinyl Wrap?
You need a squeegee, heat gun, utility knife, and microfiber cloth. These tools help smooth out bubbles and cut excess vinyl precisely.
Can Vinyl Wrap Be Applied On Curved Surfaces?
Yes, vinyl wrap can be applied on curves. Use a heat gun to soften the vinyl, allowing it to stretch and conform smoothly.
How Long Does It Take To Apply A Vinyl Wrap?
Applying a vinyl wrap usually takes 1 to 4 hours. The time depends on the surface size and your experience level.
Conclusion
Applying vinyl wrap takes patience and care for the best results. Clean and prepare the surface well before starting. Use a squeegee to smooth out air bubbles as you go. Work slowly and check your progress often. Small mistakes can be fixed with heat and gentle pressure.
With practice, you will improve each time. Vinyl wrap can change the look of your car or items easily. Follow these simple steps, and enjoy your new style. It’s a fun and affordable way to refresh surfaces at home.


