
Are you unsure if your brake rotors are in good shape? Knowing how to measure brake rotors can save you money and keep your car running safely.
If you skip this step, you might miss signs of wear that could lead to costly repairs or even dangerous driving conditions. You’ll learn simple and effective ways to check your brake rotors yourself. By the end, you’ll feel confident spotting problems early and making smart decisions about your brakes.
Keep reading to protect your ride and your peace of mind.
Credit: www.buybrakes.com
Tools Needed
Measuring brake rotors requires specific tools to ensure accuracy and safety. These tools help check thickness, runout, and wear. Using the right equipment makes the process easier and more precise. Below are the main tools needed for measuring brake rotors.
Calipers And Micrometers
Calipers and micrometers measure the thickness of brake rotors. Calipers are easy to use and provide quick measurements. Micrometers offer higher accuracy for detailed checks. Both tools help detect if the rotor is too thin or worn out. Regular thickness checks prevent brake failure and maintain vehicle safety.
Dial Indicators
Dial indicators measure rotor runout or warping. This tool shows how much the rotor surface moves when it spins. Excessive runout causes brake vibration and noise. Using a dial indicator helps find uneven surfaces early. Accurate runout measurement ensures smooth braking and longer rotor life.
Brake Rotor Specifications
Brake rotor specifications provide standard thickness and runout limits. These specs come from the vehicle or rotor manufacturer. Knowing these numbers helps decide if the rotor needs replacement or resurfacing. Always compare measurements with specs to keep brakes safe. Following specifications prevents brake problems and ensures proper performance.
Credit: www.import-car.com
Preparing The Rotor
Preparing the rotor is a crucial step before measuring its thickness. A clean and properly removed rotor ensures accurate results. Dirt, rust, or debris can cause false readings. Proper preparation helps you identify any wear or damage clearly.
Cleaning The Surface
Start by wiping the rotor surface with a clean cloth. Use a brake cleaner spray to remove grease and dirt. Avoid using water, as it can cause rust. Make sure the rotor is dry before measuring. Clean surfaces give you precise measurements.
Removing The Rotor
First, lift the vehicle safely using a jack and secure it with stands. Remove the wheel to access the rotor. Loosen and remove the caliper bolts carefully. Slide the caliper off without stressing the brake line. Take off any retaining screws holding the rotor. Pull the rotor straight off the hub. If stuck, tap gently with a rubber mallet. Removing the rotor correctly prevents damage and ensures proper measurement.
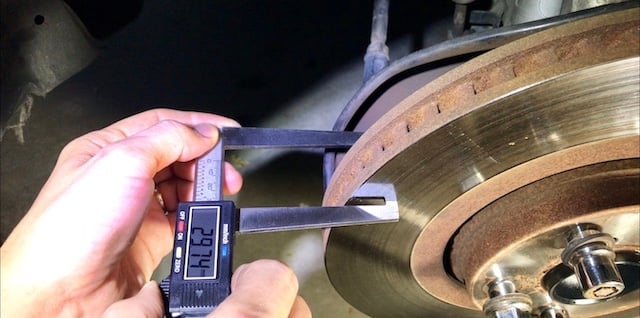
Measuring Rotor Thickness
Measuring rotor thickness is key to checking brake rotor health. It helps spot wear and decide when to replace the rotor. Proper thickness keeps braking safe and effective. Use the right tools and methods to get accurate readings.
Selecting Measurement Points
Choose points near the rotor’s edge and center. Avoid areas with rust or dirt. Measure on the friction surface where brake pads touch. This ensures you check the part that wears down most. Use a clean cloth to wipe the surface before measuring.
Recording Multiple Measurements
Take at least three measurements around the rotor. This finds uneven wear or warping. Write down each thickness reading carefully. Compare the numbers to the manufacturer’s minimum thickness. Replace the rotor if any measurement falls below the limit.

Credit: alconkits.com
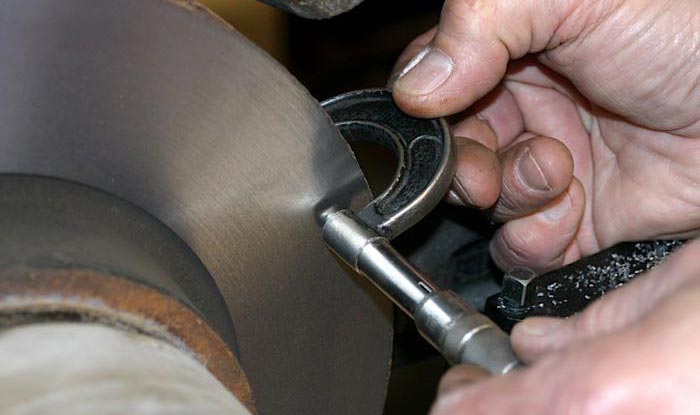
Checking Rotor Runout
Checking rotor runout is a key step in measuring brake rotors. It shows if the rotor surface is uneven or warped. Uneven rotors cause brake vibration and noise. Measuring runout helps find rotor problems early. This process uses a dial indicator tool. It gives precise readings of rotor movement. Follow clear steps to set up and read the dial indicator.
Setting Up The Dial Indicator
First, attach the dial indicator to a stable base. Position the tip of the indicator on the rotor surface. Place it near the outer edge of the rotor. Rotate the rotor slowly by hand. Watch the dial needle move as the rotor turns. Make sure the dial indicator stays steady. Avoid any movement of the base during measurement. Zero the dial indicator before starting. This sets a reference point for accurate results.
Interpreting Runout Results
Check the dial indicator’s highest and lowest readings. The difference between these shows the runout amount. Small runout values usually mean the rotor is fine. Large runout means the rotor is warped or damaged. Each vehicle has a runout limit in the manual. Compare your reading to this limit. If runout is above the limit, the rotor needs attention. Either resurface or replace the rotor for safe braking.
Comparing Measurements To Limits
Comparing measurements to limits is a key step in checking brake rotors. It tells you if the rotor is safe to use or needs replacement. You measure the rotor thickness and then compare it to the allowed limits. This ensures the braking system works well and keeps you safe on the road.
Manufacturer Specifications
Every brake rotor has a minimum thickness set by the maker. This number shows how thin the rotor can get before it becomes unsafe. You can find these specs in the car’s manual or on the rotor itself. Measuring the rotor thickness with a micrometer or caliper helps you see if it meets these specs. Staying above this limit keeps the brakes effective and prevents damage.
Signs Of Excessive Wear
Rotors that are too thin often show signs of wear. You might see deep grooves, cracks, or rust on the surface. The brake pedal could feel soft or the car might pull to one side when braking. These signs mean the rotor is past its safe limit. Checking the thickness confirms if the rotor needs to be replaced before it causes problems.
Common Mistakes To Avoid
Measuring brake rotors correctly is key to safe driving. Many people make errors that cause wrong readings. These mistakes can lead to poor brake performance and extra costs. Avoid these common errors to get accurate measurements and keep your brakes reliable.
Inaccurate Tool Calibration
Using uncalibrated tools gives false measurements. Always check your micrometer or caliper for accuracy. Tools can lose precision over time or after heavy use. Calibrate regularly or use a trusted measuring device. This step saves time and prevents wrong rotor assessments.
Ignoring Surface Damage
Surface damage affects measurement accuracy. Look for grooves, rust, or warping before measuring. These flaws change the rotor thickness and shape. Clean the rotor and examine it carefully. Measuring over damage leads to incorrect thickness values. Address surface issues first for better results.
Tips For Reliable Results
Getting reliable results when measuring brake rotors is important for safety and performance. Small errors can lead to wrong decisions about rotor replacement or repair. Simple habits help keep your measurements accurate and consistent.
Following a good routine reduces mistakes and improves trust in your work. Focus on clear steps and proper care of your tools. These tips will help you get the best results every time.
Consistent Measurement Technique
Always measure the same spot on the rotor. Choose a flat, clean area free of rust or dirt. Hold your tool steady and avoid tilting it. Use the same tool for all measurements to keep results uniform. Repeat the measurement a few times to check for consistency. Note the smallest number to ensure accuracy.
Regular Tool Maintenance
Keep your measuring tools clean and free from damage. Wipe them after each use to remove dust and grease. Check for wear or loose parts regularly. Calibrate your tools often according to the manufacturer’s instructions. Well-maintained tools provide precise and reliable measurements every time.
Frequently Asked Questions
How Do You Check Brake Rotor Thickness?
Use a micrometer to measure the rotor’s thickness at multiple points. Compare readings to manufacturer specifications. If thickness is below minimum, replace the rotor.
What Tools Are Needed To Measure Brake Rotors?
A digital or dial micrometer is essential for accurate rotor thickness measurement. Calipers can help for diameter checks. No complex tools are required.
When Should Brake Rotors Be Measured?
Measure rotors during routine brake inspections or if you notice vibrations while braking. Regular checks prevent brake failure and ensure safety.
Can Worn Brake Rotors Cause Braking Issues?
Yes, thin or warped rotors reduce braking efficiency, causing noise, vibration, or longer stopping distances. Measuring thickness helps diagnose such problems.
Conclusion
Measuring brake rotors helps keep your vehicle safe. Check rotor thickness with a micrometer or caliper. Compare measurements to the manufacturer’s limits. Replace rotors if they are too thin or uneven. Regular checks prevent brake problems and costly repairs. Simple steps protect you and your passengers.
Stay alert and maintain your brakes well. Safe driving starts with good brake care.


