Thinking about giving your car a fresh new look with a vinyl wrap? You might wonder, how hard is it to vinyl wrap your car yourself?
It sounds like a cool idea — saving money, customizing your ride exactly how you want it, and turning heads wherever you go. But before you jump in, it’s important to know what you’re really getting into. Is it something you can handle on your own, or will it test your patience and skills?
Stick around, and I’ll break down what it takes, so you can decide if vinyl wrapping your car is a fun DIY project or better left to the pros.
Choosing The Right Vinyl
Choosing the right vinyl is the first step in wrapping your car. The type and quality of vinyl affect the look and lifespan of the wrap. Picking the best vinyl helps the wrap stick well and last long. Understanding your options makes the process easier and more successful.
Types Of Vinyl Wraps
Cast vinyl is popular for car wraps. It is thin, flexible, and molds easily to curves. This type lasts longer and resists cracking better.
Calendered vinyl is thicker and less flexible. It suits flat surfaces more than curved ones. This vinyl is cheaper but may not last as long.
Choosing between cast and calendered vinyl depends on your car’s shape and budget.
Color And Finish Options
Vinyl wraps come in many colors. You can pick bright, dark, or neutral tones. Custom colors are also available.
Finishes vary too. Glossy vinyl gives a shiny look. Matte vinyl offers a flat, smooth surface.
Other finishes include satin and textured styles. They add unique effects to your car’s appearance.
Quality And Durability Factors
High-quality vinyl lasts longer and resists damage better. Cheaper vinyl may peel or fade quickly.
Look for vinyl with UV protection. It prevents colors from fading in sunlight.
Good vinyl also sticks strongly but peels off cleanly. This protects your car’s original paint.
Durability depends on the vinyl brand, type, and installation quality.
Credit: www.tintingchicago.com
Tools You’ll Need
Vinyl wrapping a car needs the right tools to go smoothly. Using proper tools helps avoid mistakes and saves time. It also makes the job easier and gives a cleaner finish.
Some tools are a must-have for every wrap job. Others help improve the process but are not required. Knowing which tools to get helps you prepare well.
Essential Tools List
- Vinyl wrap film – the main material to cover the car
- Heat gun – softens the vinyl to stretch and stick
- Squeegee with felt edge – removes air bubbles and smooths vinyl
- Sharp utility knife – cuts vinyl cleanly without damage
- Measuring tape – measures car parts and vinyl pieces
- Gloves – protect hands and keep vinyl clean
- Cleaning solution and microfiber cloth – prepare surface for wrapping
Optional Accessories
- Magnets – hold vinyl in place during application
- Surface primer – helps vinyl stick on tricky areas
- Plastic scraper – smooths edges without scratching paint
- Infrared thermometer – checks surface temperature for best adhesion
- Masking tape – protects trim and paint during cutting
Where To Buy Supplies
Vinyl wrap films and tools are sold online and in stores. Specialty auto shops often have quality vinyl and tools. Websites like Amazon and eBay offer a wide range. Buying from trusted brands ensures better results. Check reviews before purchasing to avoid poor quality products.
Preparing Your Car
Preparing your car is the first and most important step in vinyl wrapping. It helps the vinyl stick well and last longer. A smooth, clean surface makes the wrap look neat and professional. Taking time here saves effort later.
Cleaning And Surface Prep
Start by washing your car thoroughly. Dirt and dust prevent vinyl from sticking. Use soap and water, then dry the surface completely. After washing, wipe the car with rubbing alcohol. This removes oils and grease that soap misses. Avoid wax or polish before wrapping. These can stop the vinyl from adhering properly.
Removing Obstacles
Remove parts like mirrors, badges, and trims if possible. These pieces create bumps under the vinyl. Taking them off gives a smooth surface to work on. Use the right tools to avoid damage. Keep all screws and parts safe for reassembly. Small obstacles can cause wrinkles or bubbles in the wrap.
Handling Paint Imperfections
Vinyl wraps highlight scratches and dents. Fix deep scratches or chips before wrapping. Sand small rough spots to smooth the surface. A clean, even base helps the wrap look perfect. Avoid wrapping over loose paint or rust. These areas cause the vinyl to peel quickly. Proper repair ensures a better finish and longer life.
Step-by-step Wrapping Process
Wrapping a car with vinyl takes patience and care. The process has clear steps. Each step matters to get a smooth, lasting finish. Understanding these steps helps reduce mistakes and frustration.
Start by preparing your space and materials. Clean the car surface well. Dust, dirt, and grease can stop the vinyl from sticking.
Measuring And Cutting Vinyl
Measure each car panel carefully. Add a few extra inches to your measurements. This gives room to adjust the vinyl during application. Cut the vinyl sheets based on your measurements. Use a sharp knife or scissors for clean edges.
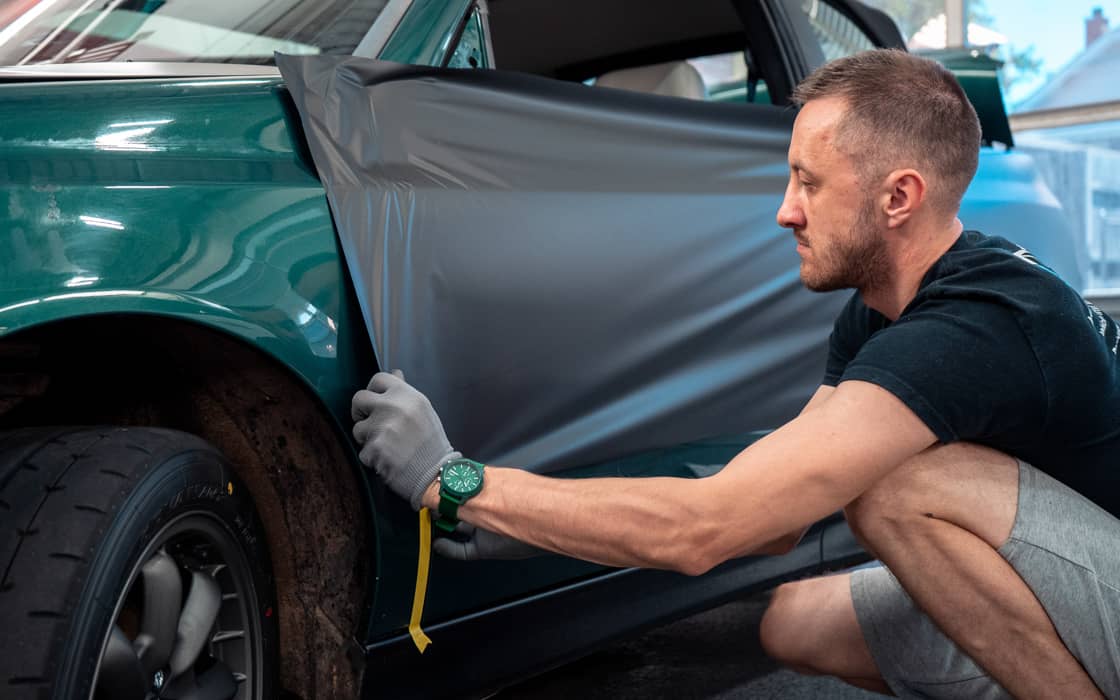
Applying The Vinyl Smoothly
Peel back a small part of the vinyl backing. Stick the vinyl gently onto the car surface. Use a squeegee or soft cloth to smooth out air bubbles. Work slowly from the center outwards. Check often to avoid wrinkles or folds.
Dealing With Curves And Edges
Heat the vinyl slightly with a heat gun or hair dryer. This makes the vinyl more flexible. Stretch it carefully over curves and edges. Press the vinyl firmly to fit the shape. Avoid overstretching to prevent damage or tears.
Trimming And Finishing Touches
Trim excess vinyl along edges with a sharp blade. Cut close but do not damage the car paint. Press edges down firmly to seal them. Use heat again for a tight fit. Check for any remaining bubbles or loose parts.
Common Challenges
Vinyl wrapping a car is a popular way to change its look. Many people try it themselves. Yet, the process is not simple. There are common challenges that can make wrapping hard. Knowing these challenges helps prepare for them.
Air Bubbles And Wrinkles
Air bubbles often appear under the vinyl film. They create bumps that look bad. Wrinkles can form if the vinyl is stretched too much. Both problems happen easily. Careful smoothing and heating help reduce these issues.
Temperature And Weather Issues
Temperature plays a big role in vinyl wrapping. Too cold, and the vinyl becomes stiff. Too hot, and it gets too soft. Both affect how the vinyl sticks to the car. Wrapping in dry weather is best. Rain or humidity can cause problems.
Fixing Mistakes
Mistakes happen during wrapping. Removing vinyl without damage is tricky. Small tears or dust under the film can spoil the look. Fixing these takes time and patience. Sometimes, parts must be redone for a clean finish.

Credit: www.turtlewax.com
Time And Cost Expectations
Understanding the time and cost involved in vinyl wrapping your car helps set clear expectations. It is a task that demands patience and budget planning. The process varies greatly depending on the car’s size, the wrap quality, and whether you do it yourself or hire a professional.
How Long It Takes
Vinyl wrapping a car usually takes between one and three days. Smaller cars might only need a day or two. Larger vehicles with complex curves require more time. Professionals often finish faster because of their experience. DIY projects might take longer due to learning and mistakes.
Budget Breakdown
The cost depends on materials, labor, and car size. Vinyl film prices range from $2 to $5 per square foot. High-quality film costs more but lasts longer. Labor fees vary widely, often between $1,500 and $3,000. Extra costs include tools and surface preparation. Keep in mind, some jobs need paint correction before wrapping.
Diy Vs Professional Costs
Doing it yourself can save money but requires skill and time. You pay mainly for the vinyl wrap and tools. Mistakes can add unexpected expenses. Hiring a professional ensures a clean, durable finish. Professionals offer warranties and handle all details. The choice depends on your budget, skill, and patience.
Maintaining Your Vinyl Wrap
Maintaining your vinyl wrap keeps it looking fresh and new. Proper care can extend its life and save money on repairs. Simple steps protect the wrap from dirt, scratches, and fading. Focus on cleaning, avoiding damage, and knowing when to rewrap.
Cleaning Tips
Use a soft cloth or sponge to clean the wrap. Wash with mild soap and water only. Avoid harsh chemicals or abrasive brushes. Rinse thoroughly to remove all soap. Dry with a clean, soft towel to prevent water spots. Clean your wrap regularly to stop dirt build-up.
Avoiding Damage
Park in shaded areas to reduce sun exposure. Avoid scraping ice or snow with hard tools. Do not use pressure washers too close or with high force. Be careful when opening doors near walls or objects. Small scratches can turn into big problems over time. Handle your wrap gently to keep it intact.
When To Rewrap
Look for peeling edges or bubbles under the wrap. Fading colors or cracks show wear and tear. Damage from accidents or weather may need rewrapping. If cleaning no longer restores the look, consider a new wrap. Rewrapping keeps your car looking sharp and well cared for.

Credit: www.youtube.com
Frequently Asked Questions
How Difficult Is It To Vinyl Wrap A Car Yourself?
Vinyl wrapping a car yourself can be moderately challenging. It requires patience, precision, and some skill. Beginners may struggle with bubbles and alignment. Proper tools and a clean workspace help. Watching tutorials and practicing on smaller surfaces is recommended before a full wrap.
What Tools Do I Need For Vinyl Car Wrapping?
Essential tools include a squeegee, heat gun, utility knife, and microfiber cloth. These help smooth the vinyl and remove air bubbles. A surface cleaner is also important for prepping the car. Having the right tools ensures a professional-looking finish and reduces mistakes.
How Long Does A Vinyl Wrap Take To Complete?
A full car vinyl wrap typically takes 1 to 3 days. Time depends on car size, complexity, and installer experience. Proper surface preparation and careful application extend the process but improve results. Rushing can cause imperfections and reduce wrap durability.
Can Vinyl Wraps Damage My Car’s Paint?
Vinyl wraps usually do not damage paint if applied and removed properly. They act as a protective layer against minor scratches and UV rays. However, poor installation or removal may cause paint peeling, especially on old or damaged paint surfaces.
Conclusion
Vinyl wrapping a car takes patience and some skill. It is not a quick or easy task. Small bubbles and wrinkles can appear if done too fast. Practice helps improve your technique over time. Watching tutorials and preparing your car well makes a big difference.
It can save money compared to a full paint job. Still, it needs careful work to look good. Consider your comfort level before starting. Vinyl wrap can change your car’s look with effort and care.