Are you ready to take your car washing routine to the next level? Knowing how to assemble a foam cannon can make your cleaning faster, easier, and more effective.
Imagine covering your vehicle with thick, rich foam that loosens dirt and grime effortlessly. In this guide, you’ll learn simple steps to put your foam cannon together quickly, so you can start enjoying a spotless shine without any hassle. Keep reading, and you’ll be amazed at how easy it is to get professional-quality results right at home.
Credit: www.drbeasleys.com
Choosing The Right Foam Cannon
Choosing the right foam cannon is important for a good car wash. The right foam cannon helps apply soap evenly. It saves water and time. Picking the correct one makes your cleaning easy and effective.
Types Of Foam Cannons
Foam cannons come in different types. Some use air to create thick foam. Others mix soap and water with high pressure. There are electric foam cannons for small jobs. Manual ones suit simple cleaning tasks. Choose based on how often you wash and the job size.
Key Features To Consider
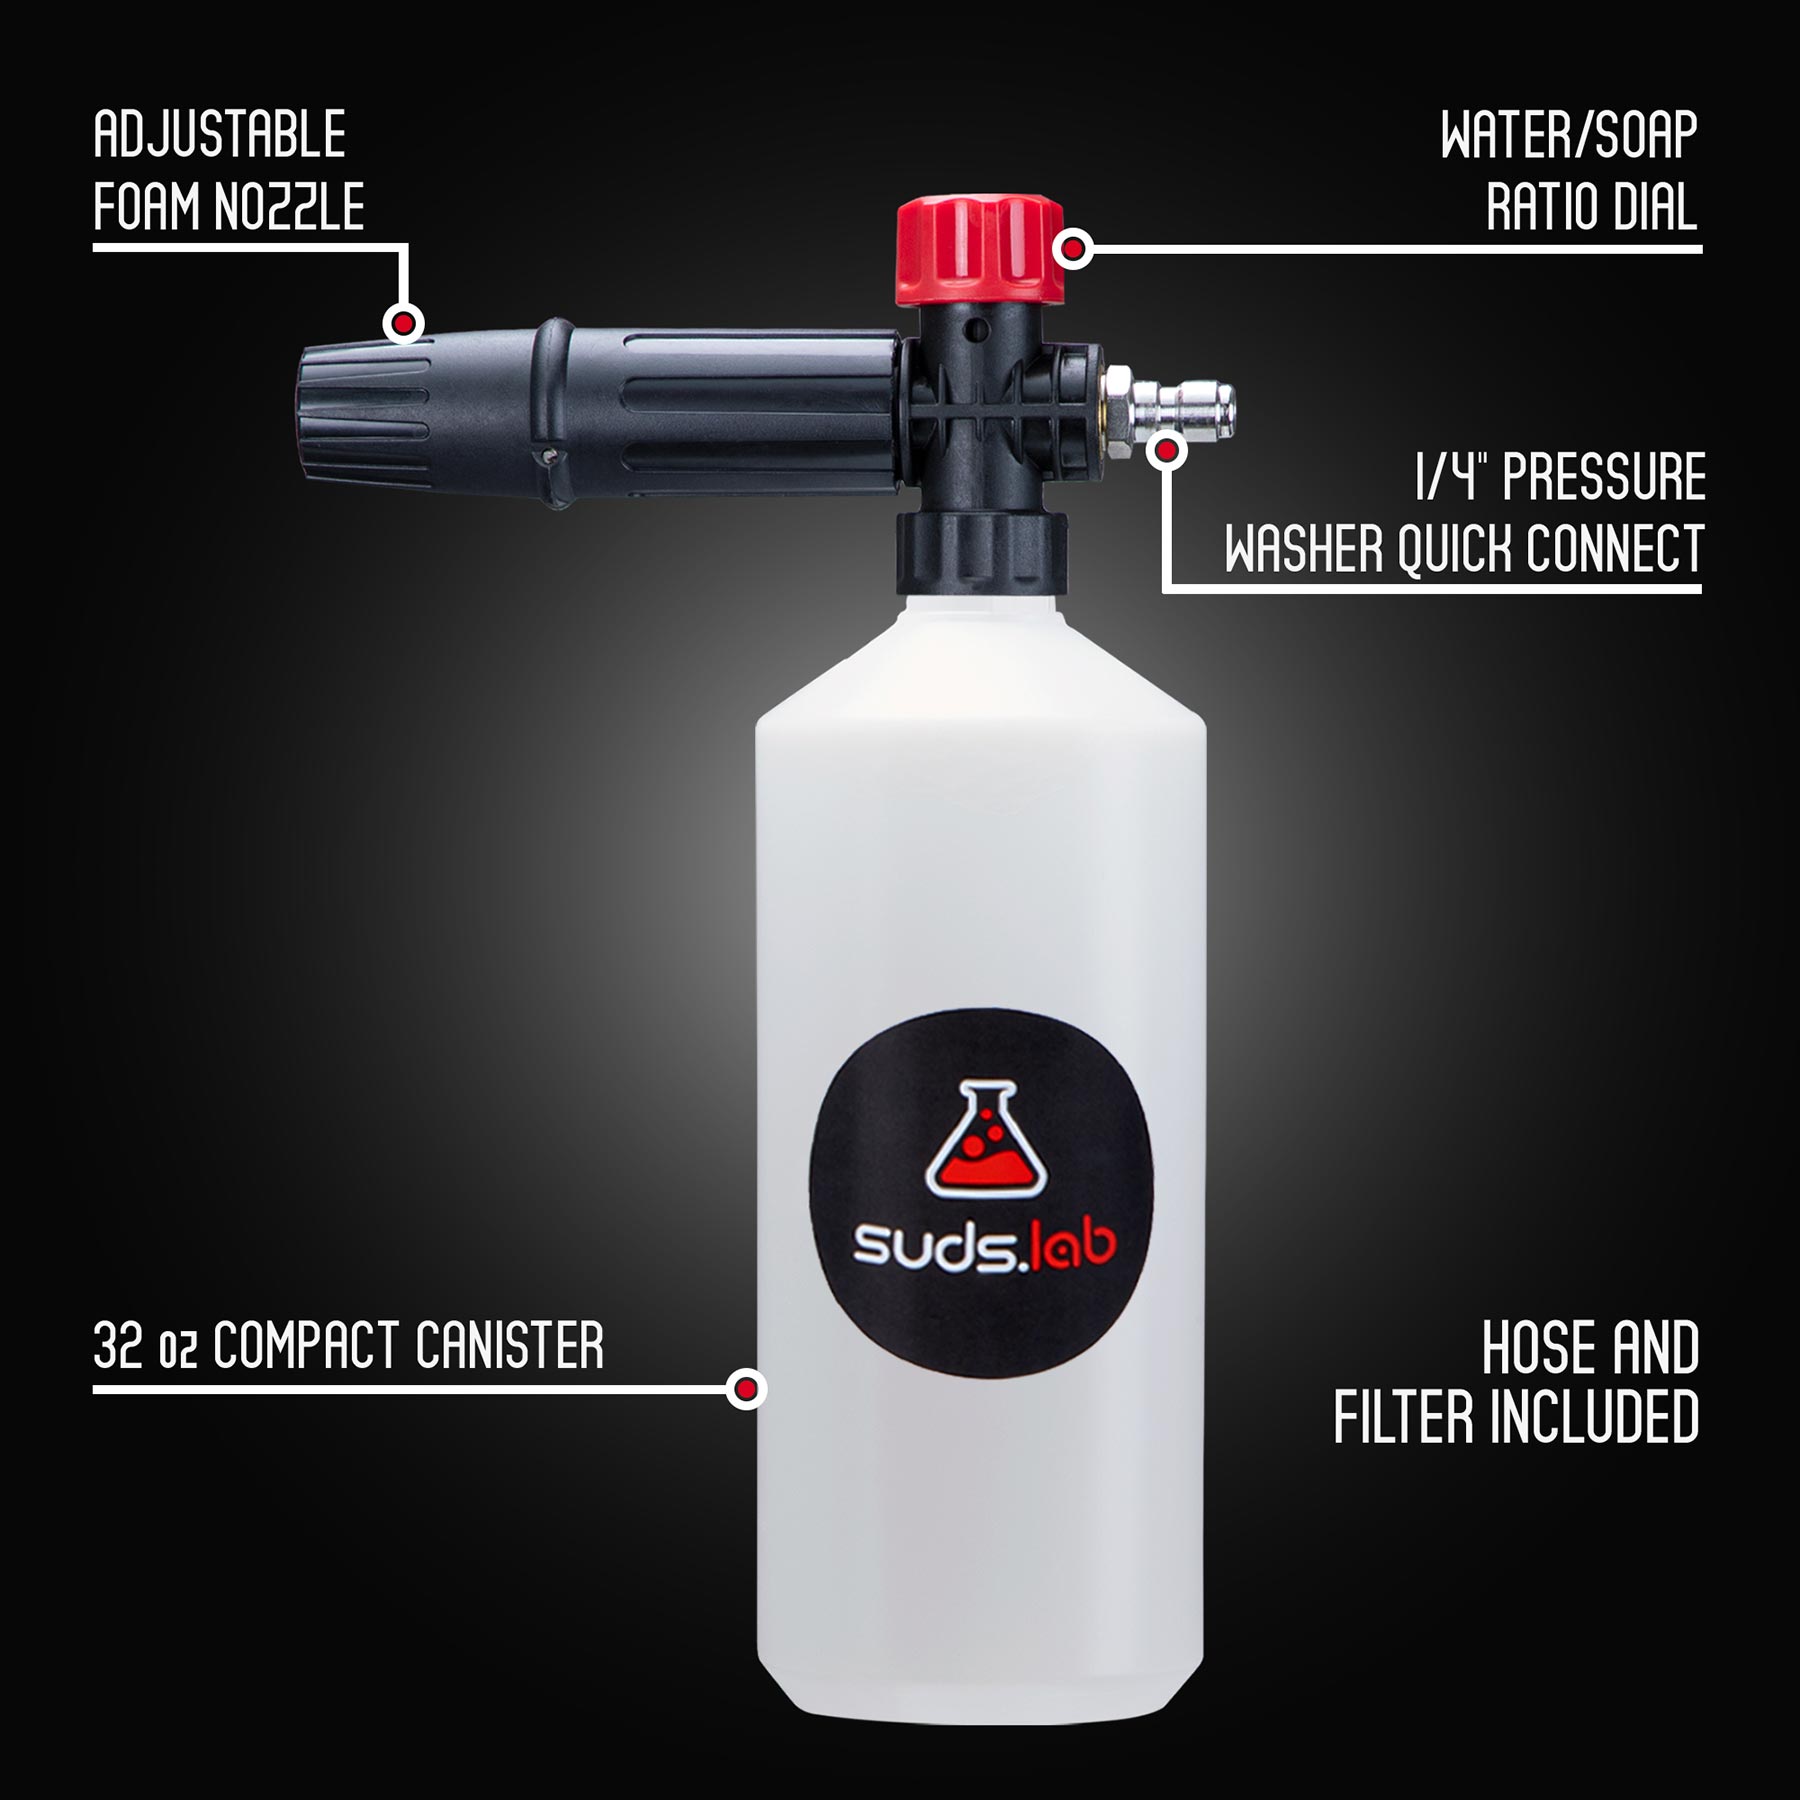
Check the nozzle type. Adjustable nozzles allow control of foam thickness. Look for a large soap tank to reduce refills. Durable materials like metal last longer than plastic. Easy to clean foam cannons save time. Lightweight models are easier to handle.
Compatibility With Pressure Washers
Ensure the foam cannon fits your pressure washer. Match the connection size and type. Some foam cannons work only with certain brands. Check the pressure range before buying. Using an incompatible foam cannon can reduce cleaning power. Proper fit ensures safe and effective use.
Gathering Necessary Tools And Supplies
Gathering the right tools and supplies is the first step to assemble a foam cannon. Having everything ready makes the process quick and smooth. It also ensures safety and better results. This section covers the essential tools, cleaning solutions, and safety gear needed.
Essential Tools
Start with the foam cannon itself. Check that it fits your pressure washer. You need a wrench to tighten connections. A funnel helps pour liquids without spilling. Keep a bucket nearby for mixing solutions. Have a clean cloth for wiping parts. These tools make assembly easy and safe.
Recommended Cleaning Solutions
Use soap designed for foam cannons. Car wash soap is a good choice. Avoid harsh chemicals that damage surfaces. Mix soap with water according to instructions. Some solutions create thick foam for better cleaning. Choose a product that suits your needs and budget.
Safety Gear
Wear safety glasses to protect your eyes. Gloves keep your hands safe from chemicals. Use old clothes or a waterproof apron. This prevents stains and irritation. Good ventilation is important if working indoors. Safety gear protects you during assembly and use.
Preparing The Foam Cannon Components
Preparing the foam cannon parts is the first step to a smooth assembly. It ensures the device works well and lasts longer. Take time to check each component carefully. Clean parts help the foam cannon spray better and avoid clogs.
Follow these simple steps to prepare your foam cannon. This makes the assembly easier and more effective.
Inspecting Parts For Damage
Start by checking every part for cracks or breaks. Look at the bottle, nozzle, and spray gun closely. Damaged parts can cause leaks or poor spraying. Replace any broken pieces before you begin assembly. This saves time and frustration later.
Cleaning Nozzles And Bottles
Rinse the bottle with warm water to remove dust and dirt. Use a soft brush to clean the nozzle gently. Clear nozzles ensure the foam sprays evenly. Dirty parts can block the flow and reduce pressure. Let all parts dry completely before assembling.
Assembling The Spray Gun
Attach the nozzle to the spray gun tightly but without forcing it. Screw the bottle onto the spray gun firmly. Check that all connections are secure and sealed. Loose parts may leak or fall off during use. Test the spray gun by pressing the trigger lightly before adding soap.
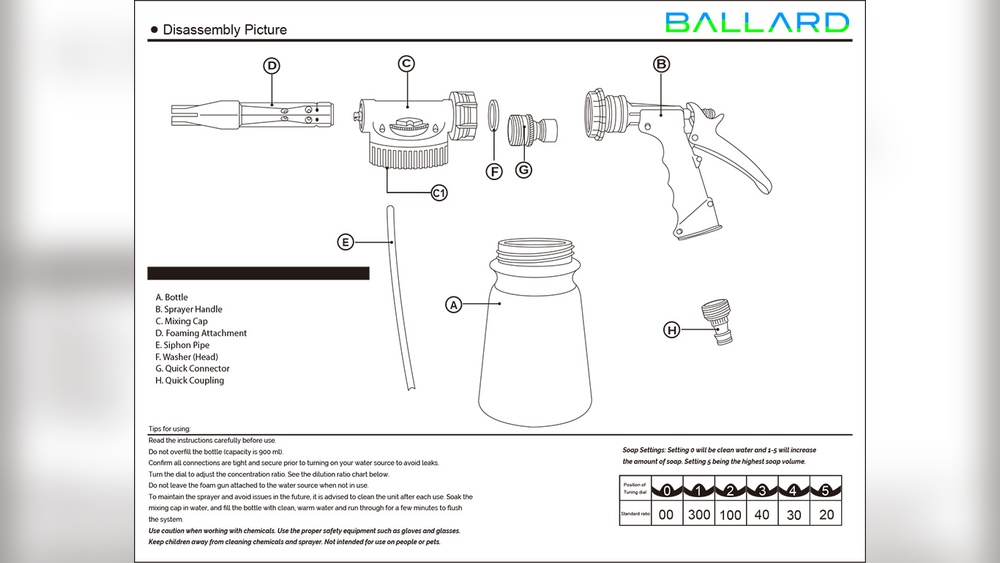
Credit: www.ballard-inc.com
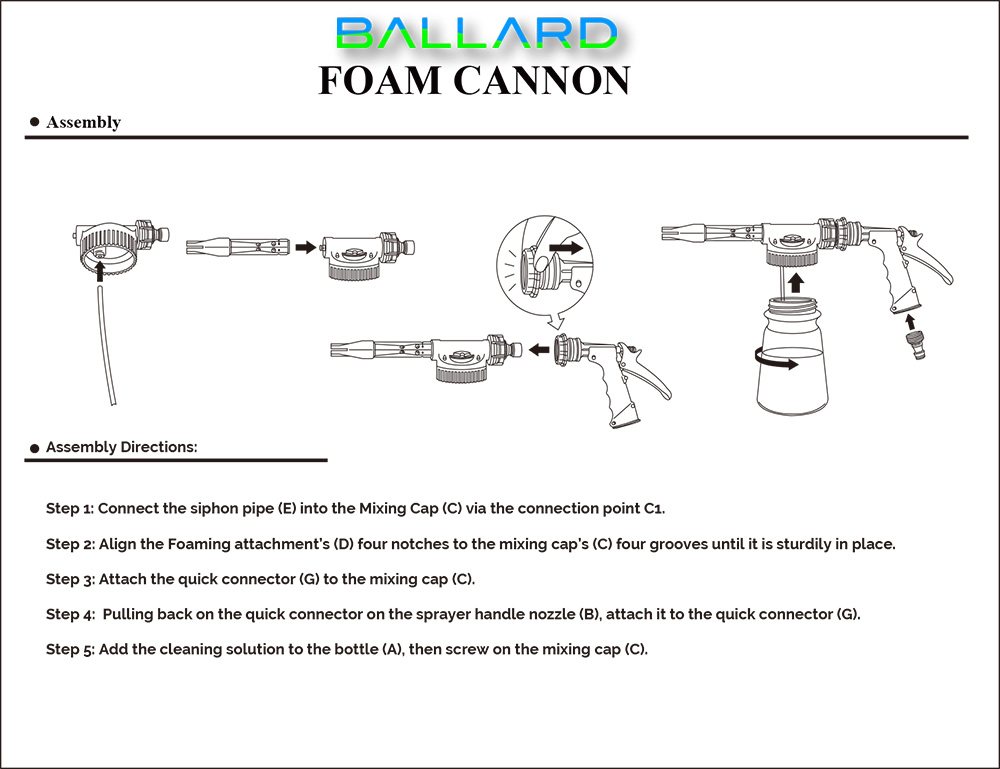
Step-by-step Assembly Process
Assembling a foam cannon is simple if you follow clear steps. Each part connects easily to create a working unit. Take your time and check each connection. This ensures the best foam output for washing.
Attaching The Bottle To The Cannon
First, fill the bottle with foam soap and water mix. Screw the bottle tightly onto the foam cannon base. Make sure it fits snugly to avoid leaks. A secure fit helps maintain strong foam pressure.
Connecting To The Pressure Washer
Next, attach the foam cannon to the pressure washer lance. Push the cannon’s connector firmly onto the lance. Some models click into place for a secure hold. Check that the connection is tight to prevent spray loss.
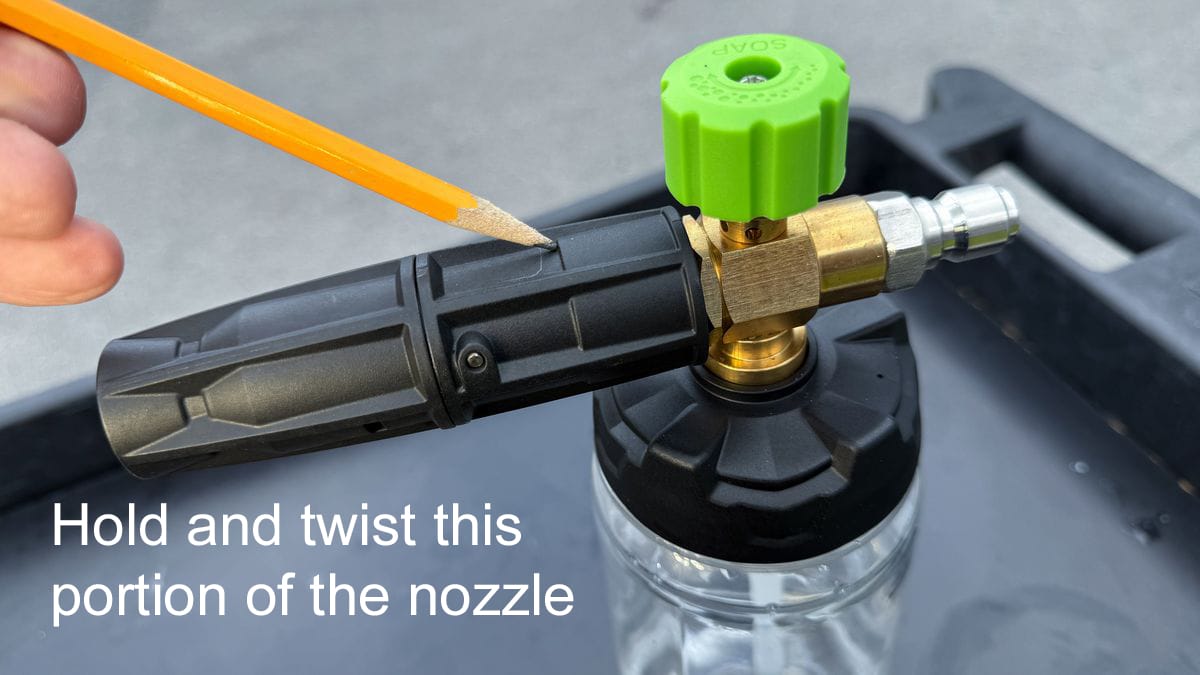
Adjusting The Spray Nozzle
Finally, turn the spray nozzle to set foam thickness and spray pattern. Twist the nozzle clockwise for a narrow spray. Turn it counterclockwise for a wider foam coverage. Adjust until you find the right balance for your cleaning task.
Mixing The Foam Solution
Mixing the foam solution correctly is key for a rich, thick foam. It helps the foam cannon work better and cleans surfaces gently. Understanding how to mix the solution saves time and avoids waste.
Choosing The Right Soap Concentration
Use a soap made for foam cannons or car washing. Check the label for recommended dilution rates. Too much soap makes the foam runny and weak. Too little soap creates thin foam that cleans poorly. Start with a 1:10 soap-to-water ratio. Adjust after testing the foam thickness.
Filling The Bottle Correctly
Use clean, soft water for the best results. Fill the bottle halfway with water first. Add the soap concentrate next. Fill the rest of the bottle with water. Close the bottle tightly and shake gently to mix. Avoid overfilling to prevent spills and poor mixing.
Avoiding Common Mixing Mistakes
Never use hot water; it can damage the soap. Avoid using harsh detergents or bleach. They can harm the foam cannon and surfaces. Do not mix soap directly in the foam cannon. Mix in the bottle only. Always test your mix before spraying to ensure proper foam quality.
Testing And Adjusting Foam Output
Testing and adjusting the foam output is key to get the best cleaning results. It ensures the foam cannon sprays the right amount of foam. Proper testing saves soap and water. It also protects your vehicle’s paint from damage due to too much pressure or thin foam.
Start by checking how the foam sprays. Then, change the nozzle to get the right spray pattern. Lastly, make sure the foam is thick enough to stick to surfaces but not too dense.
Performing Initial Spray Test
Attach the foam cannon to your pressure washer. Point it at a safe spot like a driveway. Pull the trigger and watch how the foam sprays. Note if the spray covers a wide area or if it is too narrow. Check if the foam sticks to the surface or runs off quickly.
Tweaking The Nozzle Settings
Adjust the nozzle to change the spray pattern. Turn the nozzle clockwise for a narrower spray. Turn it counterclockwise to widen the spray. Test spray after each adjustment. Find a balance between coverage and foam thickness.
Optimizing Foam Thickness
Control foam thickness by changing the soap mix ratio. Add more soap for thicker foam. Add more water for thinner foam. Test spray to see how foam behaves on surfaces. Thick foam lasts longer and cleans better but must rinse off easily.
Maintenance And Storage Tips
Proper maintenance and storage keep your foam cannon working well. It saves money and time. Taking care of your tool helps it last longer. Follow these simple steps to maintain your foam cannon after use.
Cleaning After Use
Rinse the foam cannon with clean water right after use. This removes soap and dirt inside the nozzle and container. Use warm water and run it through the cannon until it flows clear. Avoid using harsh chemicals that can damage parts. Dry all pieces before storing to stop rust and mold.
Storing The Foam Cannon Properly
Keep the foam cannon in a dry place away from direct sunlight. Store it in a cool spot to prevent plastic and seals from breaking. Make sure it is fully dry before putting it away. Avoid leaving water or soap inside the container during storage. Use a protective case or cover if possible.
Troubleshooting Common Issues
Check for clogs if foam flow is weak or stops. Clean the nozzle and hose with a soft brush or pin. Inspect seals and gaskets for cracks or wear. Replace any broken parts to keep the cannon working well. Tighten loose connections to stop leaks. Test the foam cannon before each use.
Credit: www.suds-lab.com
Frequently Asked Questions
What Tools Do I Need To Assemble A Foam Cannon?
You need a foam cannon kit, a pressure washer, and basic hand tools. Usually, no extra tools are required. Follow the instructions for proper assembly and safety.
How Do I Connect The Foam Cannon To The Pressure Washer?
Attach the foam cannon’s quick-connect fitting to the pressure washer’s spray gun. Ensure a secure connection to avoid leaks during use. Tighten if necessary for a firm fit.
What Is The Best Soap To Use In A Foam Cannon?
Use a high-quality, pH-balanced car wash soap designed for foam cannons. Avoid harsh detergents to protect your vehicle’s paint. Dilute soap according to manufacturer instructions.
How Do I Adjust The Foam Thickness On A Foam Cannon?
Adjust the foam cannon’s soap mixture and nozzle settings. Increasing soap concentration or tightening the nozzle creates thicker foam. Experiment to find the desired foam consistency.
Conclusion
Assembling a foam cannon is simple with the right steps. Follow the guide carefully to avoid mistakes. Connect each part tightly for the best results. Test the foam cannon before using it on your vehicle. Clean it after every use to keep it working well.
Enjoy a cleaner car with less effort. Practice makes perfect, so don’t rush. Now, you can confidently assemble and use your foam cannon.