If you’ve just installed new rotors and pads on your vehicle, knowing how to brake properly is crucial. The way you break them in can make all the difference between smooth stops and noisy, uneven wear.
You want your brakes to last longer, perform better, and keep you safe on the road. You’ll discover simple, step-by-step tips to bed in your new brakes the right way. Keep reading to make sure your investment pays off with quiet, reliable braking every time you hit the pedal.

Credit: www.greatwater360autocare.com
Why Bedding In Matters
New brake rotors and pads need special care before full use. This process is called bedding in. It helps the brakes work well and last longer. Skipping this step can cause problems. Understanding why bedding in matters keeps your car safe and your brakes strong.
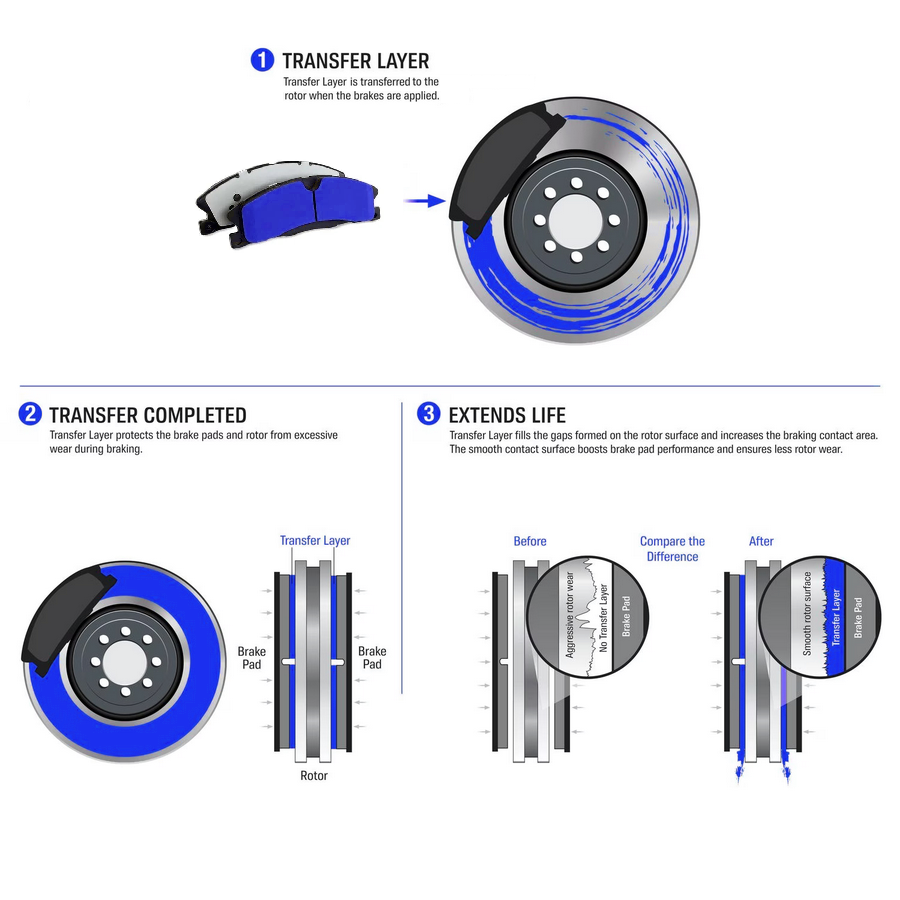
Purpose Of Bedding New Brakes
Bedding new brakes prepares the surface between pads and rotors. It creates a smooth, even layer of brake pad material on the rotor. This layer helps brakes stop the car better. It also reduces noise and vibration. Proper bedding improves brake performance and extends brake life.
Risks Of Skipping Bedding Process
Skipping bedding can cause uneven pad material on rotors. This leads to poor braking and noise. Brake pads may wear out quickly or unevenly. Rotors can develop hot spots and warp. This makes braking unsafe and costly. Proper bedding avoids these risks and keeps brakes working well.
Preparing For The First Drive
Preparing for the first drive after installing new rotors and pads is crucial. This step ensures your brakes work safely and smoothly. Taking time to prepare helps avoid problems later. Follow simple checks and choose the right place for your test drive.
Checking Brake Components
Start by inspecting all brake parts carefully. Make sure the rotors and pads are clean and properly installed. Look for any loose bolts or parts that might move. Check the brake fluid level and top it if needed. Confirm the brake lines are not leaking. A thorough check prevents brake failure on the road.
Choosing A Safe Location
Pick a quiet, open area for your first test drive. Avoid busy streets or steep hills. An empty parking lot works well. It gives space to test brakes without danger. This location allows you to feel how brakes respond. Take slow stops first and increase speed gradually.
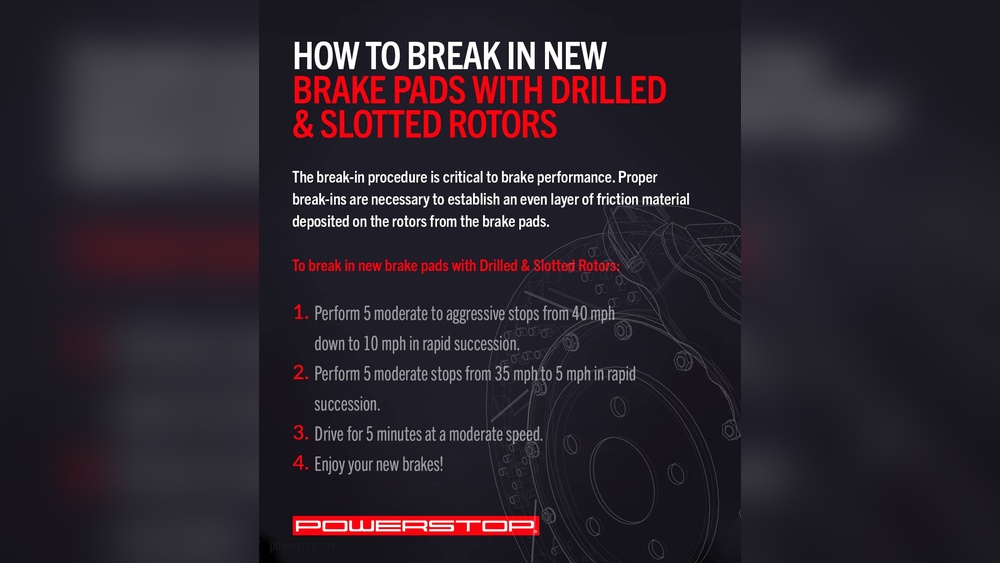
Step-by-step Bedding Procedure
Bedding new rotors and pads is important for safety and performance. The process helps the brakes work better and last longer. Follow a simple step-by-step method to properly bed your new brake parts. This will improve stopping power and reduce noise or vibrations.
Initial Gentle Stops
Start by driving slowly and making gentle stops. Apply light pressure on the brake pedal. Avoid hard or sudden stops at this stage. Make about 10 to 15 stops from low speed. This helps the brake pads and rotors start to warm up evenly.
Gradual Increase In Braking Force
Next, increase the brake pressure gradually. Make stops from a higher speed but still avoid full braking. Use medium pressure for 8 to 10 stops. This step allows the pads to transfer a thin layer of material to the rotors. It improves grip and braking response.
Cooling Down Periods
Let the brakes cool down after each set of stops. Avoid driving fast or stopping hard during this time. Cooling prevents damage and helps the brake surface harden evenly. Repeat the bedding cycle if needed, but always allow cooling between cycles.
Credit: www.brakes-shop.com
Signs Of Proper Bedding
Proper bedding of new brake rotors and pads is key for safe driving. It means the brakes work well and last longer. Knowing the signs of good bedding helps you confirm the process is done right. This section explains the main signs that show your brakes are properly bedded.
Improved Brake Performance
The first sign is better brake response. Your car should stop more smoothly and quickly. You will feel steady pressure on the brake pedal. The car should not pull to one side during braking. These changes show the pads and rotors are working together well.
Absence Of Unusual Noises
Good bedding means no strange sounds. Grinding, squealing, or scraping noises should disappear. Quiet brakes mean the pads fit well on the rotors. This also means less wear and tear on parts. Silence during braking is a strong sign of proper bedding.
Common Mistakes To Avoid
Installing new rotors and pads requires care for best results. Many drivers make mistakes that reduce brake performance and safety. Avoiding these common errors helps your brakes last longer and work better. Here are key mistakes to watch out for.
Hard Braking Too Soon
Pressing the brake pedal hard right after installing new parts can cause damage. The pads and rotors need time to adjust and form a smooth contact surface. Hard braking too soon creates uneven wear and noise. Instead, use gentle stops at first to let the brakes settle properly.
Overheating Rotors
Riding the brakes or braking too hard repeatedly heats the rotors quickly. Overheated rotors can warp or crack, leading to vibration and poor braking. Avoid long downhill braking without breaks. Give the brakes time to cool before heavy use again to keep rotors in good shape.
Ignoring Manufacturer Guidelines
Every brake part comes with specific break-in instructions. Skipping these steps risks poor brake performance and faster wear. Follow the manufacturer’s guide on speed, braking force, and distance during the bedding-in process. This ensures the pads and rotors work together smoothly and safely.
Credit: www.counterman.com
Maintaining Brakes After Bedding
Maintaining brakes after bedding is key to long brake life and safety. Bedding helps new rotors and pads work well together. Once done, proper care keeps them in good shape. Regular attention avoids early wear and costly repairs.
Regular Inspections
Check brakes every few weeks or before long trips. Look for uneven pad wear or rotor grooves. Listen for strange noises during braking. Feel for vibrations or pulling to one side. Early problems show in these signs.
Cleaning Tips
Keep brake parts clean from dust and dirt. Use a soft brush or cloth to wipe rotors and pads. Avoid harsh chemicals that can damage parts. Clean areas around brakes to prevent buildup. Clean brakes stop better and last longer.
When To Replace Pads And Rotors
Replace pads if thickness is less than 3mm. Change rotors if warped or deeply scored. Notice reduced braking power or strange sounds. Check brakes more often as pads get thinner. Timely replacement ensures safe driving and good brake feel.
Frequently Asked Questions
How Long To Break In New Rotors And Pads?
Breaking in new rotors and pads typically takes 200 to 300 miles. This process helps to create an even layer of brake pad material on the rotors. Proper bedding ensures maximum braking performance and prevents uneven wear or noise.
Why Is Bedding New Brake Pads Important?
Bedding new brake pads improves braking efficiency and reduces noise. It conditions the pads and rotors for better contact. This process also prevents glazing and uneven pad deposits, ensuring smooth and safe braking.
Can I Drive Normally After Installing New Rotors And Pads?
You should avoid heavy braking during the first 200 miles. Drive gently to allow proper bedding. This cautious driving prevents damage and helps the brakes perform optimally.
What Steps Are Involved In Braking In New Rotors?
Brake in new rotors by performing gradual stops from moderate speeds. Avoid full stops initially and allow cool down periods. Repeat this process several times to evenly transfer pad material.
Conclusion
New rotors and pads need careful breaking in for best results. Start slow and avoid hard stops at first. This helps the parts wear evenly and last longer. Drive gently for a few hundred miles after installation. Notice how your brakes feel and respond.
Proper breaking ensures safety and better brake performance. Taking these simple steps protects your car and your wallet. Remember, patience now saves trouble later. Keep your brakes in good shape for smooth, safe drives ahead.


