
If you own a boat with an outboard motor, you know how important it is to keep it running smoothly. One simple step that can save you from costly repairs is changing the fuel filter regularly.
But how do you do it yourself without wasting time or money? In this guide, you’ll learn exactly how to change a fuel filter on your outboard motor quickly and easily. By the end, you’ll have the confidence to tackle this task on your own and keep your boat ready for every adventure.
Keep reading—you don’t want to miss these essential tips!

Credit: www.youtube.com
Tools And Materials Needed
Changing the fuel filter on an outboard motor requires the right tools and materials. Having everything ready makes the task faster and easier. It also helps avoid mistakes that could harm the motor.
This section lists all the essential tools and materials. These items ensure you complete the job safely and correctly. Keep them close before you start.
Basic Hand Tools
You need simple hand tools like screwdrivers and pliers. A flathead and a Phillips screwdriver work best. Pliers help remove clamps and hoses securely.
Replacement Fuel Filter
Choose a fuel filter that fits your motor model. Using the correct filter keeps the engine running smoothly. Check your motor’s manual for the right type.
Fuel Line Clamps
New fuel line clamps help secure hoses after the filter change. They prevent leaks and fuel spills. Use clamps that match the hose size.
Clean Container
Have a clean container ready to catch any fuel spills. It keeps your workspace tidy and safe. Avoid letting fuel drip on the ground.
Rags And Gloves
Use rags to wipe spills and clean the filter area. Gloves protect your hands from fuel and dirt. Choose gloves that fit well for better control.
Safety Glasses
Wear safety glasses to protect your eyes from fuel splashes. Fuel can irritate your eyes. Always prioritize safety during maintenance.
Credit: partsvu.com
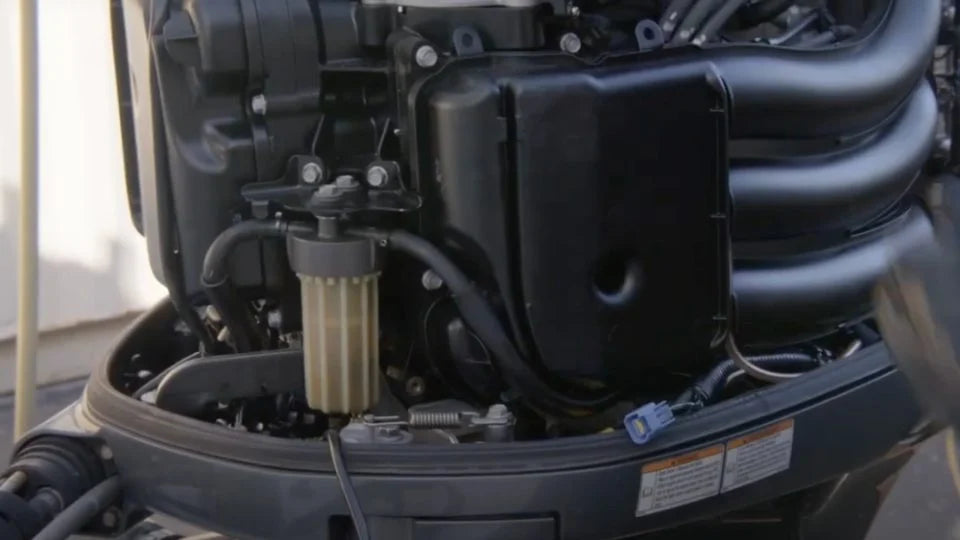
Locating The Fuel Filter
Finding the fuel filter on an outboard motor is the first step to changing it. The fuel filter cleans the fuel before it reaches the engine. Dirt or water in the fuel can cause engine problems. Knowing where the filter sits helps you work safely and quickly.
Fuel filters can look different depending on the motor model. Some are small and round, while others are clear plastic cylinders. Most filters are near the fuel line or fuel tank. They connect the fuel hose to the engine. This location helps catch debris before it enters the motor.
Check Near The Fuel Line
Start by tracing the fuel line from the tank to the motor. The fuel filter usually sits along this line. It might be attached with clamps or screws. Look for a small device that the fuel hose passes through. This part is often transparent or metal.
Look Close To The Engine Base
Many outboard motors have the fuel filter near the base. This spot is easy to access for maintenance. You may find the filter attached to the motor block or frame. Dirt and water are filtered out here before fuel enters the carburetor or injector.
Consult Your Owner’s Manual
The manual shows the exact fuel filter location for your motor model. It may include pictures or diagrams. This guide helps avoid guesswork and saves time. If you do not have a manual, check the manufacturer’s website for a copy.
Preparing The Outboard Motor
Preparing your outboard motor before changing the fuel filter is important. It helps keep you safe and makes the job easier. Follow these steps carefully to get ready.
Turn Off The Engine
Start by turning off the outboard motor. Make sure the engine is completely off. This stops fuel from flowing and prevents accidents. Remove the key from the ignition for extra safety. Wait a few minutes to let the engine cool down.
Relieve Fuel System Pressure
Next, relieve the pressure in the fuel system. Fuel under pressure can spray and cause injury. Find the fuel line or filter connection. Slowly loosen the fitting to release any trapped fuel. Use a cloth to catch any spills. This step reduces the risk of fuel leaks while you work.
Removing The Old Fuel Filter
Removing the old fuel filter is an important step in maintaining your outboard motor. It helps keep the engine running smoothly and prevents dirt from entering the fuel system. The process is simple and requires careful handling to avoid fuel spills or damage.
Start by making sure the engine is off and cool. Work in a well-ventilated area to avoid inhaling fumes. Have a small container ready to catch any fuel that may leak out during removal.
Disconnect Fuel Lines
First, locate the fuel lines connected to the filter. These lines carry fuel to and from the engine. Use pliers or a screwdriver to loosen the clamps holding the lines in place. Carefully pull the fuel lines off the filter. Some fuel may drip out, so be ready to catch it.
Be gentle to avoid damaging the fuel lines. If the lines are stuck, twist them slightly before pulling. Keep the ends of the lines clean and sealed to prevent dirt from entering.
Remove The Filter
After disconnecting the fuel lines, focus on removing the filter itself. Most filters twist off by hand or with a wrench. Turn the filter counterclockwise to loosen it. Hold a container underneath to catch any fuel inside the filter.
Dispose of the old filter properly. Do not throw it in regular trash. Some fuel may still be inside, so handle it carefully. Clean the mounting area before installing a new filter to ensure a good seal.
Installing The New Fuel Filter
Installing the new fuel filter is a key step to keep your outboard motor running smoothly. This process involves checking the new filter, attaching it securely, and reconnecting the fuel lines properly. Careful handling ensures no leaks and keeps fuel flowing well.
Check The New Filter
First, inspect the new fuel filter closely. Make sure it matches the old one in size and shape. Check for any damage or dirt on the filter. Confirm that the filter is clean and ready to use.
Attach The Filter
Next, position the new filter in the holder. Align it exactly as the old filter was placed. Push or twist the filter into place until it fits tightly. Secure it firmly to avoid any movement while the motor runs.
Reconnect Fuel Lines
Finally, reconnect the fuel lines to the filter. Attach the hoses on the correct ends to prevent fuel flow issues. Tighten the clamps or connectors to stop leaks. Double-check all connections before starting the motor.

Credit: partsvu.com
Priming The Fuel System
Priming the fuel system helps remove air and fill the lines with fuel. This step ensures the engine starts smoothly after changing the fuel filter. It keeps the motor running without interruptions.
Understanding The Importance Of Priming
Priming the fuel system prepares your outboard motor for smooth starting.
It removes air from the fuel lines and helps fuel reach the engine.
Without priming, the engine may stall or fail to start.
Tools Needed For Priming
Gather a primer bulb, clean cloth, and gloves before starting.
These tools ensure a clean and safe priming process.
Having everything ready speeds up your work.
Step-by-step Priming Process
First, locate the primer bulb on the fuel line.
Squeeze it several times until it feels firm.
This action pushes fuel through the lines and removes air.
Watch for fuel to fill the bulb without bubbles.
Once firm, the fuel system is primed and ready.
Signs Of A Properly Primed System
The primer bulb stays firm after squeezing.
The engine will start more easily and run smoothly.
No sputtering or stalling should occur at startup.
Check for leaks around the fuel filter and connections.
Testing The Outboard Motor
Testing the outboard motor after changing the fuel filter is crucial. It ensures the engine runs smoothly and safely. This step helps detect any issues caused during the replacement. Proper testing saves time and prevents damage to the motor.
Preparing The Motor For Testing
Start by checking all connections. Make sure the fuel lines are tight and secure. Inspect the filter for any leaks or cracks. Fill the fuel tank with fresh fuel. Place the motor in the water or use a test tank for safety.
Starting The Outboard Motor
Turn the key or pull the starter cord gently. The engine should start without hesitation. Listen for any unusual sounds like knocking or sputtering. These sounds can indicate fuel flow problems or air in the lines. Let the motor run for a few minutes to stabilize.
Observing Engine Performance
Watch the motor’s RPM and throttle response. The engine should respond smoothly to speed changes. Look for steady exhaust smoke; thick or black smoke suggests issues. Check for overheating or vibrations during operation. Stop the motor immediately if any problem appears.
Final Safety Checks
Turn off the motor and inspect the fuel filter again. Confirm no leaks or fuel smells around the engine. Tighten any loose parts found during testing. Clean up any spilled fuel to avoid hazards. Proper safety checks protect the motor and user.
Maintenance Tips For Fuel Filters
Fuel filters keep dirt and water out of the engine. Good maintenance helps your outboard motor run smoothly. Clean fuel filters protect the engine and extend its life.
Check the fuel filter regularly. Replace it before it gets too dirty. This stops engine problems and saves money on repairs.
Inspect The Fuel Filter Often
Look at the fuel filter every time before you use the motor. Check for cracks, dirt, or water inside. A damaged filter can cause engine trouble.
Use Clean Fuel
Always fill your tank with fresh, clean fuel. Dirty fuel clogs the filter faster. Avoid fuel from unknown sources to keep the filter safe.
Replace Fuel Filters On Schedule
Follow the motor’s manual for filter change intervals. Change filters even if they look okay. This keeps the engine running well and avoids breakdowns.
Drain Water From The Filter
Some fuel filters have water traps. Drain water after each trip or before storing the motor. Water in fuel causes engine damage and poor performance.
Use The Right Replacement Filter
Always choose filters made for your motor. Wrong filters may not fit or protect properly. Check the model number to avoid mistakes.
Frequently Asked Questions
How Often Should I Change An Outboard Motor Fuel Filter?
Change the fuel filter every 100 hours or once a year. Regular replacement prevents clogging and engine performance issues. Always check the manufacturer’s recommendations for specific intervals. Timely changes improve fuel efficiency and prolong engine life.
What Tools Do I Need To Replace A Fuel Filter?
You need a wrench, screwdrivers, pliers, and a new fuel filter. Having a container to catch fuel spills is helpful. Wear gloves and safety glasses to protect yourself during the process.
Can I Change The Fuel Filter Without Draining The Fuel?
Yes, but it’s safer to drain some fuel first. This reduces spills and mess during filter replacement. Always work in a well-ventilated area to avoid inhaling fumes.
How Do I Know If My Fuel Filter Needs Changing?
Signs include engine stalling, rough idling, and poor acceleration. Visible dirt or discoloration in the filter also indicates a change is needed. Regular checks can prevent breakdowns on the water.
Conclusion
Changing the fuel filter on your outboard motor keeps it running smoothly. Clean filters stop dirt from damaging the engine. Regular checks help avoid unexpected breakdowns on the water. Follow the steps carefully for a safe and easy change. This simple task saves money and time in the long run.
Take care of your motor, and it will take care of you. Ready for your next trip? Your motor will be too.

