
If you own a Yamaha 115 outboard, keeping it running smoothly is a top priority. One simple but crucial task is changing the fuel filter.
Ignoring this can lead to engine problems and costly repairs. In this guide, you’ll learn exactly how to change your fuel filter quickly and safely, even if you’re not a mechanic. By the end, you’ll have the confidence to keep your boat’s engine in peak condition.
Ready to get started? Let’s dive in!
Signs Of A Clogged Fuel Filter
A clogged fuel filter can cause many problems for your Yamaha 115 outboard. It stops fuel from flowing properly. This affects engine performance and can cause damage. Knowing the signs helps you act fast. Fixing the filter early saves time and money.
Engine Performance Issues
The engine may run rough or lose power. It might hesitate or stall during use. You may notice a drop in speed. The boat may feel sluggish or weak. These are common signs of fuel blockage. The engine does not get enough fuel to work well.
Fuel Smell And Leaks
A strong fuel smell near the engine is a warning. It can mean fuel is leaking or trapped in the filter. Look for wet spots or puddles under the engine. Leaks can cause safety risks and should be fixed quickly. Clean fuel flow is important for safe operation.
Starting Problems
The engine may be hard to start or fail to start. It might crank but not catch. This happens because fuel is not reaching the engine properly. A clogged filter blocks the fuel line. Regular checks prevent long delays and frustration on the water.
Tools And Materials Needed
Changing the fuel filter on your Yamaha 115 outboard requires specific tools and materials. Having everything ready makes the job easier and safer. This section lists all essentials you need before starting.
Replacement Fuel Filter
The correct replacement fuel filter is vital. Choose one made for Yamaha 115 outboard engines. Using the right filter ensures your engine runs clean and smoothly. Check your owner’s manual or parts store for the exact model number.
Basic Hand Tools
Gather simple tools like screwdrivers and pliers. A wrench set helps to loosen fuel line clamps. A small container catches any spilled fuel. Keep a clean rag handy for wiping up spills and dirt. These tools help you work safely and efficiently.
Safety Equipment
Fuel handling can be risky. Always wear safety gloves to protect your hands. Safety glasses prevent fuel splashes from reaching your eyes. Work in a well-ventilated area to avoid inhaling fumes. Keep a fire extinguisher nearby for emergencies.
Preparing The Outboard Motor
Preparing the outboard motor is the first step before changing the fuel filter on your Yamaha 115. This stage ensures safety and makes the process smoother. It involves stopping the engine, finding the fuel filter, and removing extra fuel. Follow these steps carefully to avoid problems.
Turn Off The Engine
Switch off the outboard motor completely. This prevents fuel flow and reduces risk. Make sure the engine is cool before you start working.
Locate The Fuel Filter
Find the fuel filter on your Yamaha 115 outboard. It is usually near the fuel line or engine block. Check your owner’s manual for the exact spot.
Drain Excess Fuel
Remove any extra fuel from the filter area. Use a small container to catch the fuel. This step helps avoid spills and keeps the workspace clean.

Credit: yourpghlawyer.com
Removing The Old Fuel Filter
Removing the old fuel filter on your Yamaha 115 outboard is a key step before installing a new one. This process helps keep your engine running smoothly. Follow the steps carefully to avoid fuel spills and damage.
Disconnect Fuel Lines
Start by turning off the fuel valve. Next, use pliers to loosen the clamps on the fuel lines. Gently pull the fuel lines off the filter. Be ready for some fuel to leak out. Use a rag to catch any spills.
Remove Filter Mounting
Look for screws or bolts holding the filter in place. Use the right tool to remove these fasteners. Carefully take the old filter from its mount. Avoid dropping it to prevent fuel messes.
Dispose Of Old Filter
Do not throw the old filter in regular trash. Place it in a sealed plastic bag to contain fuel residue. Take the bag to a local hazardous waste disposal site. Proper disposal protects the environment and follows safety rules.
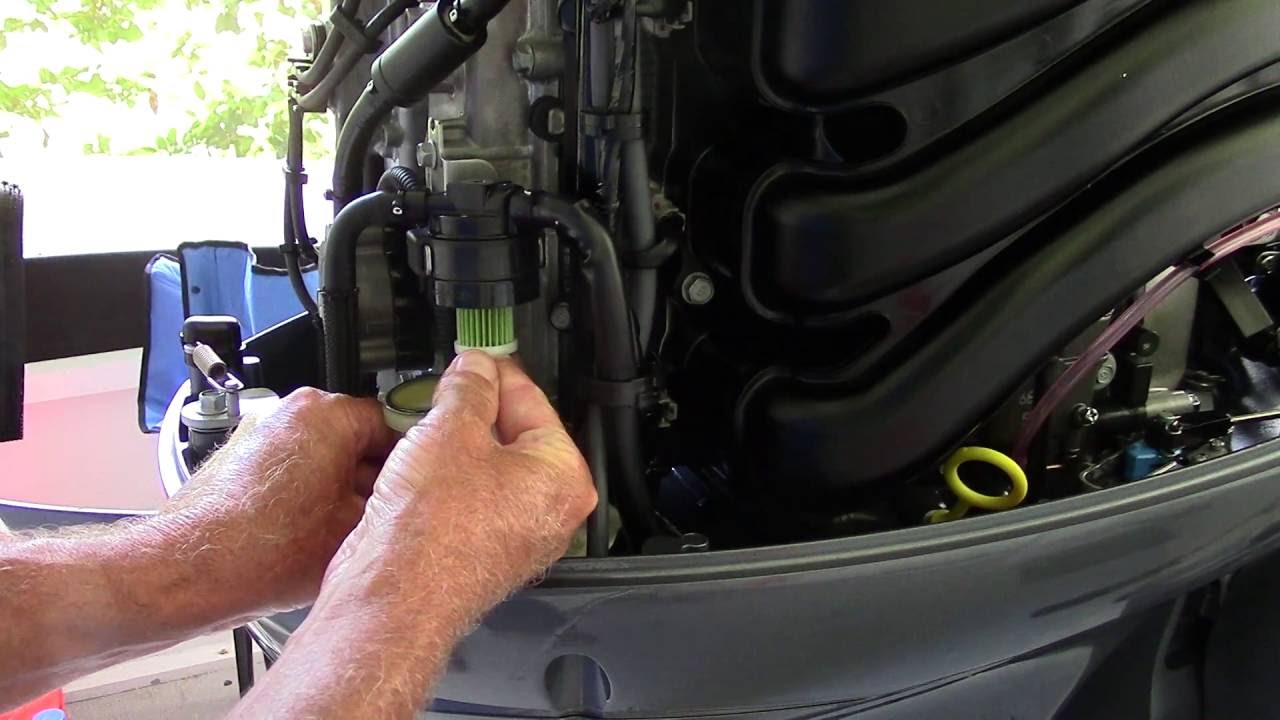
Installing The New Fuel Filter
Installing the new fuel filter on your Yamaha 115 outboard is a simple process. It helps keep your engine running smoothly. Follow these steps carefully to ensure a proper fit and secure connection.
Check Filter Orientation
Look at the new fuel filter closely. Find the arrow or mark that shows fuel flow direction. The arrow must point toward the engine. This step prevents fuel from flowing backward. Install the filter in the right direction for best performance.
Attach Filter Securely
Place the fuel filter in its holder or bracket. Push it firmly until it fits snugly. Some filters twist or click into place. Make sure it does not move or wiggle. A loose filter can cause leaks or poor fuel flow.
Reconnect Fuel Lines
Attach the fuel lines to the new filter. Check that each line goes to the correct port. Push the hoses fully onto the filter fittings. Use clamps or clips to hold the lines tight. Tight connections stop fuel leaks and keep your engine safe.
Bleeding The Fuel System
Bleeding the fuel system is a vital step after changing the fuel filter on your Yamaha 115 outboard. It removes air pockets trapped in the fuel lines. Air in the system can stop the engine from starting or running smoothly. This process ensures fuel flows freely and the engine performs well.
Release Air From Lines
Start by loosening the fuel line fittings slightly. Watch for air bubbles escaping with fuel. Keep loosening until only fuel flows out. Tighten the fittings again to prevent leaks. This step clears trapped air from the fuel lines.
Prime The Filter
Use the primer bulb to push fuel through the filter. Squeeze the bulb until it feels firm. This action fills the filter with fuel and removes air inside it. Priming makes sure the engine gets clean fuel without interruptions.
Check For Leaks
Inspect all connections carefully after priming. Look for any fuel drips or wet spots. Tighten fittings if you find leaks. Running the engine briefly helps spot leaks under pressure. Fix leaks quickly to avoid engine problems.
Testing The Outboard Motor
Testing the outboard motor after changing the fuel filter is crucial. It ensures the engine runs smoothly and safely. This step helps spot any issues early. Follow these simple checks to confirm your Yamaha 115 outboard is ready to go.
Start The Engine
Turn the key to start the Yamaha 115 outboard motor. Listen for any unusual sounds or rough starts. The engine should fire up quickly and run steadily. If it struggles, check the fuel filter installation again. Make sure all connections are tight and secure.
Monitor Performance
Let the motor run at idle speed for a few minutes. Watch the RPM gauge to ensure steady readings. Check for any sputtering or hesitation. Increase the throttle slowly to test acceleration. The engine should respond smoothly without stalling or jerking.
Final Safety Checks
Inspect the fuel lines and filter area for leaks. Smell for any strong fuel odors near the engine. Confirm the engine temperature stays within normal limits. Make sure the motor cuts off properly when turned off. These checks keep your Yamaha 115 outboard safe and reliable.
Credit: www.youtube.com
Maintenance Tips For Fuel Filters
Proper care of your Yamaha 115 outboard’s fuel filter keeps the engine running smooth. Fuel filters stop dirt and water from reaching the engine. Regular maintenance helps avoid breakdowns and saves money on repairs. Follow these simple tips to keep your fuel filter in top shape.
Regular Inspection Schedule
Check the fuel filter every 50 hours of use or once a season. Look for dirt, rust, or water in the filter bowl. Replace the filter if it looks dirty or clogged. Keep a log of inspections to track filter changes and spot problems early.
Choosing Quality Filters
Use filters made for Yamaha 115 outboard engines. Cheap filters may allow dirt to pass through. Select filters with good reviews and proper certifications. High-quality filters protect the engine better and last longer.
Storage And Handling Advice
Store spare fuel filters in a dry, cool place. Keep them sealed in original packaging until use. Avoid touching filter elements with dirty hands. Handle filters gently to prevent damage before installation.
Credit: www.shrimpnfishflorida.com
Frequently Asked Questions
How Often Should I Change The Fuel Filter On Yamaha 115?
Change the fuel filter every 100 hours or annually. Regular replacement prevents clogging and ensures optimal engine performance. Always check the owner’s manual for specific intervals related to your Yamaha 115 outboard.
What Tools Are Needed To Replace The Fuel Filter?
You need a screwdriver, pliers, a new fuel filter, and a container to catch fuel. Having clean rags handy helps manage spills during the replacement process safely and efficiently.
Can I Change The Fuel Filter Myself Safely?
Yes, changing the fuel filter is a straightforward DIY task. Follow safety precautions like turning off the engine and working in a well-ventilated area to avoid fire hazards or fuel spills.
How Do I Know If The Fuel Filter Needs Replacement?
Signs include engine hesitation, poor acceleration, or difficulty starting. A clogged fuel filter restricts fuel flow, causing these performance issues on your Yamaha 115 outboard motor.
Conclusion
Changing the fuel filter on your Yamaha 115 outboard keeps the engine running smooth. Regular filter changes stop dirt and debris from causing problems. This simple task saves you time and money on repairs. Follow the steps carefully to avoid mistakes.
Check the filter often to catch issues early. Clean fuel means better engine performance and longer life. Take care of your boat’s fuel system for worry-free trips. Simple maintenance makes a big difference on the water.


