Are your wheel covers looking worn out or outdated? Changing them can give your car a fresh, stylish look without spending a fortune.
You might think it’s complicated, but it’s actually easier than you expect. In this guide, you’ll discover simple steps to change your wheel covers quickly and safely. By the end, you’ll feel confident handling this task on your own—and enjoy the satisfaction of giving your car a new shine.
Keep reading to find out how!

Credit: www.youtube.com
Tools Needed
Changing wheel covers is a simple task that needs the right tools. Having the correct tools makes the job faster and safer. This section lists the tools you need to change wheel covers easily. Some tools are essential, and others can help but are not required.
Essential Items
Start with a flathead screwdriver. It helps pry off the old wheel cover carefully. A rubber mallet is useful for tapping the new cover into place without damage. Gloves protect your hands from sharp edges and dirt. A clean cloth helps wipe the wheel and cover before installation. These items are necessary for most wheel cover changes.
Optional Accessories
You may want a tire iron to loosen wheel nuts if needed. A lubricant spray can help remove stuck covers. Wheel cover clips or fasteners may be needed if the old ones break. A small flashlight is handy for working in low light. These accessories make the process easier but are not always required.

Credit: treefruitresearch.org
Preparing Your Vehicle
Preparing your vehicle is an important step before changing wheel covers. It helps keep you safe and makes the task easier. Taking simple precautions sets a good base for the whole process. Follow these steps to get ready.
Park On A Flat Surface
Choose a flat, stable area to park your car. This prevents the vehicle from rolling or moving. Avoid slopes or uneven ground. A flat surface keeps the car steady while you work.
Engage The Parking Brake
Apply the parking brake firmly after parking. This locks the wheels in place. It adds an extra layer of safety. The brake stops the car from shifting during the wheel cover change.
Removing Old Wheel Covers
Removing old wheel covers is the first step to change them. This task requires care to avoid damage to the wheel or cover. Understanding how the covers attach to the wheels helps make the process smooth. Some covers use clips, others use screws. Identifying these fasteners is important before starting the removal.
Using the right tools and techniques can prevent scratches and injury. Taking your time during removal ensures the covers stay intact. Let’s break down the removal process into clear steps.
Locate The Clips Or Screws
Check the wheel cover closely for clips or screws holding it. Clips are small metal or plastic tabs around the cover edges. Screws may be visible near the center or under a decorative cap. Use a flashlight if needed to see clearly. Knowing the fastener type guides your removal method.
Use Proper Techniques To Remove
For clips, gently pry the cover using a flat tool like a screwdriver. Insert the tool under the edge and lift slowly. Move around the cover, releasing clips one by one to avoid bending. For screws, use a matching screwdriver to unscrew carefully. Keep screws safe for reinstallation or disposal. Pull the cover off once all fasteners release. Avoid forcing the cover to prevent damage.
Inspecting The Wheels
Inspecting the wheels is an important step before changing wheel covers. This process helps you ensure the wheels are in good condition. Checking the wheels carefully can prevent problems later. You can spot damage or dirt that may affect the new covers. Proper inspection also makes the wheel covers fit better and last longer.
Check For Damage
Look closely at the wheel surface for any cracks or dents. Small cracks can grow bigger and cause trouble. Dents can stop the wheel cover from sitting correctly. Also, check for rust spots. Rust can weaken the wheel and cause the cover to loosen. Use a flashlight if the light is low. Make sure to inspect the entire wheel thoroughly.
Clean The Wheel Surface
Remove dirt and grease from the wheel before installing the cover. Use a clean cloth or a soft brush to scrub the wheel. Soap and water work well to clean off grime. Dirt can stop the cover from sticking properly. A clean surface helps the cover snap on tightly. Dry the wheel fully to avoid slipping or damage.
Installing New Wheel Covers
Installing new wheel covers is a simple task that anyone can do with a little care. It protects your wheels and makes your car look fresh. This step-by-step guide helps you put on wheel covers correctly.
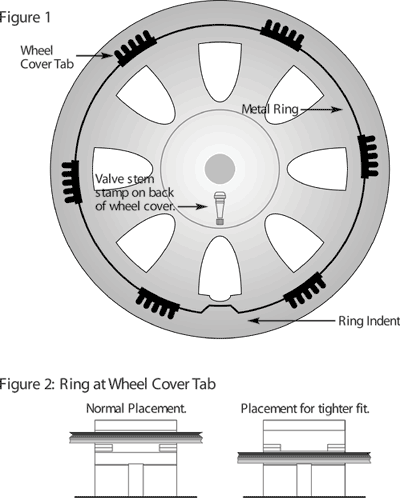
Aligning The Cover
Start by holding the wheel cover close to the wheel. Check the holes or clips on the cover. Match these with the wheel’s bolts or rim edges. Proper alignment prevents damage and ensures a snug fit. Take your time to line up the cover evenly around the wheel.
Securing The Cover In Place
Once aligned, press the cover firmly against the wheel. Use your hands to push around the edges. Listen for clicks or snaps that show the cover is locked in place. Avoid using tools that can break the cover. Double-check by gently pulling on the cover to confirm it is secure.
Final Checks
After fitting the new wheel covers, final checks are crucial. They ensure safety and proper function. Skipping these checks can cause problems while driving.
Ensure Tight Fit
Press the wheel covers firmly against the wheels. Check each clip or fastener to confirm it locks in place. Wiggle the cover slightly to test its grip. A loose cover can fall off or cause noise.
Test Drive For Stability
Drive your car slowly on a smooth road. Listen for any rattling sounds from the wheels. Feel if the covers stay in place during turns or bumps. Stop and recheck if anything feels loose or unstable.
Tips For Maintaining Wheel Covers
Maintaining wheel covers keeps them looking fresh and protects them from damage. Clean wheel covers regularly to stop dirt buildup. Dirt and grime can cause scratches and dull the finish. Proper care extends the life of your wheel covers and keeps your car looking neat.
Regular Cleaning
Wash wheel covers with water and mild soap. Use a soft cloth or sponge to avoid scratches. Clean every two weeks or after driving on dirty roads. Dry covers with a soft towel to stop water spots. Avoid using rough brushes or steel wool. These can damage the cover’s surface.
Avoiding Harsh Chemicals
Stay away from strong chemicals like bleach or acid cleaners. Harsh chemicals can fade or weaken the wheel cover material. Use gentle car cleaning products made for plastic or metal surfaces. Test any cleaner on a small area first. This prevents unexpected damage or discoloration. Safe cleaning helps keep wheel covers looking new longer.
Credit: www.tirerack.com
Frequently Asked Questions
How Do I Remove Old Wheel Covers Safely?
To remove old wheel covers, use a flat tool to gently pry them off. Work slowly to avoid damage. Protect your hands with gloves and ensure the car is stationary with the parking brake engaged.
What Tools Do I Need To Change Wheel Covers?
Typically, no special tools are required to change wheel covers. A flathead screwdriver or a plastic pry tool helps safely remove the covers without scratching the wheels or hubcaps.
Can I Change Wheel Covers Myself At Home?
Yes, changing wheel covers is simple and can be done at home. Follow safety precautions, remove old covers carefully, and snap the new ones securely in place.
How Do I Choose The Right Size Wheel Covers?
Measure your wheel diameter in inches, usually 14, 15, or 16 inches. Match the new wheel cover size exactly to your wheel size for proper fit and appearance.
Conclusion
Changing wheel covers is simple with the right steps. Take your time and follow the instructions carefully. Using the right tools makes the job easier and safer. Check the fit before you press the cover on. Regularly changing wheel covers keeps your car looking neat.
A fresh look can boost your car’s appeal. Keep your wheels clean to protect the covers longer. Now, you can change your wheel covers with confidence and ease.