
Your motorcycle’s fuel filter plays a crucial role in keeping your engine running smoothly. Over time, dirt and debris can clog it, causing poor performance or even engine trouble.
If you want to avoid costly repairs and keep your bike in top shape, knowing how to clean your fuel filter is a must. In this guide, you’ll learn simple, step-by-step methods to clean your motorcycle fuel filter quickly and effectively.
Keep reading to discover easy tips that save you time and money, so your ride stays strong and reliable every time you hit the road.
Credit: motor.onehowto.com
Signs Of A Dirty Fuel Filter
A motorcycle fuel filter stops dirt and debris from reaching the engine. Over time, it can get clogged. A dirty fuel filter causes several problems. Knowing the signs helps you fix the issue early. This keeps your bike running smoothly and safely.
Reduced Engine Performance
The engine may lose power during rides. Acceleration feels weak and slow. The bike may hesitate or sputter. This happens because fuel flow is blocked. The engine does not get enough clean fuel.
Starting Problems
The bike takes longer to start than usual. Sometimes, it may not start at all. This happens if fuel cannot reach the engine. A dirty fuel filter restricts fuel flow. Starting becomes harder as the engine struggles.
Fuel Smell And Leaks
You may notice a strong fuel smell near the bike. Fuel leaks can appear around the fuel filter area. A clogged filter can cause pressure build-up. This leads to leaks and fuel odor. Check the filter if you smell fuel.
Tools And Materials Needed
Preparing to clean your motorcycle fuel filter requires the right tools and materials. Having everything ready makes the process smooth and safe. A well-chosen toolkit helps you avoid mistakes and saves time.
Basic Tools
You need a few basic tools for this task. A screwdriver helps remove the fuel filter cover. Pliers allow you to disconnect fuel lines safely. A wrench may be necessary for loosening bolts. Clean rags are useful to catch any fuel spills.
Cleaning Supplies
Choose the right cleaning supplies for your fuel filter. Use a mild detergent or carburetor cleaner to remove dirt. A small brush helps scrub stubborn grime. Clean water rinses away residues. Make sure to dry the filter completely before reinstalling it.
Replacement Parts
Sometimes, cleaning is not enough. Keep a replacement fuel filter on hand for a quick swap. Check your motorcycle manual for the correct part number. Using genuine parts ensures your bike runs smoothly and lasts longer.
Safety Precautions
Cleaning a motorcycle fuel filter requires careful attention to safety. Fuel is flammable and can cause harm if handled incorrectly. Taking safety steps protects you and your bike. Follow these precautions before starting the cleaning process.
Work In A Ventilated Area
Choose a place with good airflow. Open windows or work outside if possible. Ventilation helps remove fuel fumes that can be harmful or catch fire. Avoid enclosed spaces to reduce risk.
Wear Protective Gear
Put on gloves to protect your skin from fuel and dirt. Use safety glasses to shield your eyes from splashes. Wear old clothes or a protective apron. This gear keeps you safe during cleaning.
Handle Fuel Carefully
Use a container designed for fuel to catch spills. Avoid smoking or open flames nearby. Clean up spills immediately with a cloth. Store fuel away from heat and sunlight to prevent accidents.
Locating The Fuel Filter
Finding the fuel filter on a motorcycle is the first step to cleaning it. The fuel filter stops dirt and debris from reaching the engine. Knowing its exact place helps in removing and cleaning it properly. Fuel filters can be in different spots depending on the bike model. Some are easy to spot, while others need more searching.
Common Fuel Filter Locations
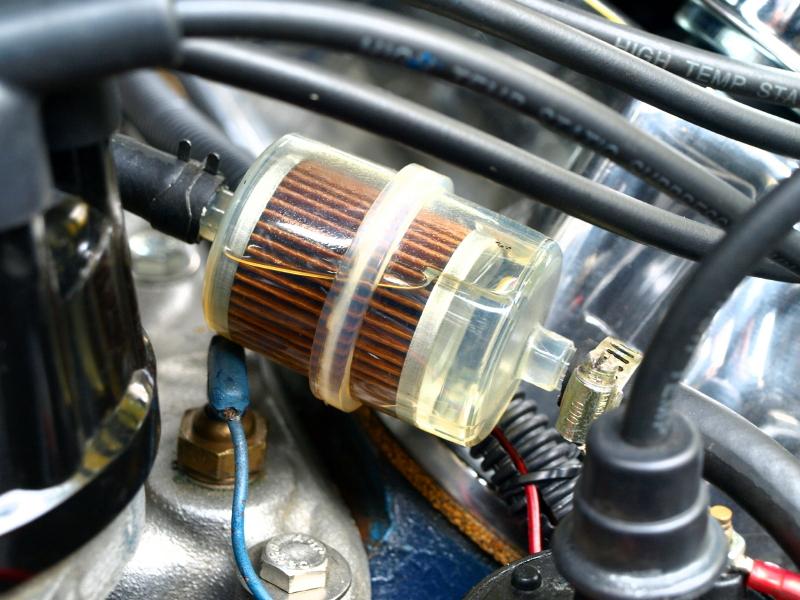
Many motorcycles have the fuel filter near the fuel tank. It might be inside the tank or attached to a fuel line outside. Some bikes place the filter close to the carburetor or fuel injector. Look along the fuel hose between the tank and the engine. Fuel filters often look like small, clear or metal cylinders.
Consulting The Motorcycle Manual
The motorcycle manual gives exact details about the fuel filter’s location. It shows diagrams and parts lists for your bike model. Use the manual to identify the fuel filter and any tools you need. Following the manual helps avoid damage and makes cleaning safer. Manuals are the best guide for specific bike information.
Removing The Fuel Filter
Removing the fuel filter is the first step in cleaning it. This process allows you to access the filter safely and avoid fuel spills. Follow these steps carefully to protect yourself and your motorcycle.
Relieving Fuel System Pressure
Start by relieving the fuel system pressure. This step helps prevent fuel from spraying out when you disconnect lines. Turn off the engine and remove the fuel pump fuse or relay. Then, start the engine and let it run until it stops. This means the pressure has dropped.
Detaching Fuel Lines
Next, detach the fuel lines connected to the filter. Use pliers to loosen any clamps holding the lines. Gently pull the lines off the filter. Be ready with a container to catch any leftover fuel. Work carefully to avoid damage to the fuel lines.
Extracting The Filter
Finally, extract the fuel filter from its holder. Check for screws or clips securing it in place. Remove these fasteners with the right tools. Pull the filter out slowly and keep it upright. This prevents fuel from leaking and keeps dirt away from the filter.
Cleaning The Fuel Filter
Cleaning the fuel filter is important for your motorcycle’s performance. A clean filter helps fuel flow smoothly. Dirt and debris can block the filter. This stops the engine from running well. Regular cleaning keeps the engine healthy and saves money on repairs.
Follow these steps to clean the fuel filter properly. Take your time and be gentle. This will protect the filter and your bike.
Using Appropriate Cleaning Solutions
Choose a cleaning solution made for fuel filters. Avoid harsh chemicals that can damage parts. A mild solvent or carburetor cleaner works well. Soak the filter in the solution for a few minutes. This loosens dirt and grime. Use a soft brush to clean tough spots. Rinse with clean water after scrubbing.
Drying The Filter
Dry the filter completely before reinstalling. Shake off excess water gently. Let the filter air dry in a clean place. Avoid using heat or direct sunlight. These can weaken the filter material. Wait until it feels dry to the touch. Drying well prevents water from entering the fuel system.
Inspecting For Damage
Check the filter for cracks or tears. Look closely at the mesh and edges. Damage can cause fuel leaks or poor filtering. Replace the filter if you find any faults. Using a damaged filter can harm the engine. Always use a filter designed for your motorcycle model.
Reinstalling The Fuel Filter
Reinstalling the fuel filter is a key step after cleaning it. This part ensures your motorcycle runs smoothly by filtering fuel properly. Correct reinstallation helps avoid leaks and keeps fuel flowing well. Follow these steps carefully to put the fuel filter back in place.
Reattaching Fuel Lines
Start by reconnecting the fuel lines to the filter. Push each line firmly onto the filter’s connectors. Make sure the lines fit snugly to prevent fuel leaks. Use pliers to tighten clamps if needed. Loose connections can cause fuel spills and engine issues.
Securing The Filter
Next, secure the fuel filter in its holder or bracket. Use screws or clips that came with your motorcycle. Tighten them just enough to hold the filter steady. Avoid overtightening, as this can damage the filter or bracket. A stable filter stays in place during rides and vibrations.
Checking For Leaks
After securing, check for any fuel leaks around the filter. Turn on the motorcycle’s fuel valve or start the engine briefly. Look closely at the filter connections. If you see fuel dripping, tighten the clamps or reattach the lines. No leaks mean your filter is installed correctly and ready to work.

Credit: www.youtube.com
Testing The Motorcycle
Testing the motorcycle after cleaning the fuel filter is important. It helps check if the fuel flows well and the engine runs smoothly. This step ensures your cleaning job works right. Follow simple steps to test your motorcycle safely and effectively.
Starting The Engine
Turn the key to the “on” position. Listen for any unusual sounds. Try to start the engine. It may take a few tries if the fuel system needs to pump fuel. Watch for smooth starting without hesitation or stalling.
Monitoring Performance
Let the engine run for a few minutes. Notice how it idles. Check for steady sound and no sputtering. Rev the throttle gently. The engine should respond quickly. Watch for any lag or rough running. These signs indicate if the fuel filter is clean enough.
Final Adjustments
Adjust the choke if the engine runs too rich or too lean. Tighten any loose connections. Repeat starting and running tests if needed. Clear any air bubbles in the fuel line. Your motorcycle should run smoothly and reliably after these steps.
When To Replace The Fuel Filter
Knowing when to replace the fuel filter is important for your motorcycle’s performance. A clean fuel filter keeps dirt and debris out of the engine. Over time, the filter can get clogged or damaged. Replacing it at the right time helps avoid engine problems and keeps your bike running smoothly.
Signs Of Irreparable Damage
Watch for signs that show the fuel filter needs replacement. If the engine sputters or stalls often, the filter may be blocked. A drop in power or slow acceleration can also indicate trouble. Visible cracks or damage to the filter housing means it must be replaced. Fuel leaks near the filter area are a clear warning. Ignoring these signs can cause engine damage.
Recommended Replacement Intervals
Check your motorcycle’s manual for the fuel filter schedule. Most filters should be replaced every 12,000 to 15,000 miles. For bikes used in dusty or dirty conditions, replace the filter more often. Regular replacement prevents dirt build-up and fuel flow issues. Mark your calendar or service log to track replacements on time.

Credit: www.mycover-protection.com
Frequently Asked Questions
How Often Should I Clean My Motorcycle Fuel Filter?
Clean your motorcycle fuel filter every 12,000 to 15,000 miles. Regular maintenance prevents clogging and fuel flow issues. Check your owner’s manual for specific intervals. Frequent cleaning improves engine performance and fuel efficiency.
What Tools Are Needed To Clean A Fuel Filter?
You need basic tools like screwdrivers, pliers, and a container for fuel. Use a clean cloth and carburetor cleaner or fuel system cleaner. Proper tools ensure safe and effective fuel filter cleaning.
Can I Clean The Fuel Filter Without Removing It?
It’s best to remove the fuel filter before cleaning for thorough dirt removal. Cleaning it in place risks incomplete cleaning and fuel contamination. Removing ensures better inspection and proper maintenance.
How Do I Know If The Fuel Filter Needs Cleaning?
Signs include engine hesitation, stalling, or reduced power. Check for dirt or debris in the filter. Regular inspection helps detect clogging early, preventing engine damage and improving fuel flow.
Conclusion
Cleaning a motorcycle fuel filter keeps your bike running smooth. It prevents dirt from clogging the engine. Regular cleaning saves you from costly repairs. Use the right tools and follow safety steps. Take your time and work carefully. A clean fuel filter means better fuel flow and performance.
Check the filter often for signs of damage. Stay safe and enjoy a smoother ride every time. Simple maintenance helps your motorcycle last longer. Keep your bike in top shape with this easy task.


