
If you want your brakes to work smoothly and safely, keeping your rotors clean is a must. Dirty rotors can cause squeaking, vibrations, or even reduce braking power.
But don’t worry—cleaning them is easier than you might think. You’ll learn exactly how to clean rotors with brake cleaner step-by-step. By the end, you’ll have the confidence to tackle this simple task yourself and keep your brakes performing at their best.
Ready to get started? Let’s dive in!
Why Clean Brake Rotors
Cleaning brake rotors is important for car safety and smooth driving. Dirt, dust, and brake residue build up on rotors over time. This build-up can reduce how well brakes work. Keeping rotors clean helps the brakes stop the car quickly and safely. It also prevents damage and extends the life of brake parts.
Impact On Brake Performance
Dirty rotors make brakes less effective. Dust and grime create a barrier between the rotor and brake pads. This reduces friction, which slows stopping power. Clean rotors help brakes grip better and stop faster. They also prevent vibrations and noise when braking. Regular cleaning keeps brakes working at their best.
Signs Of Dirty Rotors
Brakes that feel rough or make noise may have dirty rotors. You might hear squealing or grinding sounds. The brake pedal may feel soft or shaky. Sometimes the car pulls to one side when stopping. These signs mean the rotors need cleaning. Check rotors often to avoid brake problems.
Choosing The Right Brake Cleaner
Choosing the right brake cleaner is key to cleaning rotors safely and effectively. The cleaner removes dirt, grease, and brake dust. It helps the brakes work better and last longer. Picking the wrong cleaner can damage parts or leave residue behind. Knowing the types and safety tips helps you find the best product for your rotors.
Types Of Brake Cleaners
There are two main types of brake cleaners: chlorinated and non-chlorinated. Chlorinated cleaners are strong and dry quickly. They do not leave oily residue. Non-chlorinated cleaners are less harsh. They take longer to dry and may leave a light film. Choose based on the rotor material and your health concerns. Non-chlorinated types are safer for the environment and user.
Safety Considerations
Brake cleaners contain chemicals that can be harmful. Always use them in a well-ventilated area. Wear gloves and eye protection to avoid skin and eye contact. Avoid breathing in the fumes. Keep the cleaner away from open flames or sparks. Store the product in a cool, dry place. Follow the instructions on the label carefully. Proper safety helps prevent accidents and health issues.
Tools And Materials Needed
Cleaning rotors with brake cleaner needs specific tools and materials. Having the right supplies makes the job easier and safer. This section lists what you need before starting the cleaning process.
Essential Cleaning Supplies
Start with a good quality brake cleaner spray. It removes dirt, grease, and brake dust quickly. Use a clean, lint-free cloth or paper towels for wiping. A stiff brush helps to scrub off tough grime. Keep a catch pan or tray ready to catch drips. Avoid using water or regular cleaners as they may damage the rotors.
Protective Gear
Wear safety glasses to protect your eyes from spray and dust. Use gloves to keep chemicals off your skin. A mask prevents inhaling brake dust and fumes. Long sleeves protect your arms from splashes. Safety gear keeps you safe while cleaning your rotors efficiently.

Credit: wd40.com.au
Preparing Your Vehicle
Preparing your vehicle is the first step to clean rotors safely and effectively. Proper preparation helps avoid accidents and makes the job easier. It takes some time but is very important.
Lifting And Securing The Car
Park the car on a flat, hard surface. Engage the parking brake to stop the car from moving. Place wheel chocks behind the wheels that will stay on the ground. Use a reliable jack to lift the car at the right points. Lift the car high enough to remove the wheels easily. Secure the car with jack stands for safety. Never rely on the jack alone to hold the car up.
Removing The Wheels
Loosen the lug nuts before lifting the car if possible. Use a lug wrench or breaker bar for this. Remove the lug nuts completely once the car is lifted and secured. Pull the wheel straight off the hub. Keep the lug nuts in a safe place. Removing the wheels gives full access to the rotors for cleaning. Work carefully to avoid damaging the wheel or hub.
Step-by-step Rotor Cleaning
Cleaning rotors is important to keep your brakes working well. Dirt, dust, and grease can build up and make brakes less effective. Using brake cleaner helps remove these contaminants fast. Follow these simple steps to clean your rotors safely and thoroughly.
Spraying Brake Cleaner
Start by spraying brake cleaner directly on the rotor surface. Hold the can about 6-8 inches away. Spray evenly across the entire rotor. The cleaner will loosen dirt and brake dust. Avoid spraying other parts like brake pads or calipers.
Scrubbing And Wiping
Use a clean, soft cloth or a brush to scrub the rotor. Focus on areas with heavy dirt or rust. Wipe the rotor surface gently to remove grime. Repeat spraying and scrubbing if needed. This removes stubborn build-up for a smooth finish.
Drying The Rotors
Let the rotors air dry for a few minutes. Make sure they are completely dry before reassembling. Avoid touching the rotor surface with your hands. Dry rotors prevent brake noise and ensure good brake performance.
Post-cleaning Checks
After cleaning rotors with brake cleaner, some important checks come next. These checks ensure safety and proper function of your brake system. Skipping them can cause problems later. Take time to inspect the parts carefully and reassemble the wheels correctly.
Inspecting For Damage
Look closely at the rotor surface for scratches or cracks. Small cracks can grow and cause brake failure. Check for rust spots that the cleaner did not remove. Also, examine the rotor edges for any dents or bends. If you find damage, replace the rotor before driving. A damaged rotor reduces braking power and increases risk.
Reassembling Wheels
Put the wheels back on in the right order. Tighten lug nuts evenly to avoid warping the rotor. Use a torque wrench to get the exact tightness. Loose wheels can be dangerous on the road. After reassembly, press the brake pedal a few times. This helps set the brake pads against the rotor again.
Tips For Maintaining Clean Rotors
Keeping your brake rotors clean helps your vehicle stop safely. Dirt and grime reduce brake performance. Cleaning rotors with brake cleaner is simple. Follow these tips to keep rotors clean and working well.
Regular Cleaning Schedule
Clean your rotors regularly to avoid buildup. Check them every few thousand miles. Clean more often in dusty or wet areas. Use brake cleaner and a soft cloth. Regular cleaning prevents rust and dirt buildup.
Avoiding Contaminants
Keep oil, grease, and road grime away from rotors. Contaminants reduce braking power and cause noise. Handle brake parts with clean hands. Store brake cleaner and tools in a clean place. Avoid touching rotor surfaces with dirty gloves.
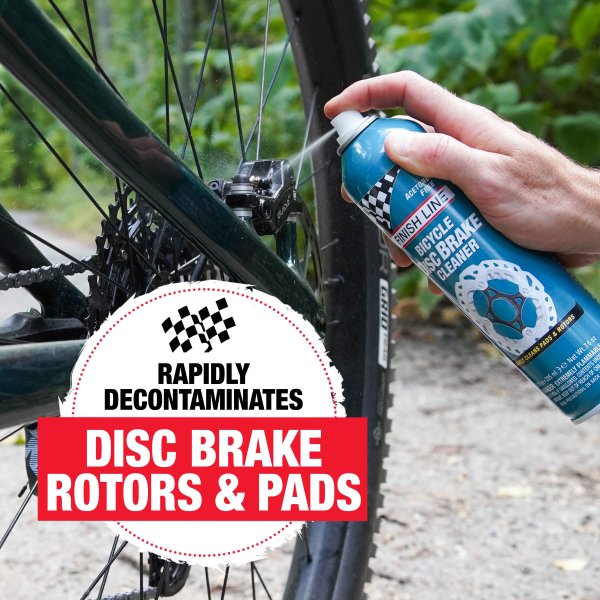
Credit: www.finishlineusa.com

Credit: www.arloren.com
Frequently Asked Questions
How Do I Clean Rotors With Brake Cleaner?
Spray brake cleaner directly on the rotor surface. Let it sit for a few minutes. Wipe off dirt and grime with a clean cloth. Repeat if necessary. Avoid getting cleaner on brake pads or calipers.
Can Brake Cleaner Damage Rotors?
Brake cleaner is safe for rotors when used properly. It removes grease and brake dust without harming metal. Avoid prolonged soaking or harsh scrubbing to prevent damage. Always follow product instructions for best results.
How Often Should I Clean Brake Rotors?
Clean rotors during brake pad replacement or when you notice noise or vibration. Regular cleaning helps maintain braking efficiency. Typically, inspect and clean rotors every 20,000 to 30,000 miles or as recommended by your vehicle’s manufacturer.
Is Brake Cleaner Toxic Or Harmful To Use?
Brake cleaner contains chemicals that can be harmful if inhaled or ingested. Use it in a well-ventilated area. Wear gloves and eye protection to avoid skin and eye contact. Follow safety guidelines on the product label carefully.
Conclusion
Cleaning rotors with brake cleaner keeps your brakes working well. It removes dirt, dust, and oil that affect brake performance. Always follow safety steps and use proper tools. Regular cleaning helps avoid brake noise and uneven wear. A clean rotor means safer and smoother driving.
Take your time and be careful during the process. This simple task extends the life of your brake parts. Keep your vehicle safe by maintaining clean rotors often.


