
Your steering wheel is one of the most important parts of your car, but it often gets ignored when it comes to comfort and style. Imagine gripping a steering wheel that feels smooth, looks great, and matches your personality perfectly.
Sounds good, right? You don’t have to spend a lot of money or buy a ready-made cover that may not fit well. In this guide, you’ll learn exactly how to DIY a steering wheel cover that’s both easy to make and customized just for you.
Keep reading, and you’ll discover simple steps that turn your driving experience into something more comfortable and enjoyable.
Credit: www.reddit.com
Choosing Materials
Choosing the right material for your DIY steering wheel cover is important. It affects comfort, grip, and style. Different materials offer different benefits. Understanding these can help you pick the best one for your needs.
Leather Vs Fabric
Leather feels smooth and looks classy. It lasts long and handles wear well. Leather grips better when your hands are dry. It can get slippery if your hands sweat.
Fabric feels softer and warmer. It comes in many colors and patterns. Fabric covers can be easier to clean. They may wear out faster than leather.
Tools And Supplies Needed
Gather these before starting your project. You need strong thread or string for sewing. A needle or sewing machine helps join materials. Scissors cut fabric or leather to size.
Use glue for extra hold if needed. A measuring tape ensures the right fit. Pins or clips keep materials in place while you work. These tools make the process smooth and easy.
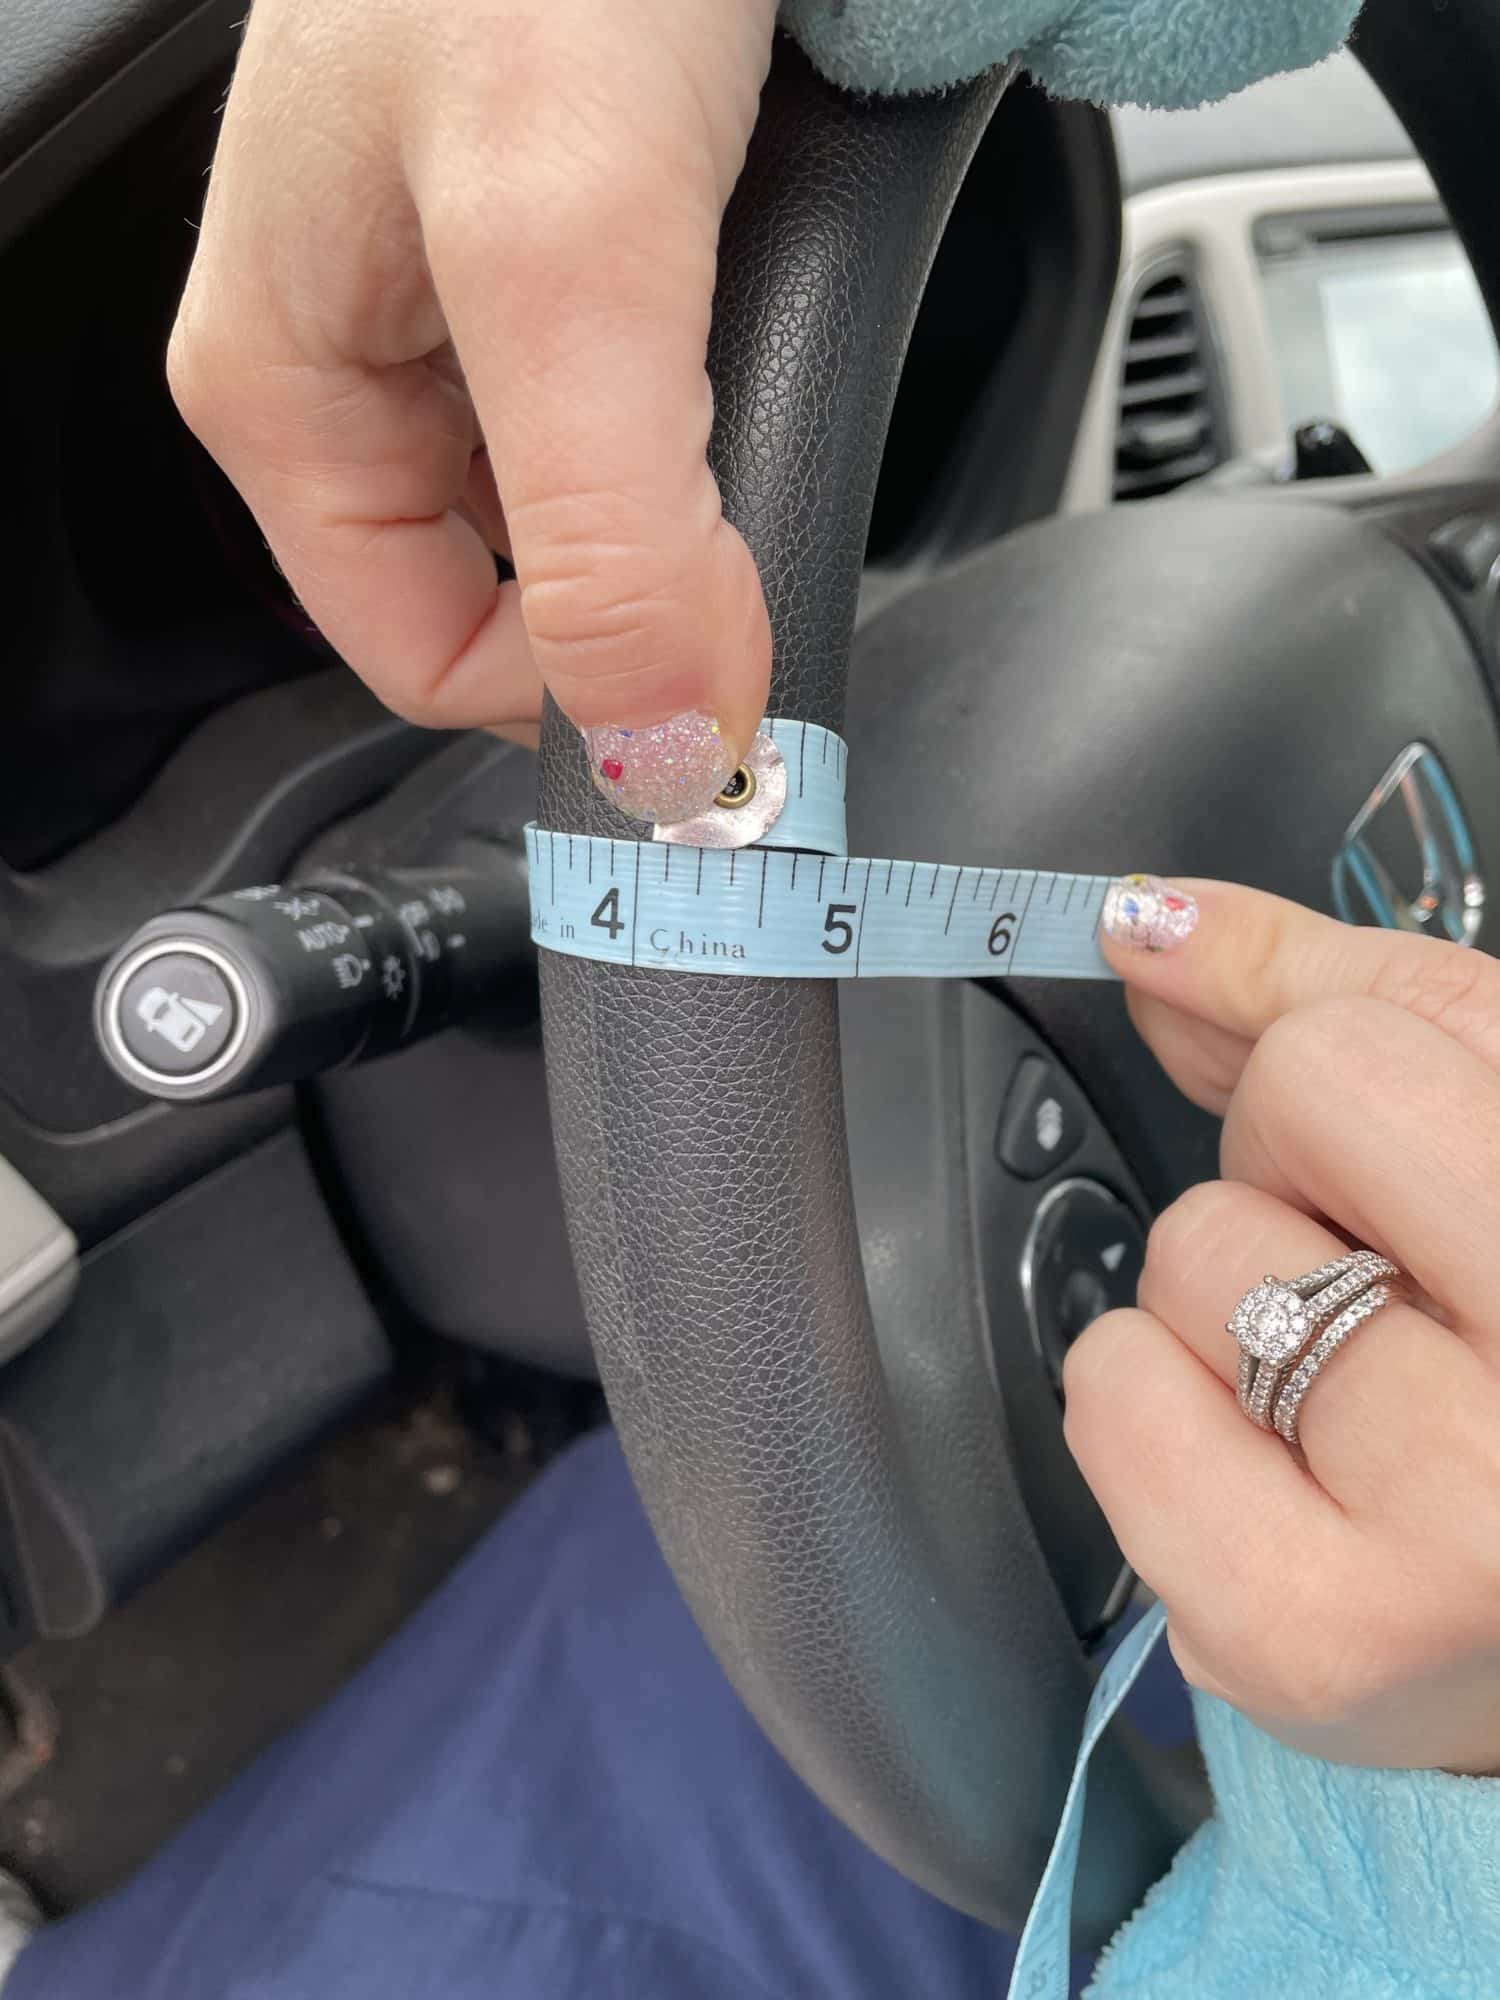
Measuring Your Steering Wheel
Measuring your steering wheel is the first step in making a perfect DIY cover. Accurate measurements help create a cover that fits snugly and looks great. Taking time here saves effort later.
Taking Accurate Measurements
Start by measuring the diameter of your steering wheel. Use a tape measure or a string to wrap around it. Note the distance across the center, from edge to edge. Next, measure the circumference by wrapping the tape or string around the wheel’s outer edge. Write down these numbers carefully. Double-check to avoid errors. These numbers guide your pattern size.
Marking Your Pattern
Use the measurements to draw your pattern on paper. Start with a circle matching the diameter. Draw another circle outside, adding extra space for seams and comfort. Mark spots for any special wheel features, like grips or buttons. Cut out the paper pattern and test it on the wheel. Adjust if needed. This pattern will be the base for your fabric or leather cover.
Cutting The Cover Pieces
Cutting the cover pieces is a key step in making a DIY steering wheel cover. It shapes the fabric or leather to fit perfectly. Accurate cutting ensures a neat and tight fit on the steering wheel. Careful measurement and cutting save time and materials. Prepare the right tools before starting this step.
Follow simple methods to cut the pieces without mistakes. Use patterns or templates to guide your cutting. Keep the fabric steady and mark the lines clearly. This step sets the base for sewing the cover together.
Using Templates
Templates help cut the cover pieces in the right shape. You can make one from paper or cardboard. Wrap the template around the steering wheel to check the fit. Adjust the size until it matches the wheel perfectly. Trace the template onto your fabric with a pencil or chalk. This avoids wrong cuts and wasted material.
Tips For Precise Cutting
Use sharp scissors for clean edges. Dull scissors can cause fraying and uneven cuts. Cut slowly along the traced lines for accuracy. Pin the fabric to the template to keep it from moving. Work on a flat surface to control the fabric well. Double-check measurements before cutting each piece. These simple tips help create a smooth, professional-looking cover.
Sewing The Cover
Sewing the steering wheel cover is a key step in the DIY process. This part brings the fabric or material together to fit snugly around the wheel. It needs careful stitching to make sure the cover lasts long and looks good.
You can sew the cover by hand or use a sewing machine. Both methods work well but have different speeds and finishes. Choose the one that fits your skills and tools best.
Hand Stitching Techniques
Hand stitching gives more control over the cover’s shape. Start by threading a strong needle with durable thread. Use a simple running stitch or backstitch for strength. Keep stitches small and even to avoid gaps.
Pin the fabric edges together before sewing. This holds pieces steady and prevents shifting. Take your time stitching around curves. Tight stitches help the cover fit the wheel tightly. Finish by knotting the thread securely.
Using A Sewing Machine
A sewing machine speeds up the process and makes neat stitches. Use heavy-duty thread and a needle for thick fabric. Set the stitch length to medium for balance between strength and flexibility.
Guide the fabric slowly under the needle, especially around curves. Keep the fabric edges aligned for a smooth seam. Backstitch at the start and end to lock stitches. This method creates a clean, professional look for the cover.
Fitting The Cover
Fitting the steering wheel cover is an important step in this DIY project. This step ensures the cover fits snugly and looks neat. A good fit makes your steering wheel comfortable and safe to use. Follow these simple steps for a perfect fit.
Stretching And Adjusting
Start by gently stretching the cover over the top of the steering wheel. Pull the cover evenly on both sides. This helps the material to spread without tearing. Work your way down the sides, stretching and adjusting as you go. Make sure the cover fits tightly without wrinkles or loose spots. A stretched cover grips the wheel better and stays in place.
Securing The Cover In Place
Once the cover fits well, secure it firmly around the wheel. Some covers have built-in elastic or drawstrings to tighten them. Use these features to lock the cover in place. If your cover does not have these, use small clips or double-sided tape inside the cover. Check all around the wheel to confirm the cover does not move or slip. A secure cover improves driving comfort and safety.

Credit: onemamasdailydrama.com
Adding Personal Touches
Adding personal touches to your DIY steering wheel cover makes it truly yours. It shows your style and creativity. Small details create a unique look. These touches also make your cover more fun to use. Here are easy ways to add charm and personality.
Decorative Stitching
Decorative stitching adds color and texture to your cover. Choose thread colors that match your car’s interior or your favorite shades. Use simple stitches like cross-stitch or zigzag for a neat look. You can also try patterns like diamonds or waves. Stitch along the edges or across the cover. This detail makes the cover stand out and feel special.
Custom Embellishments
Custom embellishments give your cover a personal twist. Sew on small beads or buttons for a fun touch. Use patches or fabric paint to add designs or initials. Choose embellishments that fit your style, like stars, hearts, or geometric shapes. Keep the decorations light so they don’t make the cover bulky. These small additions make your steering wheel cover one of a kind.
Maintaining Your Steering Wheel Cover
Maintaining your steering wheel cover keeps it looking fresh and lasting longer. Dirt, sweat, and sun can damage the cover over time. Regular care helps protect your investment and keeps your car interior neat. Simple steps make a big difference in the cover’s lifespan.
Follow easy cleaning and care tips to keep your cover soft and strong. Clean covers feel good to touch and improve driving comfort. Take a few minutes to care for it every week.
Cleaning Tips
Remove the cover from the steering wheel before cleaning. Use a soft cloth to wipe dust and dirt off the surface. For fabric covers, use mild soap and warm water. Gently scrub with a soft brush to remove stains. Rinse with a damp cloth and let it air dry.
Leather covers need special care. Use a leather cleaner or a damp cloth with mild soap. Avoid soaking the cover. Dry with a soft towel and keep it away from direct sunlight while drying. Never use harsh chemicals or bleach on any cover type.
Longevity And Care
Avoid leaving your car in direct sunlight for hours. Heat and UV rays can cause cracks and fading. Park in shaded areas or use sunshades to protect the cover. Avoid sharp objects near the cover to prevent cuts or tears.
Check the cover regularly for loose threads or worn spots. Repair small damages early to stop them from getting worse. Rotate the cover occasionally to even out wear and tear. Proper care keeps your cover comfortable and looking new for years.
Credit: 5outof4.com
Frequently Asked Questions
What Materials Are Needed For A Diy Steering Wheel Cover?
You need fabric or leather, foam padding, scissors, needle, thread, and glue. Optionally, add elastic bands or Velcro for better fit and durability.
How Long Does It Take To Make A Diy Steering Wheel Cover?
Making a DIY steering wheel cover typically takes 1 to 2 hours. Time varies based on skill level and materials used.
Can I Customize The Design Of My Steering Wheel Cover?
Yes, DIY steering wheel covers allow full customization. Choose colors, patterns, and textures to match your style and car interior.
Is Sewing Necessary For A Diy Steering Wheel Cover?
Sewing is recommended for durability and fit. However, some covers can be made using glue or adhesive tape for a no-sew option.
Conclusion
Making a DIY steering wheel cover saves money and adds style. You control the material, color, and fit. It feels good in your hands while driving. The steps are simple and fun to follow. A custom cover protects your wheel from wear and tear.
Try this project to personalize your car today. Small effort leads to great comfort and look. Why buy when you can create your own?


