Have you noticed bubbles, wrinkles, or peeling edges on your vinyl wrap? It can be frustrating to see your carefully applied wrap lose its smooth, flawless look.
But don’t worry—you don’t have to replace the entire wrap or hire expensive help. You can fix these common problems yourself with a few simple steps. You’ll learn exactly how to bring your vinyl wrap back to life, save money, and keep your vehicle or surface looking sharp.
Ready to take control and restore that perfect finish? Let’s dive in.
Common Vinyl Wrap Issues
Vinyl wraps can change the look of any vehicle or surface quickly. They are affordable and stylish. Still, vinyl wraps face some common problems. Knowing these issues helps you fix them fast. This keeps the wrap looking new and fresh.
Peeling Edges
Peeling edges happen when the vinyl starts to lift at the corners. It can be caused by dirt, moisture, or poor installation. Peeling makes the wrap look old and can spread if ignored. Fix peeling by cleaning the area and pressing the edges down. Use heat to soften the vinyl for better adhesion.
Air Bubbles
Air bubbles form if air gets trapped under the vinyl. They look like small round bumps on the surface. Bubbles reduce the wrap’s smooth look and may cause damage over time. To remove bubbles, use a pin to gently pop them. Press the vinyl down and smooth it out carefully.
Scratches And Scuffs
Scratches and scuffs damage the vinyl’s surface. They happen from keys, branches, or rough cleaning. Small scratches can be fixed by rubbing gently with a vinyl-safe cleaner. Deep scratches may need touch-up paint or a new wrap section. Avoid harsh tools to protect the wrap.
Fading And Discoloration
Fading happens when the vinyl loses its color due to sun exposure. Discoloration makes the wrap look old and uneven. Protect your wrap by parking in the shade and washing it regularly. Use UV protectant sprays to keep colors bright longer.
Credit: www.acmegraphic.com
Tools And Materials Needed
Fixing a vinyl wrap requires the right tools and materials. Using proper supplies helps you achieve a smooth and lasting finish. Prepare these items before starting your repair work. Each tool plays a key role in restoring your vinyl wrap effectively.
Heat Gun Or Hair Dryer
Heat softens the vinyl, making it easier to stretch and shape. A heat gun works best for precise heat control. A hair dryer can be a good alternative for small fixes. Use heat carefully to avoid burning or damaging the vinyl.
Squeegee And Soft Cloth
A squeegee removes air bubbles and smooths the vinyl surface. Use a soft cloth to clean and polish the wrap after fixing. These tools help create a clean and professional look. Choose a squeegee with a felt edge to avoid scratches.
Vinyl Wrap Adhesive
Adhesive keeps the vinyl wrap stuck firmly to the surface. Use a high-quality glue designed for vinyl materials. Apply adhesive sparingly to prevent wrinkles or lumps. Proper adhesion ensures the wrap stays in place for a long time.
Cutting Tools
Sharp cutting tools help trim excess vinyl precisely. Use a utility knife or an X-Acto knife for clean cuts. Replace blades often to avoid tearing the vinyl. Cut slowly and carefully to match the wrap edges perfectly.
Cleaning Supplies
Clean surfaces allow the vinyl to stick better. Use rubbing alcohol or mild soap with water to clean the area. Avoid oily or dirty surfaces that reduce adhesion. Dry the surface fully before applying the vinyl wrap.
Preparing The Surface
Preparing the surface is the first step to fix a vinyl wrap properly. A clean, smooth surface helps the wrap stick well and last longer. Dirt, dust, and moisture can cause bubbles and peeling. Taking time to prepare the surface makes the repair easier and neater.
Cleaning The Area
Start by cleaning the area around the damaged vinyl. Use a mild soap and water solution. Gently wipe the surface with a soft cloth or sponge. Avoid harsh chemicals that can damage the vinyl or paint underneath. Cleaning removes oils and grime that prevent good adhesion.
Removing Dirt And Debris
Check for small dirt particles or debris on the surface. Use a soft brush or microfiber cloth to remove them. Even tiny bits can cause bumps under the wrap. Take care to clean edges and corners where dirt hides. A smooth surface ensures a smooth finish.
Drying The Surface
After cleaning, dry the area completely. Use a dry towel or let it air dry. Moisture can trap under the vinyl and cause bubbles. Make sure no water remains on the surface before applying the wrap. A dry surface helps the adhesive stick properly.
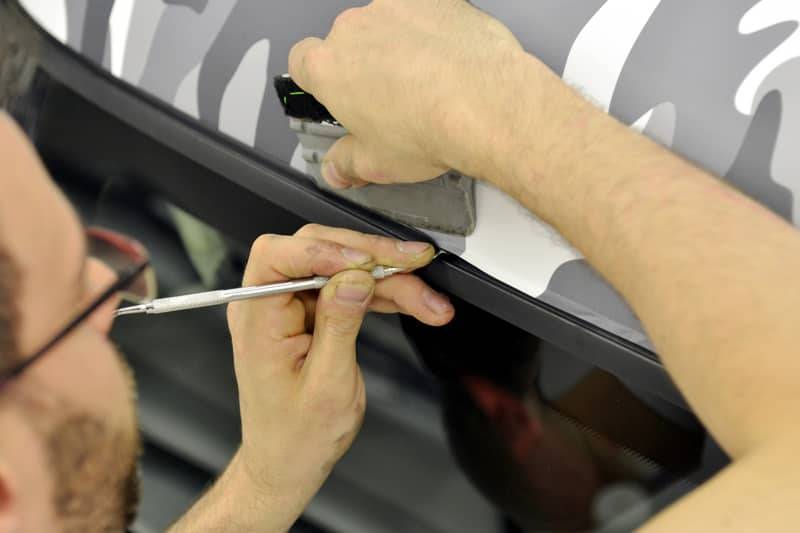
Fixing Peeling Edges
Peeling edges on vinyl wrap can ruin the look and cause further damage. Fixing these edges quickly helps keep the wrap smooth and intact. Small fixes prevent larger problems later.
Follow these steps to fix peeling edges carefully. Use simple tools and take your time.
Applying Heat To Soften Vinyl
Heat makes the vinyl flexible and easier to work with. Use a heat gun or hair dryer on low heat. Hold it a few inches away from the peel. Warm the area evenly without burning the vinyl. Soft vinyl bends back without cracking.
Reapplying Adhesive
Peeling often happens when adhesive loses strength. Use a vinyl-safe adhesive or glue designed for wraps. Apply a thin layer under the lifted edge. Press the edge down gently. Avoid using too much glue to prevent lumps.
Smoothing The Edges
After applying heat and adhesive, smooth the edge carefully. Use a soft cloth or plastic squeegee. Press from the center outwards to remove air bubbles. Smooth edges stick better and look neat. Let the vinyl dry completely before touching.
Removing Air Bubbles
Air bubbles under a vinyl wrap can spoil its smooth look. Removing these bubbles makes the wrap look neat and professional. Small bubbles can be fixed easily without removing the wrap. Using the right tools and techniques helps the vinyl stick better and last longer.
Puncturing Small Bubbles
Use a fine pin or needle to puncture small bubbles gently. Make a tiny hole at the bubble’s edge. Press the air out slowly with your finger or a soft cloth. Avoid making big holes to keep the wrap safe. This method works best for bubbles smaller than a quarter.
Using A Squeegee To Smooth
A squeegee helps push air bubbles out from under the vinyl. Start from the center of the bubble and move outward. Use firm but gentle pressure to avoid tearing the wrap. Work slowly to smooth the vinyl evenly. A plastic or felt-edge squeegee is best to prevent scratches.
Applying Heat For Better Adhesion
Heat softens the vinyl and helps it stick better to the surface. Use a heat gun or hairdryer on low heat. Move the heat source back and forth to avoid damage. After heating, press the vinyl down with a squeegee. Heat also helps the vinyl conform to curves and edges.

Credit: www.youtube.com
Repairing Scratches And Scuffs
Vinyl wrap on vehicles or furniture can get scratches and scuffs over time. These marks can make the surface look old and worn out. Fixing these damages helps keep the wrap looking fresh and new. Repairing scratches and scuffs is easier than many think. Small fixes can restore the appearance quickly.
Cleaning The Damaged Area
Start by cleaning the scratched or scuffed area. Use a mild soap and water mix. Gently wipe the surface with a soft cloth. Remove all dirt and grease. Let the area dry completely. This step ensures the repair sticks well.
Using Vinyl Repair Kits
Vinyl repair kits are useful for small scratches and scuffs. They come with compounds and tools to fill in the damage. Apply the repair compound carefully to the affected spot. Use a small spatula or applicator. Smooth out the compound to blend with the wrap. Let it dry as the instructions say. These kits help hide damage and improve the look.
Replacing Sections If Needed
Deep scratches or large scuffs may need section replacement. Cut out the damaged area carefully. Use a matching piece of vinyl wrap. Apply adhesive to the new section. Press it firmly onto the cleaned surface. Smooth out air bubbles and edges. This method gives a clean, new look to big damages.
Restoring Color And Shine
Restoring the color and shine of vinyl wrap brings your vehicle back to life. Over time, dirt, sun, and wear dull the finish. Taking steps to clean and protect the wrap keeps it bright and smooth. Small efforts make a big difference in appearance and durability.
Cleaning And Polishing
Start with a gentle wash using mild soap and water. Avoid harsh chemicals that can damage the wrap. Use a soft cloth or sponge to remove dirt without scratching. After cleaning, apply a polish made for vinyl surfaces. Polishing removes light scratches and adds shine. Work in small sections for even results. Let the wrap dry completely before moving on.
Using Vinyl Protectants
Vinyl protectants help keep color fresh and prevent fading. Choose a product designed specifically for vinyl wrap. Spray or wipe the protectant evenly over the surface. These products add a thin layer that repels dirt and water. Regular use prolongs the life of the wrap. Always follow the instructions on the label for best results.
Avoiding Sun Damage
Sun exposure causes vinyl to fade and crack. Park in shaded areas or use a car cover when possible. If parking indoors, keep the wrap away from heat sources. Applying a UV protectant adds another layer of defense. Protecting the wrap from sun damage keeps colors vibrant longer. Small habits prevent costly repairs later.
Credit: theartworks.com
Preventive Tips For Longevity
Vinyl wraps need care to stay fresh and last longer. Small habits keep the wrap strong and bright. Protect your investment by following simple steps. These tips help avoid damage and fading.
Regular Cleaning Routine
Clean vinyl wraps often to remove dirt and dust. Use a soft cloth or sponge with mild soap. Rinse well with water to avoid soap residue. Avoid scrubbing hard to prevent scratches. Dry the surface with a microfiber towel for best results.
Avoiding Harsh Chemicals
Stay away from strong cleaners like ammonia or bleach. These can break down the vinyl material and glue. Use gentle car wash soap or products made for vinyl. Test any new cleaner on a small spot first. Protect the wrap’s color and texture by choosing safe products.
Parking In Shaded Areas
Keep your vehicle out of direct sunlight as much as possible. UV rays cause vinyl to fade and peel over time. Shade helps maintain color and flexibility of the wrap. Use a car cover if shaded parking is not available. Protect the wrap from heat and sun damage daily.
Frequently Asked Questions
How Do You Fix Bubbles In Vinyl Wrap?
To fix bubbles, gently lift the wrap near the bubble. Use a heat gun to warm the area. Smooth the bubble out with a squeegee or your fingers. For small bubbles, puncture with a pin and press out air carefully.
Can Torn Vinyl Wrap Be Repaired Easily?
Small tears can be repaired by patching with a matching vinyl piece. Clean the area, apply adhesive, and press the patch firmly. Large tears may require professional replacement to maintain a seamless look.
What Tools Are Needed To Fix Vinyl Wrap?
You’ll need a heat gun, squeegee, microfiber cloth, and sharp knife. Optional tools include a pin for bubbles and adhesive for patches. Proper tools ensure smooth, lasting repairs without damaging the vinyl.
How To Prevent Vinyl Wrap From Peeling?
Ensure proper surface cleaning before application. Avoid harsh chemicals and excessive heat exposure. Regularly inspect edges and corners, reapplying adhesive if needed. Proper installation and maintenance prevent peeling effectively.
Conclusion
Fixing vinyl wrap takes patience and the right steps. Small bubbles or wrinkles can be smoothed with heat and gentle pressure. Tears or edges need careful trimming and reapplication. Keep your tools handy and work slowly. Clean surfaces before starting to ensure better results.
With practice, your vinyl wrap will look smooth and fresh. Remember, simple fixes can extend its life and keep your vehicle looking great. Stay calm, follow the steps, and enjoy the new look.


