
If you want to give your car, laptop, or any surface a fresh, sleek look, vinyl wrapping is the way to go. But the tricky part?
Wrapping the edges perfectly. You might have tried before and ended up with bubbles, wrinkles, or peeling edges. Don’t worry—this guide will show you exactly how to vinyl wrap edges like a pro. By the end, you’ll know the simple steps to get smooth, clean edges that last.
Ready to transform your project and impress everyone with your skills? Let’s dive in!
Choosing The Right Vinyl
Choosing the right vinyl is key to a successful wrap job, especially around edges. The vinyl must stick well and look good. Picking the right type helps the wrap last longer and avoid peeling. Consider the surface and use before buying vinyl.
Types Of Vinyl Films
There are different vinyl films for wrapping edges. Cast vinyl is thin and flexible. It molds easily around curves and corners. Calendered vinyl is thicker and less flexible. It works best on flat surfaces. For edges, cast vinyl is usually better. It resists cracking and lifting.
Selecting Adhesive Strength
Adhesive strength affects how well vinyl sticks to edges. Permanent adhesive holds tightly but is hard to remove. Removable adhesive allows easy removal but may peel off sooner. Choose adhesive based on how long the wrap must last. Strong adhesive works well for outdoor or long-term wraps.
Color And Finish Options
Vinyl comes in many colors and finishes. Glossy vinyl shines and highlights edges. Matte vinyl hides fingerprints and scratches. Satin finish offers a soft shine between glossy and matte. Pick a color and finish that match the vehicle or object. The right finish enhances the overall look of the wrap.
Credit: www.reddit.com
Preparing The Surface
Preparing the surface is the first and most important step in vinyl wrapping edges. A clean, smooth surface helps the vinyl stick better and last longer. It prevents bubbles and peeling later on. Spend enough time on this step for the best results.
Cleaning And Degreasing
Start by removing dirt and dust from the edges. Use a clean cloth with soap and water. After cleaning, apply a degreaser to remove oils and grease. Oils stop the vinyl from sticking well. Wipe the edges with a dry cloth to remove any residue. Make sure the surface is completely dry before moving on.
Sanding And Smoothing Edges
Use fine sandpaper to smooth rough edges. Sanding removes bumps and old paint flakes. Smooth edges help the vinyl lay flat and look neat. After sanding, wipe the area again to remove dust. Check the edges for any sharp spots and smooth them more if needed.
Temperature Considerations
Work in a warm place for easier vinyl application. Cold surfaces make vinyl stiff and hard to stretch. Ideal temperature is between 60°F and 80°F (15°C – 27°C). Avoid very hot or very cold conditions. Proper temperature ensures the vinyl sticks well and wraps smoothly.
Tools Needed
Vinyl wrapping edges needs the right tools. These tools help you cut, heat, and press the vinyl for a smooth finish. Using good tools makes the job easier and the result better. Here are the main tools you need for vinyl wrapping edges.
Cutting Tools
Sharp cutting tools are important for clean edges. A utility knife or precision craft knife works well. Scissors can help but may not cut as precisely. Change blades often to keep cuts smooth and avoid tearing vinyl.
Heat Guns And Applicators
Heat softens vinyl, making it easier to wrap around edges. Use a heat gun for even warming. A hair dryer can work but may not get hot enough. Heat helps vinyl stick better and prevents bubbles or wrinkles.
Edge Rollers And Squeegees
Edge rollers press vinyl into corners and curves. They help vinyl stick tightly without air pockets. Squeegees smooth out large flat areas quickly. Use soft ones to avoid scratching the vinyl surface.
Techniques For Wrapping Edges
Wrapping edges with vinyl needs careful work. Edges are tricky spots. They can peel or look uneven if not done right. Using good techniques helps the vinyl stay smooth and last long. This section explains key steps to wrap edges well. Follow these to get clean and sharp results.
Measuring And Cutting Vinyl
Start by measuring the edge area carefully. Add extra length to cover the curves and corners. Cut the vinyl slightly larger than the edge size. This extra helps during wrapping and prevents gaps. Use a sharp blade to get clean cuts. Clean cuts stop the vinyl from tearing later.
Heating And Stretching Methods
Heat softens the vinyl for easy bending. Use a heat gun or warm air to warm the vinyl gently. Do not overheat; too much heat can damage the material. Stretch the vinyl slowly while heating. This helps it fit curves without wrinkles. Keep the vinyl warm as you work to keep it flexible.
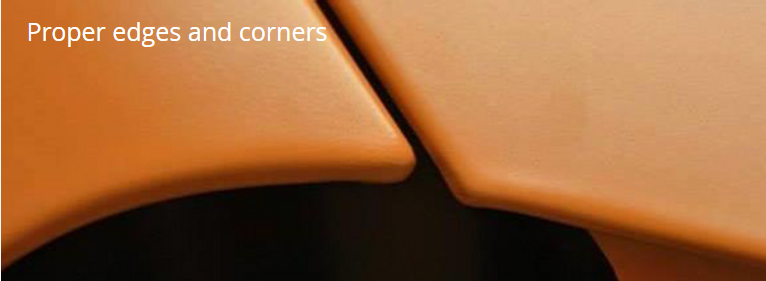
Folding And Tucking Edges
Fold the vinyl over the edge smoothly. Press down to stick it firmly. Tuck extra vinyl into corners carefully. Use a plastic squeegee to avoid scratches. Make small folds or cuts if needed for sharp corners. This ensures the vinyl lies flat and looks neat. Check for bubbles and smooth them out.
Common Challenges
Vinyl wrapping edges can be tricky. Many people face problems that slow down their work. Knowing these common challenges helps avoid mistakes. It also makes the wrap last longer and look better. The most frequent issues include bubbles, wrinkles, handling curves, and lifting edges.
Avoiding Bubbles And Wrinkles
Bubbles and wrinkles spoil the smooth look of vinyl wraps. They happen when air gets trapped under the film. Using a heat gun softens the vinyl and makes it easier to stretch. Press the vinyl down slowly and push air out from the center. Use a squeegee with gentle pressure for best results.
Handling Complex Curves
Curves are tough because vinyl can tear or stretch too much. Heat helps make the vinyl flexible. Pull the film gently over curves and hold it in place. Cut small slits in the vinyl if needed to fit tight corners. Take your time to avoid wrinkles and keep the wrap smooth.
Preventing Lifting And Peeling
Lifting happens when edges are not stuck well. Clean the surface before wrapping to remove dirt and oil. Use a primer to improve vinyl adhesion on rough areas. Press edges firmly and heat them to seal the vinyl. Avoid stretching edges too much to keep them stuck longer.

Credit: www.youtube.com
Finishing Touches
Finishing touches give your vinyl wrap a clean, professional look. These steps help protect the wrap and make it last longer. Careful attention now saves problems later. Follow simple steps to finish your edges perfectly.
Trimming Excess Vinyl
Use a sharp blade to cut extra vinyl at the edges. Cut slowly to avoid damaging the surface below. Keep the blade angled away from the wrap. Trim close but leave a small margin for safety. Clean cuts prevent peeling and keep edges neat.
Sealing Edges For Durability
Apply edge sealer to protect the vinyl from lifting. Use a brush or applicator for even coverage. Seal all edges, especially corners and curves. This step keeps water and dirt out from under the wrap. It strengthens the bond and extends the life of your wrap.
Post-application Care
Wait at least 24 hours before washing the wrapped surface. Use mild soap and soft cloths to clean. Avoid high-pressure water or harsh chemicals. Check edges regularly for lifting or damage. Fix small issues quickly to keep the wrap looking new. Proper care helps the wrap stay smooth and bright longer.
Credit: graphics-pro.com
Frequently Asked Questions
How Do You Prepare Edges For Vinyl Wrapping?
Clean the edges thoroughly using isopropyl alcohol. Remove dirt, grease, and old adhesive. Dry completely before applying vinyl. Proper prep ensures better adhesion and prevents peeling.
What Tools Are Needed For Wrapping Vinyl Edges?
Essential tools include a heat gun, squeegee, utility knife, and edge roller. These help in stretching, smoothing, and trimming vinyl for tight, clean edges.
How To Avoid Bubbles When Wrapping Vinyl Edges?
Apply vinyl slowly, using a squeegee to smooth out air pockets. Use a heat gun to gently warm vinyl for better flexibility and bubble removal.
Can Vinyl Wrap Edges Without Heat?
Heat improves flexibility and adhesion but wrapping thin edges may work without heat. However, heat is recommended for a durable, professional finish.
Conclusion
Vinyl wrapping edges takes patience and careful work. Use the right tools and follow steps slowly. Stretch the vinyl gently to avoid wrinkles or bubbles. Heat helps the vinyl stick better around curves. Take your time to trim excess material cleanly.
Practice makes the process easier and more precise. With these tips, your vinyl wrap will look neat and last longer. Keep trying, and enjoy the fresh look your wrap gives.


