
Struggling to get your wheel nut covers off? You’re not alone.
These covers can be surprisingly tricky to remove, especially if you don’t have the right tools or technique. But don’t worry—once you know the simple steps, you’ll save time and avoid damage to your wheels. Keep reading, and you’ll learn how to easily and safely remove your wheel nut covers, even if it feels impossible right now.
Types Of Wheel Nut Covers
Wheel nut covers protect the nuts that hold your wheels in place. They keep dirt and rust away. Covers come in different types. Knowing these types helps you remove them safely. Some covers are easy to take off. Others need special tools or care.
Plastic Covers
Plastic covers are common and lightweight. They snap on over the wheel nuts. They are easy to remove by hand or with a tool. Plastic covers can crack if forced too hard. They often wear out faster than metal covers.
Metal Covers
Metal covers are strong and last longer. They protect nuts from damage and rust. These covers may be heavier and fit tightly. Removing metal covers might need a wrench or special tool. They offer better protection but require care during removal.
Snap-on Vs. Bolt-on
Snap-on covers click onto the nuts. They come off with gentle prying or pulling. Bolt-on covers screw onto the nuts. These need a wrench or socket to remove. Knowing the type helps pick the right removal method. Snap-on covers are faster to remove. Bolt-on covers are more secure but harder to take off.
Tools You’ll Need
Removing wheel nut covers requires the right tools. Having the proper equipment makes the job easier and safer. You need a few basic hand tools and some specialized items. Safety gear is also important to protect yourself during the process.
Basic Hand Tools
A flathead screwdriver helps pry off the covers gently. A wrench can loosen tight nuts if needed. Pliers provide extra grip for stubborn covers. These simple tools are often enough for many wheel nut covers.
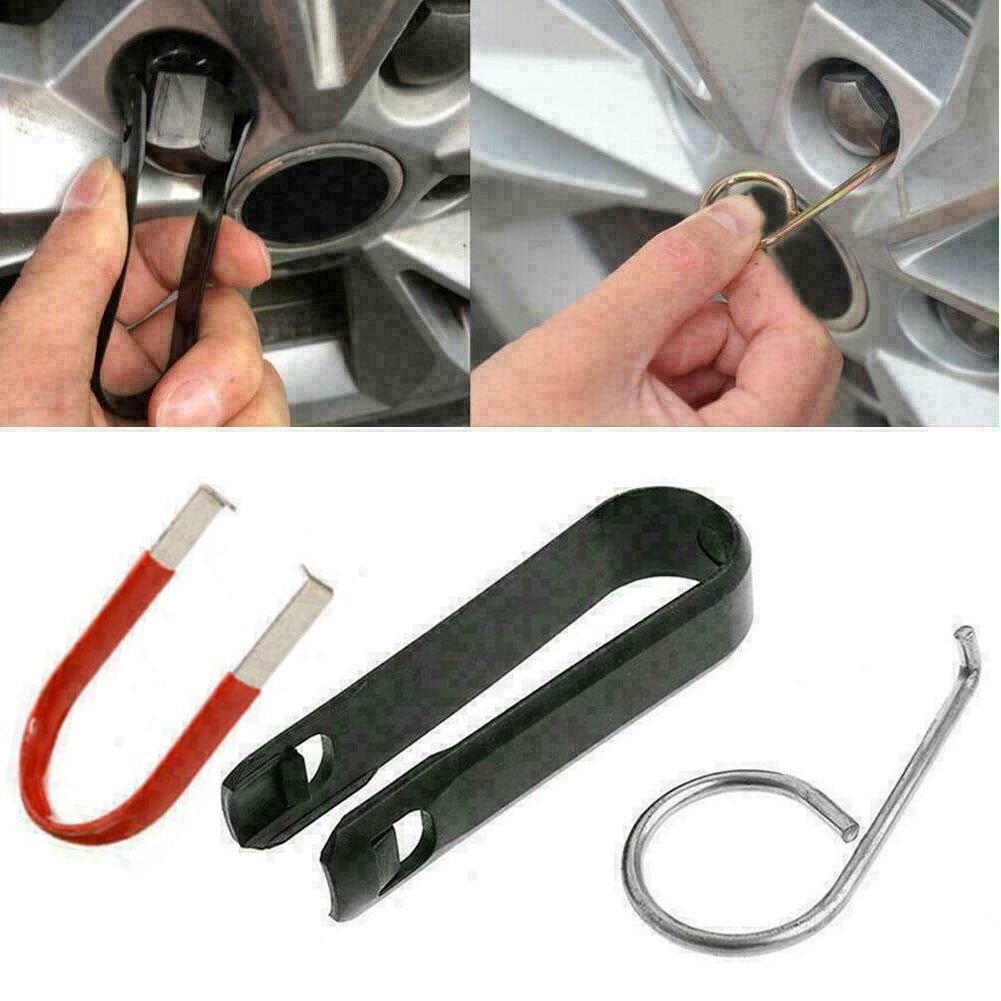
Specialized Removal Tools
Some covers need a special removal tool. These tools fit over the cover and twist it off without damage. A wheel nut cover remover or a plastic pry tool works well. These tools reduce the risk of scratching your wheels.
Safety Gear
Gloves protect your hands from sharp edges. Safety glasses shield your eyes from flying debris. Wearing closed-toe shoes keeps your feet safe. Safety gear helps prevent injuries during the removal process.
Preparation Steps
Before removing wheel nut covers, prepare well. Preparation makes the process safe and easier. It helps avoid damage to your vehicle and the covers. Follow these simple steps to get ready.
Cleaning The Area
Start by cleaning the wheel area. Dirt and grime can hide the covers’ edges. Use a brush or cloth to wipe the wheel. This helps you see how the covers fit. Clean surfaces also prevent slipping during removal.
Securing The Vehicle
Make sure the vehicle is stable and won’t move. Park on a flat surface. Engage the parking brake. Use wheel chocks if available. Safety is important before you work on the wheels.
Inspecting The Covers
Look at the wheel nut covers carefully. Check for clips or screws holding them. Note the size and shape of the covers. This helps you choose the right tools. Knowing the cover type prevents damage during removal.
Techniques To Remove Wheel Nut Covers
Removing wheel nut covers can be simple with the right methods. These covers protect the nuts but can be tricky to take off. Using proper tools and techniques will help you remove them safely. The following sections explain easy ways to do this.
Using A Flathead Screwdriver
A flathead screwdriver is a common tool for removing wheel nut covers. Gently insert the screwdriver under the edge of the cover. Twist the screwdriver slowly to lift the cover. Avoid using too much force to prevent damage. Work your way around the cover until it pops off.
Leveraging A Prying Tool
A prying tool can make cover removal easier. Place the tool under the cover’s edge. Apply light pressure to lift the cover away from the wheel. Move the tool around the cover to loosen it evenly. This method reduces the risk of scratching your wheels.
Applying Lubricants
Lubricants help loosen stuck wheel nut covers. Spray a small amount around the cover base. Let it sit for a few minutes to work. The lubricant reduces friction, making the cover easier to remove. Use a cloth to wipe away excess liquid after removal.
Using A Tire Iron Or Wrench
A tire iron or wrench can also assist in cover removal. Place the tool carefully at the cover edge. Pry gently to lift the cover off. This approach provides good leverage on tight covers. Be cautious to avoid bending the cover or tool.
Dealing With Stuck Or Damaged Covers
Wheel nut covers can get stuck or damaged over time. Dirt, rust, or impact can cause them to hold tight. Removing these covers needs care to avoid damage to the wheel or cover. Use simple methods to loosen them without force.
Try gentle techniques first. Strong pulling can break the cover or wheel nut. Patience and the right tools help a lot. Below are safe ways to deal with stuck or damaged wheel nut covers.
Applying Heat Carefully
Heat can help loosen stuck wheel nut covers. Use a hairdryer or heat gun on low setting. Warm the cover for a few minutes. Heat expands the metal slightly, easing removal.
Do not use an open flame. Avoid overheating to protect the wheel paint. Test heat on a small area first. Use gloves to avoid burns during the process.
Tapping Gently With A Hammer
Light taps can loosen a stuck cover. Use a rubber or wooden mallet for gentle force. Tap around the cover edges softly. This vibration helps break rust or dirt bonds.
Avoid hard hits to prevent cracks or dents. Check progress after every few taps. Stop if the cover starts to move or if damage appears.
When To Seek Professional Help
Some covers stay stuck despite your efforts. Covers may be cracked or severely damaged. Professionals have tools and experience for tough cases.
Visit a mechanic or tire shop if needed. They can safely remove covers without causing harm. This prevents bigger repair costs later. Don’t risk injury or damage by forcing the cover off.
Credit: www.walmart.com
Preventing Damage During Removal
Removing wheel nut covers needs care. These covers protect the nuts and keep your wheels looking good. Mistakes during removal can cause scratches or cracks. Taking the right steps helps keep the covers in top shape. This saves money and effort later.
Avoiding Scratches
Use a soft tool like a plastic pry bar or a flathead screwdriver wrapped in cloth. Metal tools can scratch the cover or wheel. Work slowly and gently around the edges. Avoid using too much force. Scratches reduce the look and value of your wheels.
Maintaining Cover Integrity
Check the cover for cracks before removal. Support the cover evenly while prying it off. Do not bend or twist the cover too hard. Handle it with care to avoid breaking clips or parts. A damaged cover may not fit back properly.
Proper Storage After Removal
Place the covers in a soft cloth or box after removal. Avoid stacking them directly on hard surfaces. Store them in a dry place to prevent rust or dirt buildup. Proper storage keeps the covers clean and ready to use again.
Tips For Quick And Safe Removal
Removing wheel nut covers can seem tricky. Using the right approach makes the job faster and safer. These tips help prevent damage to your wheels and covers. Follow simple steps to protect your vehicle and tools.
Work Methodically
Start by loosening each wheel nut cover one at a time. Avoid rushing or skipping steps. Check each cover carefully before trying to remove it. Work on one wheel nut cover fully before moving to the next. This prevents mistakes and keeps the process organized.
Use The Right Tools
Choose tools designed for wheel nut covers. A plastic pry tool or a flat screwdriver works well. Avoid metal tools that can scratch or damage the covers. Use a cloth to protect the wheel surface while prying. Proper tools reduce the risk of injury and damage.
Take Your Time
Don’t force the covers off quickly. Gentle, steady pressure is key. Pause if a cover feels stuck. Try a small wiggle or rotate slightly to loosen it. Patience prevents breaking the cover or hurting yourself. Slow and careful works best.

Credit: www.youtube.com

Credit: www.reddit.com
Frequently Asked Questions
How Do I Remove Wheel Nut Covers Safely?
Use a flathead screwdriver or a plastic pry tool. Insert it gently under the cover’s edge. Pry slowly to avoid damage. Work your way around the cover until it pops off easily. Avoid using excessive force to prevent scratches.
Can I Use Common Tools To Remove Wheel Nut Covers?
Yes, common tools like flathead screwdrivers or plastic pry bars work well. These tools help you lift the cover without damaging the wheel or cover itself. Always protect the wheel surface by wrapping the tool tip with tape.
Why Are Some Wheel Nut Covers Hard To Remove?
Some covers fit tightly or have locking mechanisms. Dirt and rust can also make removal difficult. Using the correct tool and applying gentle, steady pressure helps loosen stubborn covers safely.
Is It Necessary To Remove Wheel Nut Covers Regularly?
Not always, but removal is essential during tire changes or maintenance. Regular checks prevent dirt buildup and rust around the nuts. Keeping covers clean also preserves their appearance and function.
Conclusion
Removing wheel nut covers is easier than it seems. Use the right tools and a gentle touch. Start by loosening carefully to avoid damage. Take your time and work evenly around the cover. Keep a firm grip to prevent slips.
Once off, clean the area before putting new covers. This simple process saves time and keeps wheels looking good. Practice makes the task quicker and smoother. You can handle this with patience and care. Now, your wheels are ready for any maintenance or change.

