
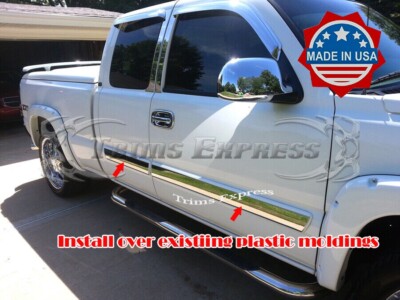
If you want to give your Silverado a fresh, customized look, installing body side molding is a smart choice. Not only does it protect your truck’s doors from dings and scratches, but it also adds a sleek, finished appearance.
You might think this job is tricky or requires a pro, but with the right steps, you can do it yourself and save time and money. Keep reading, and you’ll learn exactly how to install body side molding on your Silverado quickly and easily—no special tools or skills needed.
By the end, your truck will look sharper and be better protected. Let’s get started!
Tools And Materials Needed
Installing body side molding on your Silverado requires the right tools and materials. Proper preparation ensures a smooth and lasting installation. Knowing what you need saves time and avoids mistakes. Below are the key items to gather before starting the project.
Body Side Molding Types
Choose the correct molding type for your Silverado model. Common types include clip-on, adhesive-backed, or screw-on moldings. Clip-on moldings snap into place using factory clips. Adhesive-backed moldings stick directly to the vehicle’s surface. Screw-on moldings use screws and clips for extra strength. Pick the type that fits your truck and your skill level.
Required Tools
Gather basic tools for the installation process. A flat-head screwdriver helps remove old molding and clips. A trim removal tool prevents scratching the paint. A clean cloth wipes surfaces before applying molding. Use a measuring tape for precise placement. A drill may be needed for screw-on moldings. Have a heat gun or hair dryer to soften adhesive if necessary.
Preparation Materials
Prepare the truck surface for strong adhesion. Rubbing alcohol or adhesive remover cleans old glue and dirt. Masking tape marks the molding position for accurate alignment. Use painter’s tape to protect paint around the molding area. Have replacement clips or fasteners ready if the old ones break. Ensure the surface is dry and free of grease before starting.
Credit: www.ebay.com
Preparing The Silverado Surface
Preparing the surface of your Silverado is a key step before installing body side molding. A clean, smooth surface helps the molding stick better. It also ensures a neat, professional look. Take time to prepare well. This makes installation easier and lasts longer.
Cleaning The Area
Start by washing the area where the molding will go. Use soap and water to remove dirt and grime. Dry the surface completely with a soft cloth. Avoid oily or waxy cleaners. They can stop the adhesive from sticking properly.
Removing Old Molding
Carefully remove any old molding or adhesive residue. Use a plastic scraper to avoid scratching the paint. If needed, apply an adhesive remover designed for cars. Wipe the area clean after removal. This prevents bumps or gaps under the new molding.
Surface Inspection
Look closely at the surface for dents, rust, or paint damage. These issues can affect the molding’s fit and hold. Fix any damage before you proceed. A smooth, even surface gives the best results.
Aligning The Body Side Molding
Aligning the body side molding on your Silverado is a key step. Proper alignment ensures a clean look and strong attachment. Take your time to get it right. Small mistakes can cause gaps or uneven placement.
Marking Placement
Start by holding the molding against the truck’s side. Check the height and distance from doors and windows. Use a pencil or masking tape to mark the edges. These marks guide you during installation. Make sure marks are straight and even on both sides.
Test Fitting
Before final fixing, place the molding on the marked spots. See if it fits well and looks balanced. Adjust the marks if needed. This step avoids mistakes and saves time. Test fitting helps you feel confident before sticking the molding permanently.

Credit: www.ebay.com
Installing The Body Side Molding
Installing the body side molding on your Silverado improves its look and protects the doors from dings. This process is simple if you follow the right steps carefully. Prepare the area and tools before starting to ensure smooth installation.
Applying Adhesive Or Clips
Start by cleaning the surface where the molding will go. Use rubbing alcohol for a clean, dry area. Choose adhesive tape or clips based on your molding type. Peel off the backing from the adhesive tape slowly. Press the molding firmly along the side panel. If clips are used, align them with the holes on the truck door. Push the molding gently to snap the clips in place.
Securing The Molding
After placing the molding, press it firmly to ensure a strong bond. Use even pressure along the entire length. For adhesive, hold for a few minutes to help it stick. If clips are used, check each one is tightly fixed. Tighten any loose clips with a screwdriver. Avoid rushing this step to prevent future peeling or falling.
Final Adjustments
Check the molding’s alignment from different angles. Make small shifts before the adhesive sets completely. Remove any excess adhesive with a clean cloth. Inspect for gaps between the molding and the truck body. Press down again on loose areas if needed. Let the adhesive cure for 24 hours before washing your Silverado.
Post-installation Care
After installing body side molding on your Silverado, proper care helps keep it looking new. Taking time to maintain the molding protects your truck and extends its life. Small efforts make a big difference in preserving the finish and fit. Follow these simple steps to care for your molding and avoid common problems.
Cleaning And Maintenance Tips
Clean the molding regularly with mild soap and water. Avoid harsh chemicals that can damage the finish. Use a soft cloth or sponge to prevent scratches. Dry the molding completely after washing to stop water spots. Check the molding edges for dirt buildup and clean gently. Apply a protective wax or sealant to keep it shiny and safe from sun damage. Regular cleaning keeps the molding looking fresh and new.
Troubleshooting Common Issues
Sometimes, molding may lift or peel after installation. Check for dirt or moisture under the tape before fixing. Press the molding firmly along the edges to ensure a good bond. If the tape loses stickiness, replace it with automotive-grade adhesive tape. Watch for cracks or chips and repair them quickly with touch-up paint. Tighten any loose clips or fasteners that hold the molding in place. Early attention prevents bigger problems later.

Credit: www.americantrucks.com
Frequently Asked Questions
How Do I Prepare The Silverado For Body Side Molding?
Clean the surface thoroughly with soap and water. Dry it completely. Remove any old adhesive or debris. This ensures strong molding adhesion and a smooth finish.
What Tools Are Needed To Install Body Side Molding?
You will need adhesive promoter, cleaning cloth, measuring tape, masking tape, and the molding strips. A plastic trim tool helps with installation. These tools ensure accurate and secure placement.
How Long Does It Take To Install Body Side Molding?
Installation typically takes 30 to 60 minutes. Preparation and alignment are key. Allow adhesive to cure for at least 24 hours before washing the vehicle.
Can I Install Body Side Molding Myself?
Yes, installation is DIY-friendly with proper tools and preparation. Follow instructions carefully to avoid damage. Patience and precision are essential for the best results.
Conclusion
Installing body side molding on your Silverado is simple and rewarding. Follow each step carefully for the best fit. Use the right tools to avoid damage. Take your time to clean surfaces before applying molding. Check alignment often to keep everything straight.
This small upgrade can improve your truck’s look and protect the sides. You don’t need to be an expert to do it yourself. Just stay patient and work carefully. Enjoy your refreshed Silverado with new side molding that lasts.


