
Want to give your car’s steering wheel a fresh, stylish look while improving your grip and comfort? Installing a leather steering wheel cover with an X stitch design is a simple way to do just that.
You might think it’s tricky, but with the right steps, you can easily transform your driving experience. In this guide, you’ll learn exactly how to install your leather steering wheel cover perfectly, so it fits snugly and looks amazing. Keep reading—you’re just a few steps away from upgrading your car’s interior like a pro!
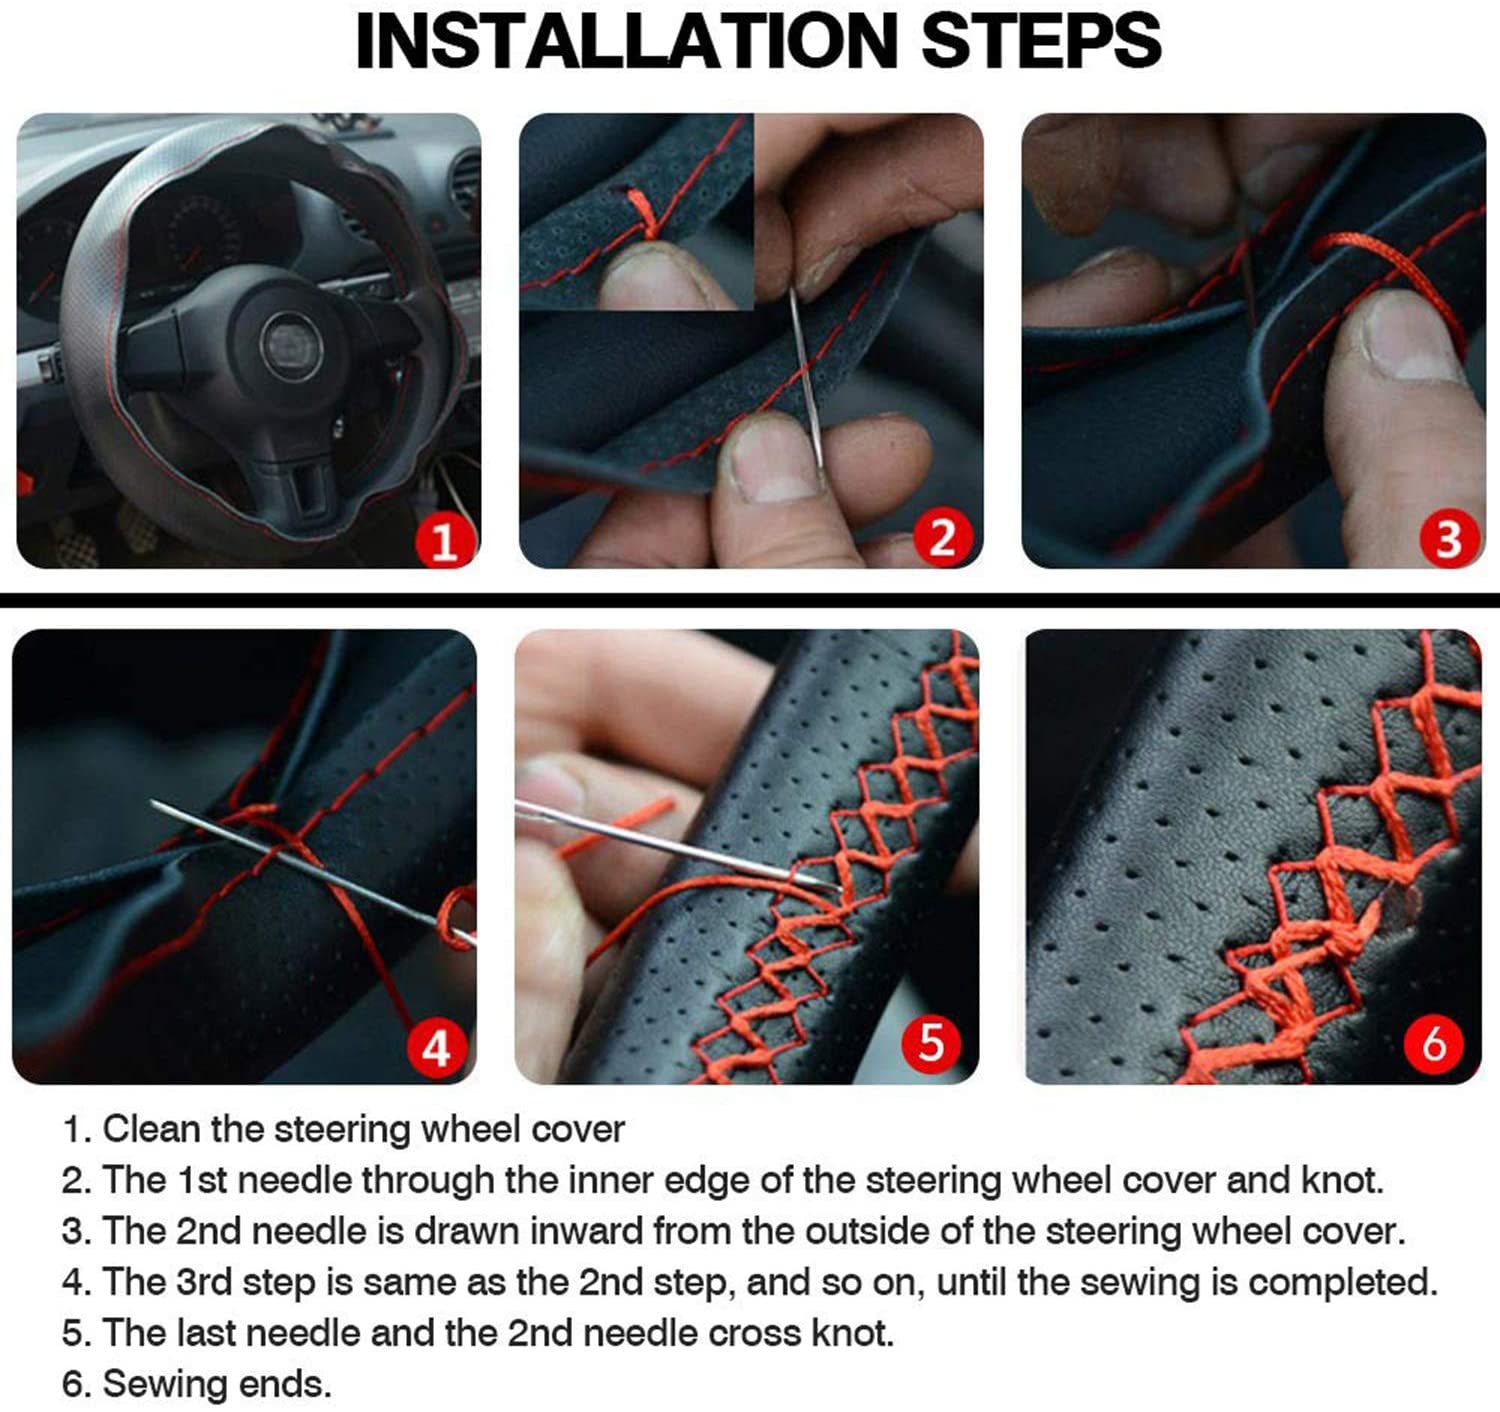
Credit: www.tesery.com
Choosing The Right Leather Steering Wheel Cover
Choosing the right leather steering wheel cover is important for comfort and style. A good cover protects your wheel and feels nice to hold. It also adds a personal touch to your car’s interior.
Consider the type of leather, the size of your steering wheel, and the stitch style. Each factor affects how the cover looks and fits. Take time to pick the best one for your needs.
Types Of Leather Materials
Leather covers come in different types. Genuine leather is soft and durable. It feels natural and lasts long. PU leather is cheaper and easier to clean. It looks nice but may wear out faster. Choose leather that fits your budget and use.
Measuring Your Steering Wheel
Measure your steering wheel before buying a cover. Use a tape measure to find the diameter. Measure across the center of the wheel from one side to the other. Knowing the size helps you find a cover that fits well. A tight fit keeps the cover from slipping.
Selecting The X Stitch Style
X stitch adds a stylish look and extra strength. The stitches keep the cover tight and secure. You can choose thread colors to match your car’s interior. Pick a stitch style that feels good in your hands and looks great.
Preparing Your Steering Wheel
Preparing your steering wheel is a key step before installing a leather steering wheel cover with X stitch. A clean and smooth surface helps the cover fit well. It also makes the cover last longer and look better.
Take your time with preparation. This makes the installation process easier and more effective.
Cleaning The Surface
Start by wiping the steering wheel with a damp cloth. Remove all dust, dirt, and oils. Use mild soap if needed. Avoid harsh chemicals that can damage the wheel.
Dry the wheel completely before moving on. A clean surface helps the leather grip firmly. It also prevents slipping or bunching of the cover.
Removing Old Covers Or Accessories
Check for any old covers, grips, or accessories on your steering wheel. Remove them carefully to avoid damage. Leftover materials can cause bumps and make the new cover fit poorly.
Inspect the wheel for sticky residue or small debris. Use a gentle cleaner to remove any leftovers. A smooth, clean surface ensures a perfect fit for your new leather cover.
Tools And Materials Needed
Installing a leather steering wheel cover with X stitch requires the right tools and materials. Having everything ready makes the process smooth and less frustrating. This section lists all essentials and helps you pick the best thread and needle for the job.
List Of Essential Tools
- Leather steering wheel cover
- Heavy-duty needle
- Strong thread (waxed thread preferred)
- Scissors
- Thimble for hand protection
- Seam ripper (optional for adjustments)
- Measuring tape
- Clamps or clips to hold leather in place
- Leather punch or awl to make stitching holes
Choosing The Right Thread And Needle
Select a thick, durable thread designed for leather. Waxed polyester thread works well because it resists wear and moisture.
Use a heavy-duty needle, often called a leather needle. It has a sharp, triangular point that pierces leather easily.
Needle size depends on leather thickness. For most steering covers, size 18 or 20 is ideal.
Thread and needle quality affect the durability and look of your X stitch. Choose them carefully for a neat finish.
Starting The Stitching Process
Starting the stitching process is key to a neat leather steering wheel cover. It sets the foundation for a tight, secure fit. Take time to prepare carefully. This will help the cover look smooth and last longer.
Positioning The Cover
Place the leather cover evenly around the steering wheel. Make sure it fits snugly without wrinkles. Align the edges so the holes for stitching match perfectly. Check that the cover covers the wheel fully. Adjust it until the fit feels right.
Securing The Starting Point
Find the spot where you want to begin stitching. Usually, this is at the bottom of the wheel for easy access. Use a small clip or tape to hold the cover in place. This stops it from moving while you sew. Thread your needle and pull it through the first hole. Tie a knot to keep the thread secure. This will prevent your stitches from loosening later.
Executing The X Stitch Technique
Executing the X stitch technique is key to a neat and secure leather steering wheel cover. This stitching style looks stylish and holds the cover tight. The X stitch uses a crisscross pattern, adding strength and a professional finish to your work. It takes patience but anyone can do it with clear steps and care.
Basic Steps For X Stitch
Start by threading a strong needle with leather lace or thick thread. Tie a knot at the end to secure it. Begin stitching at one end of the cover, pushing the needle through both leather edges.
Pull the thread tight but not too tight to avoid puckering. Skip a few holes diagonally, then push the needle through again. This creates the first diagonal of the X.
Return by stitching the opposite diagonal, crossing the thread over the first line. Repeat this pattern along the entire edge. Finish with a knot to keep the thread from unraveling.
Tips For Even And Tight Stitches
Keep your stitches evenly spaced for a clean look. Mark stitch points lightly with a pencil or chalk before sewing. This helps keep the X pattern consistent.
Maintain steady tension on the thread. Too loose stitches look sloppy, and too tight stitches can tear the leather. Pull the thread snugly after each stitch.
Use a thimble to push the needle through thick leather. It protects your fingers and makes stitching easier. Take breaks to avoid mistakes from tired hands.

Credit: www.youtube.com
Finishing The Installation
Finishing the installation of your leather steering wheel cover with the X stitch is important. This step ensures the cover stays tight and looks neat. Take your time to complete the process carefully. A clean finish makes the cover last longer and feel comfortable to use.
Tying Off The Thread
After stitching the cover tightly, it is time to tie off the thread. Pull the thread gently but firmly to close the last stitch. Make a small knot close to the leather to stop the thread from slipping. Use a sharp pair of scissors to cut off the extra thread. Leave a tiny tail to prevent the knot from coming undone.
Final Adjustments And Inspection
Check the cover all around the wheel. Look for any loose stitches or gaps. Pull the cover gently to make sure it fits snugly. Smooth out any wrinkles or folds in the leather. Make sure the cover does not block the view of the dashboard or interfere with driving. Adjust if needed for comfort and safety.
Maintenance Tips For Your Leather Cover
Keeping your leather steering wheel cover in good shape takes some care. Regular maintenance protects the leather and keeps it soft and strong. Follow simple steps to clean and protect your cover. This helps it look new for a long time.
Cleaning And Conditioning Leather
Clean your leather cover gently with a soft cloth. Use mild soap mixed with water for dirt and stains. Avoid harsh chemicals that can damage the leather.
After cleaning, apply a leather conditioner. This keeps the leather soft and prevents cracks. Use a small amount and rub it in evenly. Let it dry naturally before using the steering wheel.
Preventing Wear And Tear
Protect your cover from direct sunlight to avoid fading. Park in shaded areas or use a sunshade when possible.
Avoid sharp objects near the steering wheel. Rings, keys, or nails can scratch the leather surface. Try to keep your hands clean to reduce dirt buildup.

Credit: www.youtube.com
Frequently Asked Questions
How Do I Prepare My Steering Wheel For Leather Cover Installation?
Clean the steering wheel thoroughly to remove dirt and oils. Use a mild cleaner and dry it well. This ensures better adhesion and a smooth fit for the leather cover X stitch.
What Tools Are Needed To Install Leather Steering Wheel Cover?
You need a needle, strong thread, and scissors for X stitch installation. A pair of pliers can help pull the thread tight. These tools ensure a secure and professional-looking fit.
How Long Does It Take To Install A Leather Steering Wheel Cover?
Installation typically takes 30 to 60 minutes depending on skill level. Taking time ensures each stitch is tight and even. Rushing can cause loose stitches or damage to the leather.
Can I Install The Leather Cover Without Sewing Skills?
Basic sewing skills are helpful but not mandatory. The X stitch pattern is simple and guides you step-by-step. Practice on a small section first to gain confidence.
Conclusion
Installing a leather steering wheel cover with X stitch brings style and comfort. Follow the steps carefully for a snug fit. Take your time to avoid mistakes or damage. The cover protects your wheel and feels good to hold. Enjoy driving with a fresh, neat look inside your car.
Regular cleaning keeps the leather soft and lasting longer. This small change makes a big difference in your car’s interior. Now, your steering wheel looks great and feels better every day.

