Have you ever wanted your car to stand out with a powerful, attention-grabbing sound? Installing a train horn on your car can do just that.
It’s loud, unique, and turns heads wherever you go. But how do you make sure it’s done right and safe? In this guide, you’ll discover simple, step-by-step instructions to install a train horn on your car quickly and easily. Keep reading, and by the end, you’ll have the confidence to give your vehicle that unforgettable roar.

Credit: www.youtube.com
Choosing The Right Train Horn
Choosing the right train horn for your car is an important step. It affects sound quality, safety, and how well it fits your vehicle. Picking the correct horn can also keep you within the law. Consider all factors carefully before buying.
Types Of Train Horns
There are many types of train horns. Some sound loud and deep, while others are higher and sharper. Air-powered horns give strong, clear blasts. Electric horns are easier to install but less loud. Choose a type that fits your style and needs.
Compatibility With Your Car
Not all train horns fit every car. Check the space in your engine bay or under the hood. Some horns need an air compressor, which takes room. Also, your car’s electrical system must support the horn. Match the horn to your car for easy installation.
Legal Considerations
Train horns can be very loud. Many places have rules about using them on cars. Some areas allow them only for emergencies or off-road use. Check local laws before installing. Using a horn illegally can lead to fines or trouble.
Gathering Necessary Tools And Materials
Before installing a train horn on your car, gather all necessary tools and materials. This step saves time and avoids interruptions during the installation. Having everything ready ensures a smooth, safe process.
Below is a list of essential tools and additional materials you will need. Prepare these items before starting the work.
Essential Tools List
- Socket wrench set for bolts and nuts
- Screwdrivers (flathead and Phillips)
- Wire strippers for electrical connections
- Crimping tool to secure wire connectors
- Electrical tape for insulation
- Drill with bits for mounting holes
- Multimeter to check electrical circuits
- Adjustable pliers for gripping and twisting
Additional Materials Needed
- Train horn kit with compressor and horns
- Relay to control the horn power
- Fuse holder and fuse for safety
- Heavy gauge wiring for power and ground
- Mounting brackets or hardware
- Zip ties to organize wires
- Battery terminal connectors
Preparing Your Car For Installation
Preparing your car for a train horn installation is a key step. It helps the process go smoothly and keeps your car safe. Taking time to get ready means fewer problems later. You will work with wires, bolts, and air compressors. So, the right setup is important.
Selecting The Mounting Location
Choose a strong spot to mount the horn. Look for a place that stays dry and away from moving parts. The front of the car is a common spot. Make sure the horn will not block airflow to the engine. Also, check that it will not get wet from rain or splashes.
Disconnecting The Battery
Always disconnect the car battery before starting work. This step stops electric shocks and short circuits. Remove the negative cable first, then the positive. Keep tools away from the battery terminals. This will keep you safe while working on the horn wiring.
Clearing Space For Components
Clear space under the hood or inside the car. Remove any covers or parts blocking the installation area. Make room for the air compressor, relay, and wiring. A tidy workspace helps you work faster. It also prevents damage to car parts during installation.
Mounting The Horn
Mounting the horn correctly is key to a good installation. It keeps the horn safe and helps it sound loud and clear. Take your time to pick the right spot and fasten it well. A proper mount makes your train horn work better and last longer.
Positioning The Horn
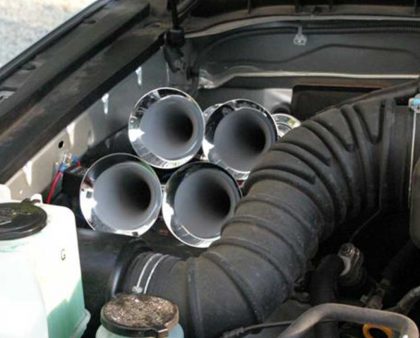
Choose a place where the horn fits easily. Avoid spots near hot engine parts or moving pieces. The front of the car, behind the grille, works well. Make sure the horn has space to sound freely. Keep it away from water or dirt as much as possible.
Securing The Brackets
Use the brackets that came with the horn kit. Hold the horn firmly without shaking or moving. Tighten the screws or bolts until the horn feels steady. Use washers if needed to keep the mount strong. Loose brackets can cause noise or damage.
Ensuring Proper Orientation
Point the horn’s opening downward or sideways. This direction helps water drain out and stops dirt from entering. Avoid pointing the horn straight up. Correct orientation improves sound quality and horn life. Double-check the angle before final tightening.
Installing The Air Compressor And Tank
Installing the air compressor and tank is a key step in setting up a train horn on your car. These parts provide the air pressure needed to sound the horn loud and clear. Proper installation ensures safety and good performance. Take your time to place and connect everything correctly.
Mounting The Compressor
Find a strong, dry spot near the engine or under the hood. Use the mounting brackets that come with the compressor. Secure the compressor tightly with bolts. Make sure it does not move or touch hot parts. Keep it away from water and dirt to avoid damage.
Attaching The Air Tank
Choose a flat surface in the trunk or under the car for the tank. Use the mounting straps or brackets to hold the tank firmly. Position the tank so the air fittings are easy to reach. Check that the tank is secure and will not shift while driving.
Connecting The Air Lines
Use the correct air hoses to connect the compressor to the tank. Cut hoses to the right length for a neat setup. Attach hoses tightly to prevent leaks. Use clamps or fittings supplied with the kit. Test for leaks by listening or using soapy water on connections.
Wiring The Electrical Components
Wiring the electrical components is a key step in installing a train horn on your car. This process powers the horn and ensures it works safely and correctly. Take your time to follow each step carefully. Proper wiring prevents damage to your car’s electrical system.
Routing The Wiring Harness
Start by routing the wiring harness from the horn to the engine bay. Avoid sharp edges and hot parts that can damage wires. Use zip ties to secure the harness neatly along the frame. Keep wires away from moving parts like the fan or belts. This keeps the wiring safe and reliable.
Connecting To Power Source
Connect the power wire to a 12-volt source. Usually, the battery positive terminal works best. Use a ring terminal to attach the wire securely. Make sure the connection is tight to avoid power loss. Ground the horn by connecting the negative wire to the car’s chassis. A good ground completes the circuit for the horn.
Installing The Relay And Fuse
Install a relay to control the high power needed by the horn. The relay protects your car’s electrical system from overload. Place the relay close to the battery for better performance. Add an inline fuse between the battery and relay. The fuse stops electrical faults from causing damage. Use the correct fuse size as stated in the horn’s manual.
Setting Up The Control Switch
Setting up the control switch is a key step in installing a train horn on your car. The switch allows you to activate the horn easily from inside the vehicle. Proper setup ensures safety and convenience. Follow these steps to install the control switch correctly.
Choosing Switch Location
Select a spot on your dashboard that is easy to reach. Avoid areas that block your view or interfere with driving. The switch should be within arm’s length. Common places include near the steering wheel or on the center console. Make sure the location is dry and protected from damage.
Wiring The Switch
Turn off your car’s power before starting the wiring. Connect the switch wires according to the horn kit’s instructions. Use a fuse to protect the circuit from overload. Secure the wires with electrical tape or zip ties. Keep wires away from moving parts and heat sources.
Testing The Control
Restore power and test the switch by pressing it. The train horn should sound clearly and loudly. If it does not work, check the wiring and connections. Fix any loose or wrong connections. Make sure the switch feels firm and works smoothly.
Testing The Train Horn System
After installing your train horn system, testing is a crucial step. It ensures the horn works correctly and safely. Testing also helps spot any problems early. Follow these steps to check your system thoroughly.
Checking Air Pressure
Start by checking the air pressure in the tank. The pressure gauge should show the recommended level. Low pressure means the horn may not sound loud. Use a compressor to fill the tank if needed. Make sure all air lines are tight and leak-free. This step keeps your horn ready to blow strong.
Activating The Horn
Next, activate the horn using the switch or button installed. Listen carefully to the horn sound. It should be loud and clear, without any hissing or weak notes. Press the horn for a few seconds to check air flow. Turn it off and on a few times to ensure consistency. This confirms your horn system responds well.
Troubleshooting Common Issues
If the horn does not sound right, check for leaks in the air system. Tighten any loose fittings and replace damaged parts. Inspect the wiring for loose or broken connections. Make sure the compressor is working and powering the horn. Clean the horn openings if dirt blocks the sound. These fixes often solve the most common problems.
Maintaining Your Train Horn
Maintaining your train horn keeps it loud and reliable. Regular care helps avoid problems and extends the horn’s life. Follow these simple steps to keep your horn in top shape.
Regular Inspections
Check your train horn often for any damage or loose parts. Look for cracks, rust, or worn wires. Tighten any loose screws or bolts you find. Early checks help catch small issues before they grow.
Cleaning And Upkeep
Keep your train horn clean by wiping it with a soft cloth. Remove dirt and dust from the horn’s openings. Avoid using strong chemicals that might harm the metal. Clean parts let sound travel better and prevent rust.
Replacing Worn Parts
Over time, some parts may wear out or break. Replace old tubes, valves, or diaphragms to keep the horn loud. Use parts that match your horn’s model for best results. Change parts promptly to avoid bigger damage.

Credit: vixenhorns.com
Credit: vixenhorns.com
Frequently Asked Questions
How Do I Install A Train Horn On My Car?
First, mount the horn securely under the hood. Connect the air compressor and tank using air lines. Wire the compressor to the car battery and switch. Test the horn for proper sound and operation before finalizing the setup.
What Tools Are Needed For Train Horn Installation?
You will need basic tools like wrenches, screwdrivers, pliers, and wire strippers. A drill may be required to mount brackets. Also, have electrical tape, zip ties, and a multimeter for wiring tasks and safety checks.
Is Installing A Train Horn Legal On Cars?
Laws vary by location. Many places restrict loud horns to emergency vehicles only. Check your local regulations before installing to avoid fines or legal issues. Use the horn responsibly and consider volume limits.
How Long Does It Take To Install A Train Horn?
Installation typically takes 2 to 4 hours depending on experience. Proper mounting and wiring require careful attention. Allow extra time for testing and troubleshooting any issues that arise during the process.
Conclusion
Installing a train horn on your car adds a unique and loud sound. Follow the steps carefully for a safe setup. Double-check all connections to avoid problems. Test the horn in a quiet place first. Use the horn responsibly and respect others around you.
Enjoy the new sound and stand out on the road. Keep safety and local laws in mind always. This simple upgrade can bring fun and attention. Take your time and work with care.

