
Are you ready to give your car, laptop, or any smooth surface a fresh new look? Learning how to join vinyl wrap properly is the key to achieving a flawless, professional finish.
Whether you’re a beginner or just want to improve your skills, this guide will walk you through simple, clear steps to make your vinyl wrap seamless and stunning. Stick with me, and you’ll discover easy tricks that save you time, avoid costly mistakes, and make your project stand out.
Let’s dive in and transform your surface with confidence!
Choosing The Right Vinyl
Choosing the right vinyl is a key step in the vinyl wrap process. The type and quality of vinyl affect the final look and durability. Picking the wrong vinyl can cause bubbles, peeling, or uneven colors. Understanding different vinyl types and quality helps to make a good choice.
Types Of Vinyl Wraps
Vinyl wraps come in many types. Some have a glossy finish that shines bright. Others have a matte finish for a smooth, non-shiny look. There are also satin finishes, which fall between glossy and matte.
Cast vinyl is thin and flexible. It works well for curves and complex shapes. Calendered vinyl is thicker and less flexible, best for flat surfaces. Choose the type based on the surface you will cover.
Selecting Quality Materials
High-quality vinyl lasts longer and looks better. Low-quality vinyl can fade or peel quickly. Look for vinyl from trusted brands with good reviews. Check the vinyl’s thickness and adhesive type.
Good vinyl should stretch without tearing. The adhesive should stick well but allow repositioning during application. Test a small piece before full application to ensure it fits your needs.
Preparing The Surface
Preparing the surface is the first step in joining vinyl wrap smoothly. A clean and smooth base helps the wrap stick better and last longer. This process takes time but saves effort later.
Cleaning And Drying
Start by cleaning the surface with soap and water. Remove all dirt, grease, and dust. Use a soft cloth to avoid scratches. Rinse well to remove soap residue. Let the surface dry completely. A dry surface ensures strong adhesion.
Removing Imperfections
Check the surface for bumps, scratches, or old glue. Use fine sandpaper to smooth rough spots. Fill deep scratches with a suitable filler. Let the filler dry and sand it flat. Clean the area again to remove dust. A smooth surface prevents wrinkles and bubbles in the wrap.
Tools For Vinyl Joining
Joining vinyl wrap perfectly needs the right tools. These tools help create smooth seams and strong bonds. Using the proper equipment saves time and avoids mistakes.
Every step in vinyl joining requires specific tools. Knowing these tools helps you work with confidence. Here is a list of must-have tools and tips on using heat guns well.
Essential Tools List
- Vinyl squeegee – removes air bubbles and smooths vinyl.
- Sharp utility knife – cuts vinyl cleanly and accurately.
- Heat gun – softens vinyl for easier shaping and joining.
- Seam roller – presses edges together for a tight seal.
- Measuring tape – ensures precise cuts and alignment.
- Gloves – protect hands and prevent fingerprints on vinyl.
- Surface cleaner – removes dirt and oils before application.
Using Heat Guns Effectively
Heat guns soften vinyl to make joining easier. Keep the gun moving to avoid overheating one spot. Hold it about 6 inches from the surface.
Apply gentle heat until the vinyl becomes flexible. Avoid direct heat on seams for too long. This prevents damage and bubbling.
Use the heat gun with a squeegee or roller. Press the vinyl edges together while warming. This creates a strong, seamless bond.
Cutting And Aligning Vinyl
Cutting and aligning vinyl is a key step in joining vinyl wrap smoothly. It ensures the pieces fit perfectly and look seamless on the surface. Careful cutting and precise alignment help avoid wrinkles and bubbles. This section covers how to measure and trim vinyl for the best results.
Measuring For Precision
Measure the surface area carefully before cutting the vinyl. Use a tape measure and note down exact dimensions. Measure twice to avoid mistakes. Mark the vinyl lightly with a pencil or a marker. This helps guide your cuts and keeps lines straight. Precise measurements make the joining process easier and cleaner.
Trimming Techniques
Use a sharp utility knife or vinyl cutter for clean edges. Cut slowly along the marked lines to prevent jagged edges. Trim excess vinyl gradually rather than cutting too much at once. Keep the blade perpendicular to the surface for a straight cut. Smooth edges help the vinyl pieces join without gaps or overlaps.
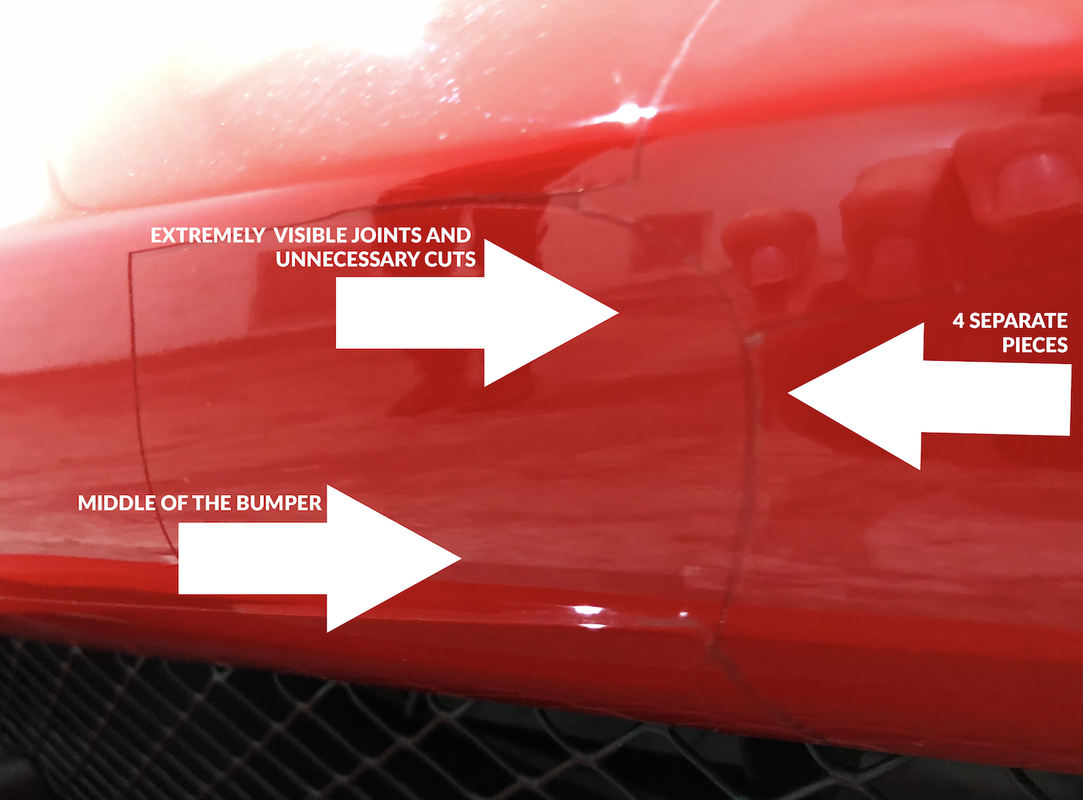
Seam Joining Techniques
Joining vinyl wrap seams is a key skill for a smooth finish. Poor seams can ruin the look and cause peeling. Choosing the right seam joining technique helps keep wraps tight and clean. Each method fits different project needs and vinyl types.
Overlap Method
The overlap method places one vinyl edge over the other. Overlapping by about half an inch creates a strong bond. Use a heat gun to soften the vinyl and press edges firmly. This method hides small errors and offers good water resistance. It’s easy for beginners and works on curved surfaces.
Butt Joint Method
The butt joint method aligns two vinyl edges side by side. Cut edges straight for a clean fit without overlap. Heat both edges slightly before pressing together with a squeegee. This method creates a nearly invisible seam. It needs careful handling to avoid gaps or lifting.
Double-bubble Prevention
Double bubbles form when air traps between vinyl layers. Prevent bubbles by slowly applying heat and pressing out air. Use a felt squeegee to push air toward the edges. Work from the center out for smooth results. Proper tension and slow heat application avoid double bubbles.
Applying Heat And Pressure
Applying heat and pressure is a key step in joining vinyl wrap pieces. It helps the vinyl stick well and creates a smooth, tight finish. Proper heat softens the vinyl, making it easier to stretch and shape. Pressure ensures the vinyl bonds firmly to the surface and to other wrap pieces.
Without the right heat and pressure, the vinyl may peel or show bubbles. This section explains how to use heat and pressure correctly for a strong, clean join.
Heat Application Tips
Use a heat gun or a strong hairdryer to warm the vinyl. Keep the heat source moving to avoid burning the vinyl. Aim for a warm, flexible feel, not too hot to melt it. Test a small area first to check the temperature. Heat helps the vinyl stretch and conform to curves and edges. Heat the edges where two vinyl pieces meet to improve adhesion.
Using Squeegees Correctly
Use a soft squeegee to press the vinyl down firmly. Start from the center and push outwards to remove air bubbles. Apply even pressure to avoid wrinkles or tears. Use firm, steady strokes for the best bond. Change the squeegee angle to reach corners and edges. A good squeegee technique helps the vinyl stay smooth and stick well.
Finishing Touches
The finishing touches are key to a smooth and lasting vinyl wrap. These steps protect the wrap edges and keep the surface flawless. Paying attention here ensures the wrap looks neat and stays in place.
Edge Sealing
Edge sealing stops the vinyl from lifting or peeling. Use a heat gun to warm the edges slightly. Press the edges down firmly with a squeegee or cloth. Apply edge sealant or clear coat to protect the edges from dirt and moisture. This step extends the life of your vinyl wrap.
Removing Air Bubbles
Air bubbles spoil the smooth look of vinyl wrap. Use a pin or needle to poke small holes in stubborn bubbles. Press gently with a squeegee to push air out toward the hole. For tiny bubbles, heat the area lightly and smooth them out. This removes trapped air and ensures a perfect finish.
Credit: mobiletechtraining.com
Common Mistakes To Avoid
Joining vinyl wrap can be tricky for beginners. Small mistakes affect the final look. Avoiding these common errors saves time and money. Focus on key areas to get smooth results. Pay attention to details for a clean finish.
Misalignment Issues
Misalignment causes uneven edges and bubbles. It happens when edges do not line up properly. Take time to position each piece correctly. Use guides or marks to keep alignment straight. Check alignment before pressing down firmly.
Fixing misalignment later is difficult. It can tear or stretch the vinyl wrap. Always peel back gently to adjust if needed. Work slowly and carefully for best results.
Surface Contamination
Dirt, dust, and grease reduce vinyl adhesion. Clean the surface thoroughly before starting. Use soap and water or alcohol wipes. Let the surface dry completely to avoid trapping moisture.
Even small particles cause bumps or peeling. Avoid touching cleaned areas with oily hands. Keep the workspace clean and free of dust. Clean surfaces help the wrap last longer and look smoother.
Maintenance For Longevity
Maintaining your vinyl wrap is key to keeping it fresh and lasting longer. Proper care helps avoid peeling, fading, and damage. Small efforts can protect your investment and keep your wrap looking new.
Regular upkeep keeps the vinyl flexible and strong. Dirt and grime can wear it out faster. Gentle cleaning and quick repairs make a big difference in the lifespan of your wrap.
Cleaning Tips
Use a soft cloth or sponge with mild soap and water. Avoid harsh chemicals or abrasive tools that can scratch the surface. Rinse thoroughly with clean water to remove all soap.
Dry the wrap with a microfiber towel to prevent water spots. Clean your wrap every two weeks or more often if exposed to dirt and dust. Avoid pressure washers on high settings to protect the vinyl edges.
Repairing Minor Damages
Small scratches or air bubbles can appear after installation. Use a heat gun or hair dryer on low heat to soften the vinyl. Press bubbles out gently with a soft squeegee or credit card.
For minor tears, use vinyl wrap repair tape under the damaged area. Cut the tape to size and apply it carefully. Replace damaged sections if the tear grows or the wrap peels off.
Credit: coverstyl.com
Credit: www.articlecity.com
Frequently Asked Questions
What Tools Are Needed To Join Vinyl Wrap Seams?
You need a heat gun, squeegee, vinyl cutter, and seam roller. These tools help align, press, and seal the vinyl edges properly for a smooth finish.
How Do You Align Vinyl Wrap Edges For Joining?
Carefully overlap edges by a few millimeters, then use a squeegee to press them flat. Proper alignment prevents visible seams and ensures a clean look.
Can Vinyl Wrap Seams Be Heat Welded For Durability?
Yes, heat welding melts the vinyl edges slightly, creating a strong bond. This technique increases seam durability and reduces peeling over time.
How To Avoid Bubbles When Joining Vinyl Wrap Panels?
Apply vinyl slowly using a squeegee, pushing air out as you go. Heat the vinyl gently to increase flexibility and reduce trapped bubbles.
Conclusion
Joining vinyl wrap takes patience and careful steps. Clean surfaces well before starting. Use heat to make the wrap bend easily. Press edges firmly to avoid bubbles and creases. Take your time and work slowly. Small mistakes can be fixed with care.
Practice helps improve your skills over time. This method keeps your wrap looking smooth and neat. Try these tips for a clean, lasting finish.


