
If you’re looking to remove your fuel filter quick connect but aren’t sure where to start, you’re in the right place. This task might seem tricky, but with the right steps, you can do it quickly and safely.
Imagine saving time and avoiding damage to your fuel system just by knowing the simple tricks. Keep reading, and you’ll discover how to handle this like a pro, even if you’ve never done it before. Your car will thank you—and so will your wallet.
Tools Needed
Removing a fuel filter quick connect needs the right tools. Using proper equipment makes the job easier and safer. Prepare all necessary items before starting. This saves time and avoids mistakes.
Essential Equipment
You need a fuel line disconnect tool set for quick connect fittings. These tools fit into the connector and release the locking tabs. A set usually includes different sizes for various vehicles.
Have a pair of needle-nose pliers ready. They help grip and move small parts. Also, keep a clean cloth nearby to wipe spills or dirt.
A small container to catch any fuel dripping out is important. It prevents spills and keeps your workspace clean. Finally, keep a screwdriver handy for removing clamps or covers.
Safety Gear
Wear safety glasses to protect your eyes from fuel spray. Fuel can cause serious eye irritation. Gloves are essential to protect your hands from fuel and dirt.
Use nitrile gloves since they resist fuel better than latex. Long sleeves protect your arms from splashes. Work in a well-ventilated area to avoid inhaling fumes.
Keep a fire extinguisher nearby. Fuel is highly flammable, so safety must come first. Proper gear prevents injuries during the task.
Credit: www.infocontent.com.br
Locate The Fuel Filter
Finding the fuel filter is the first step to removing a quick connect fuel filter. Knowing its location saves time and effort. It helps you work safely and effectively. Understanding where the fuel filter sits also helps avoid damage to other parts.
Common Locations
Fuel filters usually sit along the fuel line. Many are near the fuel tank under the car. Others can be found in the engine bay. Some vehicles have the filter inside the fuel pump module. Check near the frame rail or under the hood.
Identifying Quick Connects
Quick connect fittings look different from regular clamps. They have a plastic or metal clip that snaps on. These clips allow easy removal and attachment. You can see a small tab or button on the connector. Pressing the tab releases the fuel line from the filter.
Prepare The Vehicle
Preparing your vehicle is the first step before removing the fuel filter quick connect. This step ensures safety and makes the process easier. Proper preparation helps avoid fuel spills and potential injuries.
Always work in a well-ventilated area. Keep a fire extinguisher nearby for extra safety. Wear safety glasses and gloves to protect yourself from fuel and debris.
Relieving Fuel Pressure
Fuel systems hold pressure even after the engine is off. Releasing this pressure prevents fuel from spraying out. Locate the fuel pump fuse or relay in the fuse box. Remove it to stop fuel flow.
Start the engine and let it run until it stops. This uses up the remaining fuel pressure. Turn the ignition off and wait a few minutes before working on the fuel system.
Disconnecting The Battery
Disconnecting the battery avoids accidental sparks and electrical shorts. Use a wrench to remove the negative battery cable first. This cuts power to the fuel pump and other parts.
Secure the cable away from the battery terminal. Now you can safely work on the fuel filter and quick connect fittings.
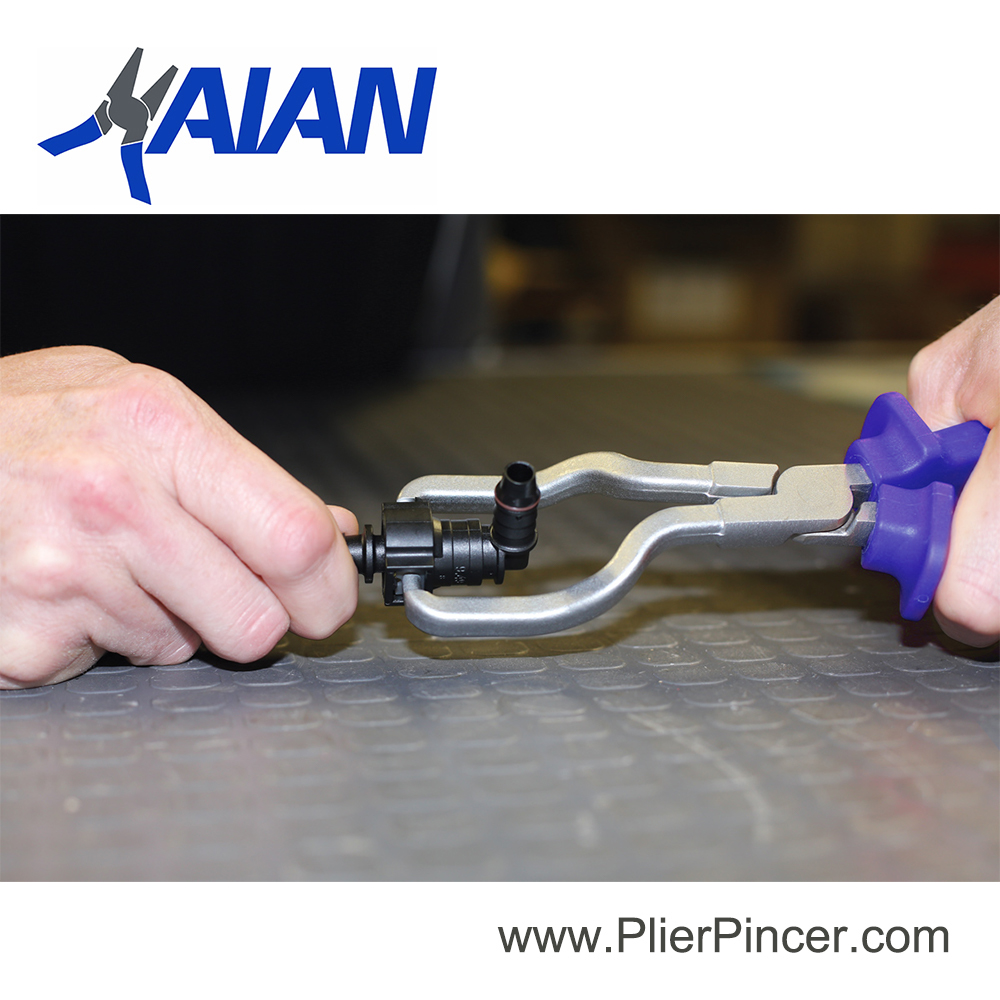
Release The Quick Connect
Releasing the quick connect on a fuel filter is a key step in removing it safely. This connection holds the fuel line firmly in place. It needs to be released carefully to avoid damage or fuel leaks. There are two main ways to release it: using a special tool or by hand. Each method works well depending on the situation and your tools.
Using The Proper Tool
Use a fuel line disconnect tool made for quick connects. These tools fit around the connection and push the locking tabs inward. This frees the fuel line without breaking it. Insert the tool fully, then pull the fuel line gently. The connection should slide off easily. Using the right tool prevents damage to the fuel line and filter.
Manual Release Techniques
Sometimes, tools are not available. In this case, try to release the quick connect by hand. Locate the locking tabs on the connection. Press or squeeze these tabs firmly. While holding the tabs, pull the fuel line straight out. It may take some force, but avoid twisting or bending. Manual release works best with clean, flexible fuel lines.
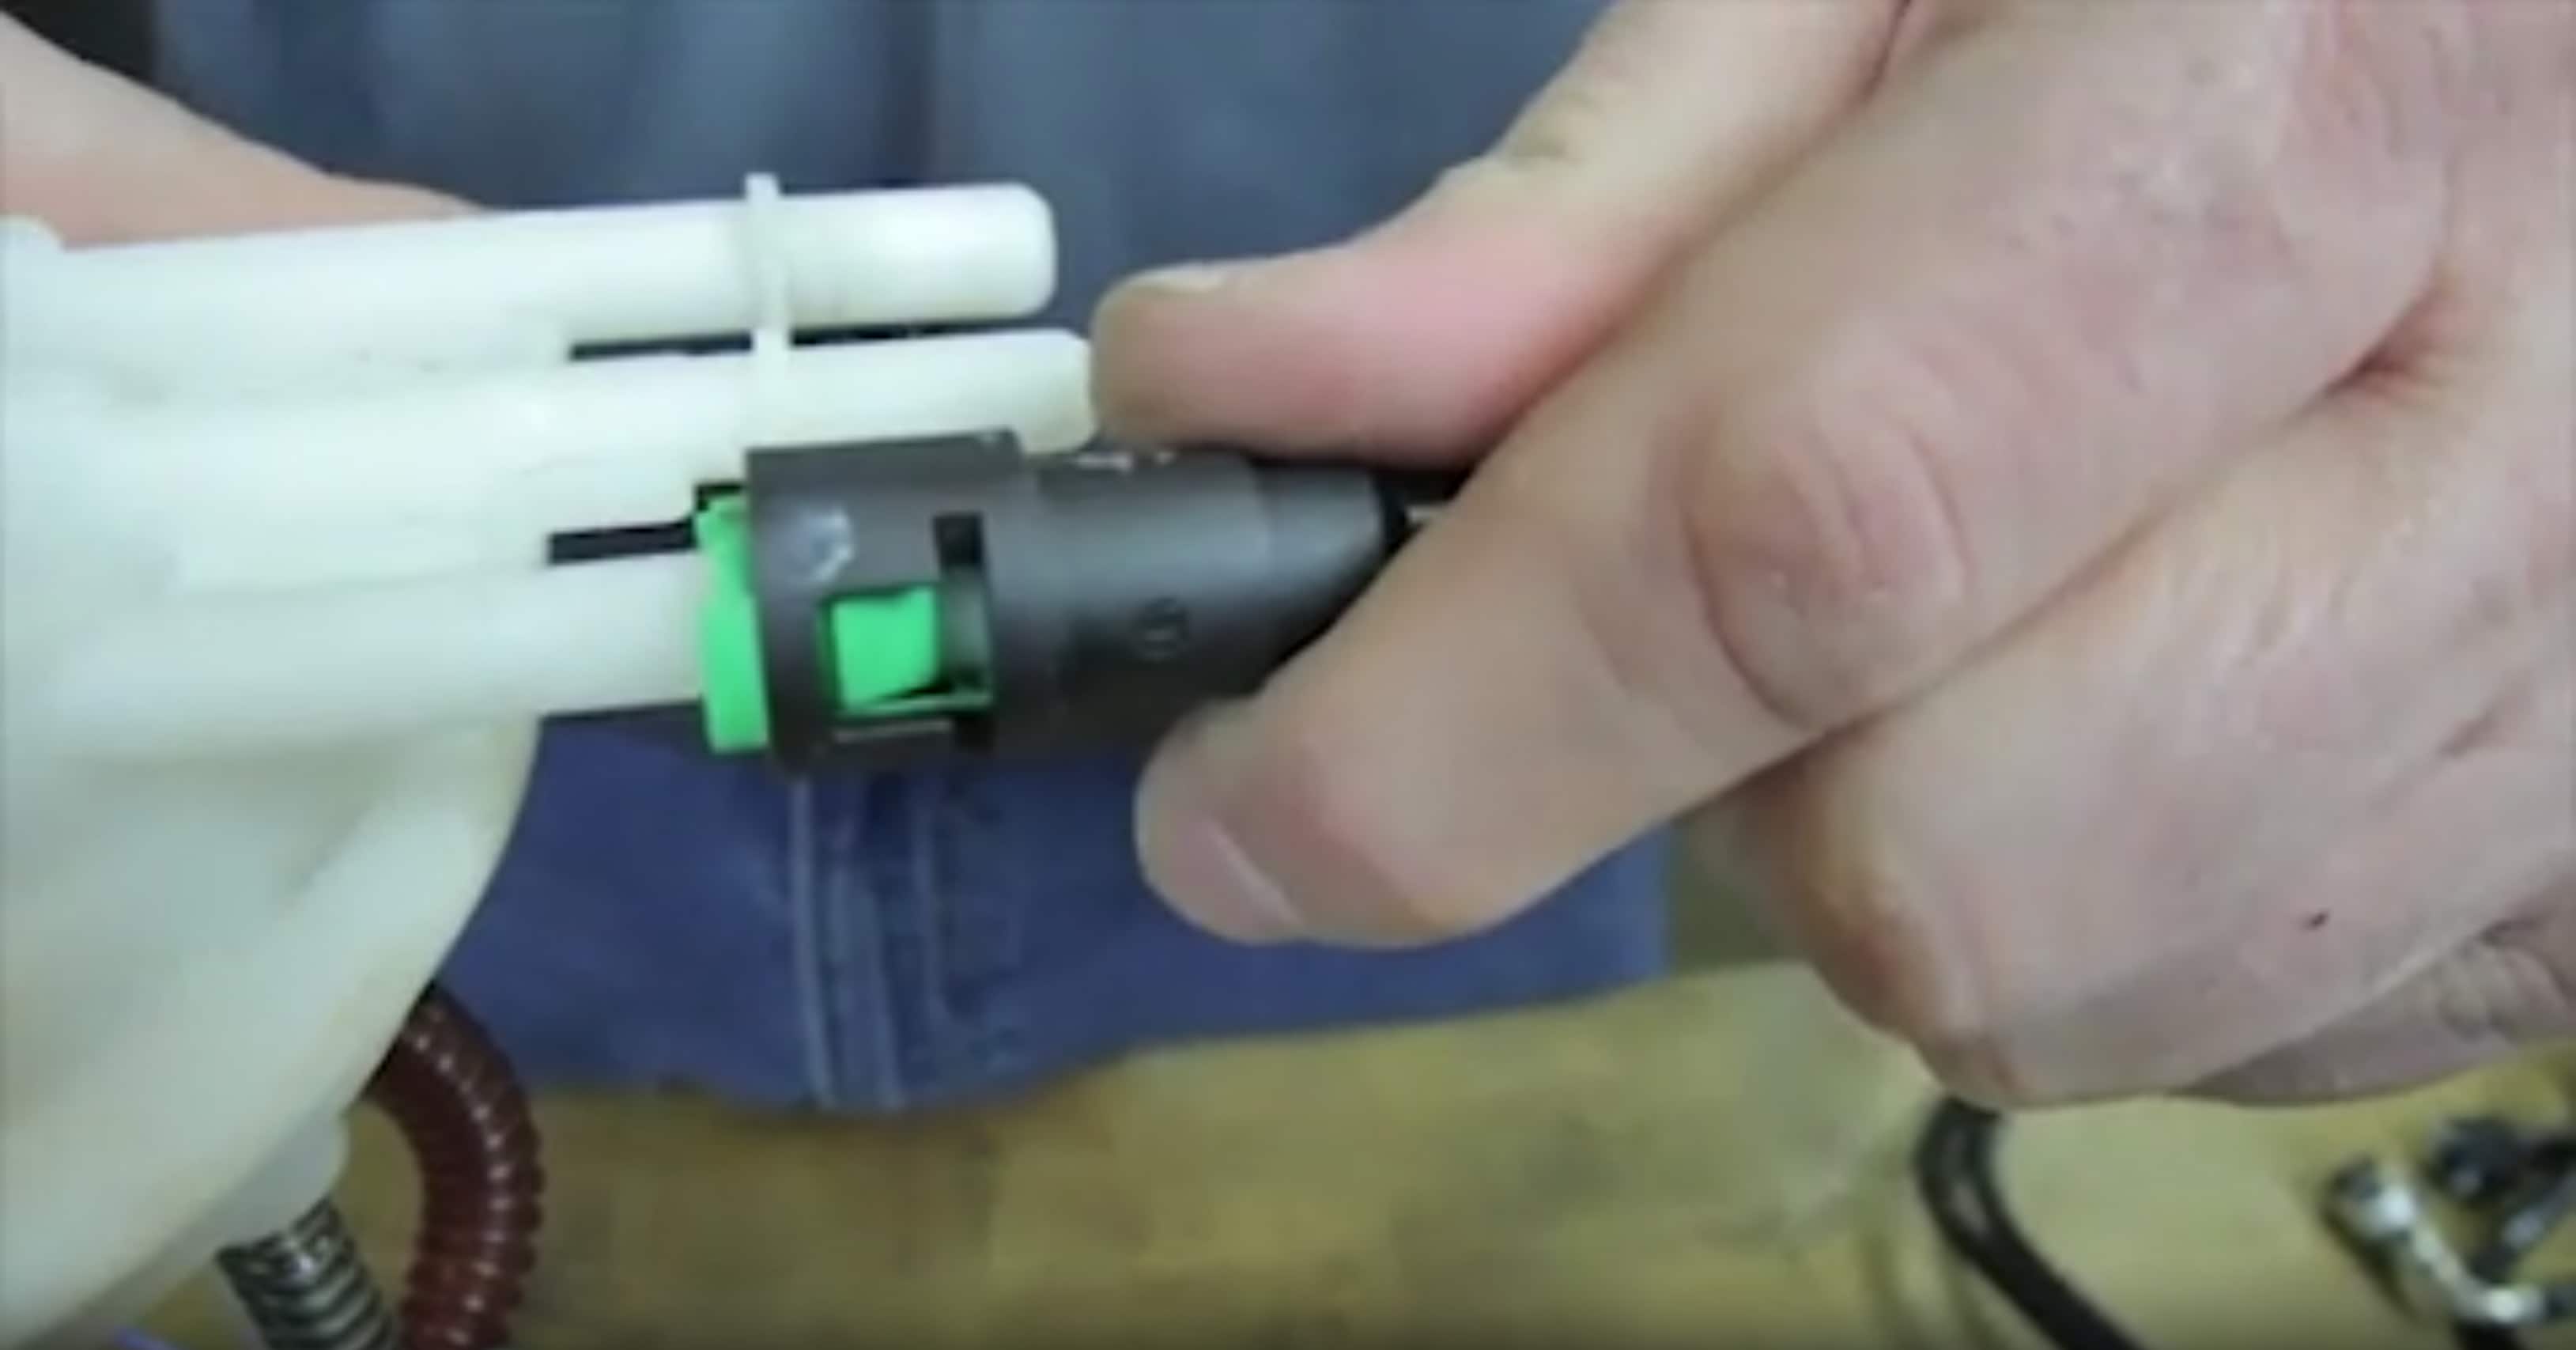
Remove The Fuel Filter
Removing the fuel filter is a key step in maintaining your vehicle’s fuel system. It helps keep the engine running smoothly by stopping dirt and debris. This process requires care to avoid damage and spills.
Follow the steps closely to remove the fuel filter quick connect safely and efficiently.
Detaching The Filter
Start by locating the quick connect fittings on the fuel filter. Press the release tabs or use a special tool to unlock the connection. Gently pull the fuel lines away from the filter. Avoid using excessive force to prevent breaking the connectors. Keep the filter upright to stop fuel from leaking out.
Handling Fuel Spillage
Fuel spillage is common during removal. Place a container or rag under the filter to catch drips. Work in a well-ventilated area to avoid inhaling fumes. Quickly wipe any spilled fuel to prevent hazards. Dispose of used rags safely as they can be flammable.
Credit: www.autozone.com
Install New Fuel Filter
Installing a new fuel filter is the next step after removing the old one. This task ensures clean fuel flows into your engine. Proper installation helps your vehicle run smoothly and saves fuel system parts.
Careful handling of the new filter and connectors keeps fuel leaks away. Follow these simple steps to install the new fuel filter correctly and safely.
Aligning The Filter
Start by checking the direction arrow on the new fuel filter. It shows the fuel flow direction. Match this arrow with the fuel line direction in your vehicle. Place the filter in the holder so it fits snugly. Avoid forcing the filter into the position. The right fit prevents leaks and damage.
Securing Quick Connects
Attach the quick connect fittings to the filter’s ends carefully. Push each connector until you hear a click. This sound means the connector is locked in place. Tug gently on the lines to confirm they are secure. Loose connectors cause fuel leaks and engine problems. Double-check each connection before moving on.
Test For Leaks
Testing for leaks is a crucial step after removing and reconnecting the fuel filter quick connect. It ensures the fuel system is sealed properly and safe to operate. Even a small leak can cause fuel loss or pose a fire hazard. This step helps catch any issues early before driving the vehicle.
Starting The Engine
Start the engine and let it run at idle. Watch for any unusual smells or sounds. Pay attention to the area around the fuel filter connection. Fuel systems pressurize quickly, so leaks may appear right away. If the engine stalls or sputters, turn it off immediately. This could indicate a problem with the fuel supply.
Inspecting Connections
Look closely at all quick connect fittings on the fuel filter. Check for wet spots or fuel drips. Use a clean cloth to wipe around the connectors. A dry cloth helps spot fresh leaks. If you find any leaks, turn off the engine and tighten the connections. Repeat the test until no leaks appear. Proper sealing keeps your fuel system safe and efficient.

Credit: www.youtube.com
Maintenance Tips
Maintaining your fuel filter is key to keeping your vehicle running smoothly. Regular care helps avoid engine trouble and saves money on repairs. Simple steps can extend the life of your fuel system and improve fuel efficiency.
Focus on these maintenance tips to keep the fuel filter in good condition. They are easy to follow and important for vehicle health.
Regular Filter Replacement
Replace the fuel filter according to the vehicle’s manual. Usually, this happens every 20,000 to 30,000 miles. Fresh filters stop dirt and debris from reaching the engine. Old filters can block fuel flow and reduce power. Use the right type of filter for your car. Changing the filter on time prevents costly engine damage.
Signs Of Clogged Fuel Filter
Notice if the car has trouble starting or stalls often. Engine misfires or poor acceleration can also signal a clogged filter. Check for unusual noises from the fuel pump. A strong smell of fuel might mean a leak or blockage. These signs show the filter needs cleaning or replacement. Acting fast keeps your car safe and reliable.
Frequently Asked Questions
How Do You Remove A Fuel Filter Quick Connect?
To remove a fuel filter quick connect, first relieve fuel pressure. Then, press the release tab and pull the connector gently to detach it.
What Tools Are Needed To Remove Quick Connect Fuel Filters?
You typically need fuel line disconnect tools or pliers. Sometimes, no tools are required if the connector has a release tab.
How To Safely Depressurize The Fuel System?
Turn off the engine and remove the fuel pump fuse. Start the engine until it stalls to release pressure safely.
Can I Remove The Fuel Filter Without Draining Fuel?
Yes, it’s possible. Just ensure the fuel system is depressurized to avoid spills and wear gloves for safety.
Conclusion
Removing a fuel filter quick connect can be simple and safe. Take your time and follow each step carefully. Use the right tools to avoid damage. Clean the area before and after removal. Check for leaks once the new filter is in place.
This helps keep your engine running smoothly. Regular maintenance saves money and prevents trouble. Keep practicing to build confidence with this task. You can do it!


