
Have you ever noticed those annoying swirls on your car’s paint after waxing? They can make your shiny finish look dull and uneven.
But don’t worry—removing wax swirls is easier than you think. You’ll learn simple, effective steps to restore your car’s smooth, glossy surface. Keep reading, and soon your car will look as good as new, turning heads wherever you go.
Causes Of Wax Swirls
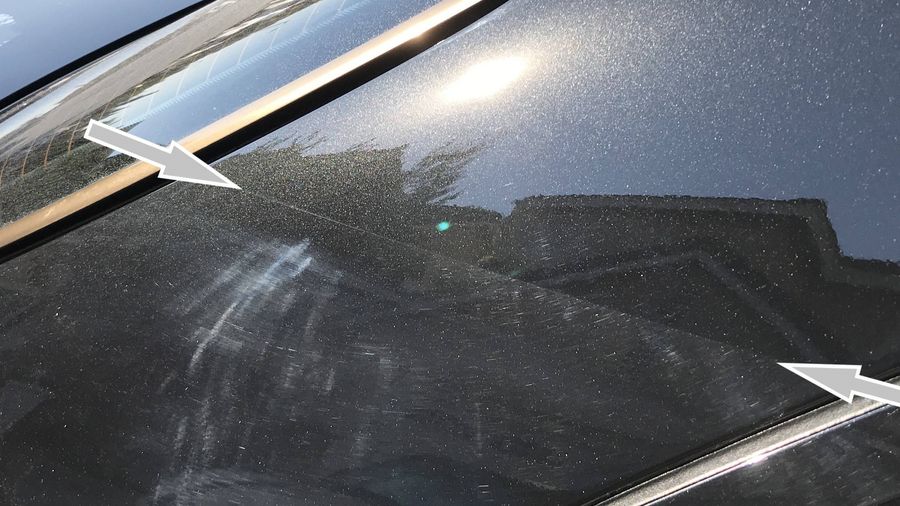
Wax swirls appear as fine, circular scratches on your car’s surface. They spoil the shine and smoothness of your paint. Understanding the causes helps prevent these marks. Knowing what triggers wax swirls keeps your car looking its best.
Common Triggers
Using dirty or rough cloths causes wax swirls. Buffing with too much pressure can also scratch the surface. Automatic car washes with harsh brushes leave swirl marks. Applying wax in direct sunlight makes it hard to spread evenly. These actions create the fine scratches that form wax swirls.
Impact On Car Paint
Wax swirls dull the car’s glossy finish. They trap dirt and make cleaning harder. Over time, these scratches weaken the paint’s protective layer. The car looks older and less cared for. Fixing wax swirls early keeps paint smooth and shiny.
Tools And Materials Needed
Removing wax swirls from your car requires the right tools and materials. Using proper supplies makes the process easier and protects your paint. Gather all items before you start to avoid interruptions.
Cleaning Supplies
You need a good car wash soap to clean the surface first. A microfiber wash mitt helps remove dirt without scratching. Use a clean microfiber towel to dry the car. Also, have a clay bar kit ready to remove embedded contaminants. This step prepares the paint for polishing.
Polishing Equipment
A dual-action polisher works best to remove wax swirls safely. Use foam or microfiber polishing pads with the machine. Choose a swirl remover or polish designed for your paint type. Have clean microfiber cloths on hand to wipe off residue. These tools restore shine and smoothness to your car’s surface.
Preparing Your Car
Preparing your car properly is the first step to removing wax swirls. A clean and dry surface helps you see the swirls clearly. Dirt or water spots can hide them or cause more damage. Taking time to prepare your car makes the next steps easier and more effective.
Washing The Surface
Start by rinsing your car with water to remove loose dirt. Use a gentle car shampoo and a soft sponge or mitt. Wash in straight lines to avoid adding new swirls. Focus on one section at a time. Rinse the soap off thoroughly to prevent residue.
Drying Techniques
Use a clean microfiber towel to dry your car. Pat the surface instead of rubbing it. This reduces the risk of scratches and new swirls. Work in small areas and replace towels when they get dirty. Avoid letting water air dry to stop water spots from forming.
Credit: montanaautopros.com
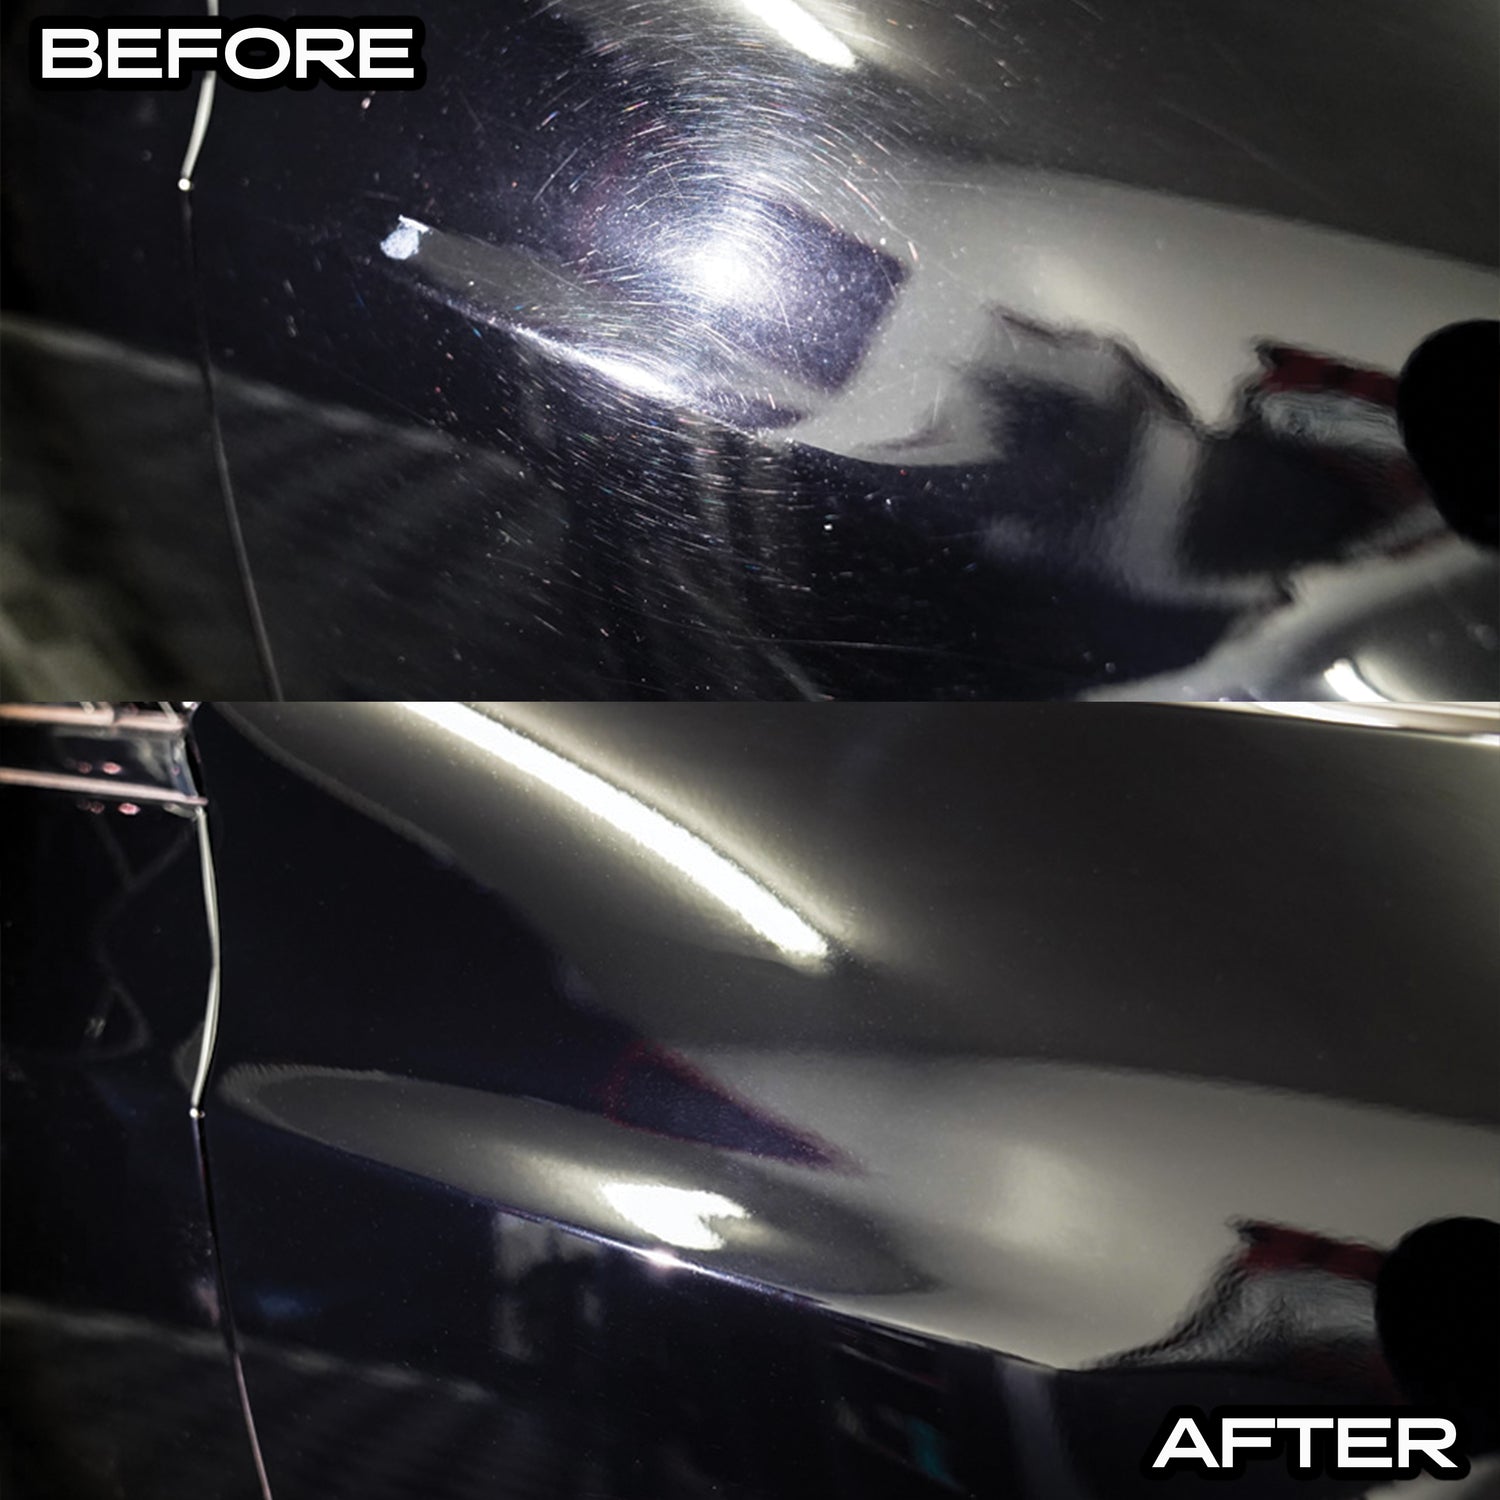
Removing Wax Swirls
Removing wax swirls from your car restores its smooth shine. These swirls appear as small scratches caused by improper washing or waxing. Fixing them improves your car’s look and protects the paint. Follow simple steps to get rid of these marks safely.
Choosing The Right Polish
Select a polish made for swirl removal. Look for one labeled “swirl remover” or “fine polish.” Avoid harsh compounds that can damage paint. A gentle polish works well on light to moderate swirls. Read product instructions before buying.
Applying By Hand Vs. Machine
Hand application is safe and easy for beginners. Use a soft foam or microfiber applicator pad. Apply polish with small circular motions. A machine polisher works faster and better on tough swirls. It requires practice to avoid damaging paint. Choose a dual-action polisher for safer results.
Step-by-step Polishing Process
First, wash and dry your car thoroughly. Next, apply a small amount of polish on the pad. Work on one small section at a time. Rub the polish gently in circular motions or use the machine on low speed. Wipe off excess polish with a clean microfiber cloth. Inspect the area under good light. Repeat if needed until swirls vanish.
Post-polishing Care
After polishing your car to remove wax swirls, it needs special care. Post-polishing care helps keep the surface smooth and shiny. It also protects the paint from dirt and damage. Follow simple steps to keep your car looking its best for longer.
Waxing For Protection
Waxing adds a strong layer over the polished paint. This layer guards against dust, water spots, and small scratches. Apply wax using a soft cloth or applicator pad. Work in small sections and use circular motions. Let the wax dry until it forms a haze. Then, buff it gently with a clean microfiber towel. This process seals the paint and enhances the shine.
Maintaining The Shine
Wash your car regularly with a gentle soap made for cars. Avoid harsh chemicals that can strip wax and dull the paint. Dry the car with a soft towel to prevent water spots. Use quick detailer sprays between washes to keep the shine fresh. Park in shaded areas to reduce sun damage. These steps keep your car’s surface smooth and bright after polishing.
Credit: www.jaxwax.com
Preventing Future Swirls
Preventing future wax swirls is key to keeping your car’s paint smooth and shiny. Swirls damage the surface and make your car look dull. Good habits and the right products help stop swirls before they start.
Proper Washing Habits
Wash your car gently using two buckets: one for soapy water, one for rinsing. This stops dirt from scratching the paint. Use a soft microfiber mitt instead of a sponge. Avoid washing in direct sunlight to prevent soap drying too fast. Dry the car with a clean, soft towel by patting, not rubbing.
Using Quality Products
Choose car wash soaps designed to be gentle on wax and paint. Cheap soaps can strip wax and cause scratches. Use microfiber cloths for drying and polishing. Select waxes and sealants from trusted brands to protect your paint better. Quality products help maintain a smooth, swirl-free finish longer.

Credit: bigsmobile.com
Frequently Asked Questions
What Causes Wax Swirls On A Car’s Surface?
Wax swirls result from improper washing, drying, or waxing methods. Using dirty cloths or harsh materials can create fine scratches. These scratches scatter light, forming visible swirl patterns on the waxed surface. Proper technique and tools help avoid this common issue.
How Can I Safely Remove Wax Swirls At Home?
Use a dual-action polisher with a fine polishing compound. Apply it gently on the swirled areas in circular motions. Always work on a clean, dry surface. Finish with a quality wax to protect the paint and restore shine.
Which Products Work Best For Removing Wax Swirls?
Choose a mild polish or swirl remover designed for automotive paint. Avoid abrasive compounds that may damage the clear coat. Microfiber cloths and foam applicators are ideal tools. Read product reviews and instructions to ensure compatibility with your car’s finish.
Can Waxing After Swirl Removal Prevent Future Swirls?
Yes, waxing protects the paint and reduces swirl formation. It creates a smooth barrier, minimizing friction during washing. Regular waxing maintains the car’s shine and durability. Use high-quality wax and proper application techniques for best results.
Conclusion
Removing wax swirls keeps your car looking smooth and shiny. Use gentle methods and the right products for best results. Take your time and work carefully to avoid damage. Clean your car regularly to prevent swirls from coming back. A well-maintained car always looks better on the road.
Try these tips and enjoy a clear, glossy finish every time. Small steps make a big difference in car care. Keep your car’s paint fresh and swirl-free with simple care.


