
Are you struggling to remove that stubborn brake rotor? You’re not alone.
Taking a brake rotor off can feel tricky, especially if it’s stuck or rusted in place. But don’t worry—once you know the right steps, it becomes much easier and safer. In this guide, you’ll discover simple, clear instructions that save you time and frustration.
Keep reading, and you’ll gain the confidence to handle your brakes like a pro. Your car—and your wallet—will thank you.
Tools Needed
Removing a brake rotor requires the right tools. Using proper tools makes the job easier and safer. Prepare all tools before starting the work. This saves time and avoids frustration.
Essential Hand Tools
Start with basic hand tools. A lug wrench helps remove wheel nuts quickly. A socket set is needed to take off bolts holding the caliper. Use a ratchet for faster bolt removal. A flathead screwdriver helps pry off parts gently. A hammer can tap the rotor if it is stuck. Gloves protect your hands from dirt and cuts. Safety glasses keep your eyes safe from debris.
Specialty Tools For Rotor Removal
Some rotors need special tools. A rotor puller helps remove stuck rotors without damage. A brake caliper tool compresses the caliper piston safely. A torque wrench ensures bolts tighten to the right level. These tools prevent damage and make the job smoother. Renting specialty tools is an option if you don’t own them.
Safety Precautions
Safety is the first step before removing a brake rotor. Brake work involves heavy parts and sharp tools. Taking precautions helps avoid injuries and damage. Simple safety measures can protect hands, eyes, and the vehicle. Follow these steps to work safely and confidently.
Protective Gear
Wear gloves to protect your hands from cuts and dirt. Use safety glasses to shield your eyes from dust and rust. Closed-toe shoes keep feet safe from falling parts. Avoid loose clothes or jewelry that can get caught in tools. Dress in old clothes that can handle grease and dirt.
Vehicle Stability Tips
Park the vehicle on a flat, hard surface. Use wheel chocks to stop the vehicle from rolling. Always apply the parking brake before lifting the car. Use a reliable jack and jack stands to lift and hold the vehicle. Never rely only on the jack to hold the car. Check the vehicle is stable before starting work.
Preparing The Vehicle
Preparing the vehicle is the first step to safely remove a brake rotor. It sets a strong base for the entire job. Taking time here helps avoid mistakes and injuries.
Start by working in a flat area. This keeps the car stable. Gather all tools before lifting the vehicle. Safety is key throughout the process.
Lifting And Securing The Car
Use a jack to lift the car. Place it under the car’s frame, near the wheel. Check the car manual for the exact spot.
Lift the car slowly until the wheel is off the ground. Use jack stands to support the car. Never rely only on the jack.
Place the stands under strong parts of the frame. Make sure the car is steady before working underneath.
Removing The Wheel
Loosen the lug nuts before lifting the car if possible. This prevents the wheel from spinning.
After lifting, remove the lug nuts completely. Keep them in a safe place.
Pull the wheel straight off. Set it aside carefully. This exposes the brake rotor for removal.
Credit: www.youtube.com
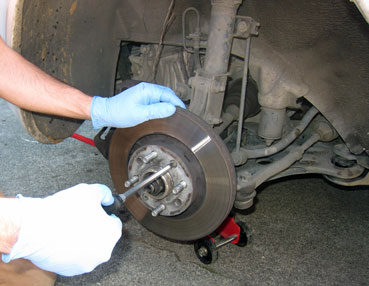
Removing The Brake Caliper
Removing the brake caliper is a key step to take the brake rotor off. The caliper holds the brake pads and must be carefully taken off. This part protects the rotor and helps the brakes work well.
Handle the caliper gently to avoid damage. Follow the steps below to remove it safely and correctly.
Locating Caliper Bolts
First, find the bolts holding the caliper to the wheel hub. These bolts are usually at the back of the caliper. Look for two bolts; one at the top and one at the bottom. Use a flashlight if needed to see clearly.
Check the size of the bolts to choose the right tool. Most caliper bolts need a socket wrench or a hex key. Keep the bolts safe after removal for reassembly.
Safely Detaching The Caliper
Loosen the caliper bolts slowly with the correct tool. Turn counterclockwise to remove them. Do not force the bolts to avoid stripping them.
Once bolts are out, gently pull the caliper away from the rotor. Support the caliper with a hook or a piece of wire. Do not let it hang by the brake hose to prevent damage.
Place the caliper on a secure surface or hang it safely. This keeps the brake hose safe and ready for the next step.
Detaching The Rotor
Detaching the brake rotor is a key step in brake maintenance. You must remove parts carefully to avoid damage. The rotor connects to the wheel hub with screws or clips. Removing these parts frees the rotor for easy removal.
Sometimes rotors stick due to rust or dirt. Handling stuck rotors requires gentle force and the right tools. This section covers removing retaining screws and dealing with stuck rotors safely.
Removing Retaining Screws
Locate the small screws holding the rotor on the hub. Use a screwdriver that fits well to avoid stripping. Turn screws counterclockwise to loosen. Keep screws in a safe place for reassembly. Some rotors have no screws; then skip this step.
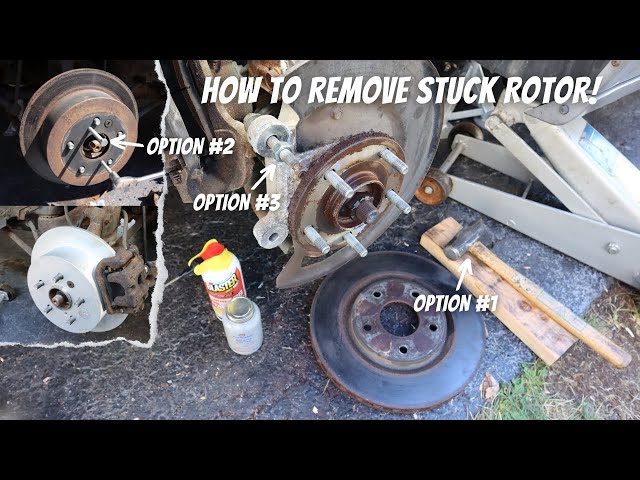
Handling Stuck Rotors
Rotors may stick due to rust or corrosion. Tap gently with a rubber mallet around the rotor edge. Avoid hitting the brake pads or caliper. Spray penetrating oil on the rotor hub area. Let it sit for a few minutes before trying again. Use steady force to wiggle the rotor free. Do not use excessive force; this can damage parts.
Tips For Stubborn Rotors
Removing a brake rotor can be tricky when it gets stuck. Rust and dirt cause rotors to bind tightly to the hub. Using simple tips helps loosen stubborn rotors safely and quickly. These steps protect your brake parts and save time.
Using Penetrating Oil
Spray penetrating oil around the rotor hub and bolts. Let it sit for 10 to 15 minutes. The oil seeps into tight spaces and breaks down rust. This makes the rotor easier to remove. Use enough oil to cover all contact points. Repeat if the rotor still feels stuck.
Applying Gentle Taps
Tap the rotor lightly with a rubber mallet or hammer. Tap around the edge evenly to avoid damage. Gentle taps help break rust bonds without bending the rotor. Avoid hitting the rotor too hard. Check if the rotor moves after each tap. Patience works best with stubborn rotors.
Cleaning And Inspecting
Cleaning and inspecting the brake rotor is a key step after removal. Dirt, rust, and debris can cause problems during reinstallation. A clean rotor hub ensures proper fit and function.
Inspection helps find damage early. Small cracks, grooves, or warping can affect braking safety. Careful checks save time and money by preventing further damage.
Cleaning Rotor Hub
Start by wiping the rotor hub with a clean cloth. Remove any loose dirt or dust. Use a wire brush for rust or stubborn debris. Avoid harsh chemicals that might damage metal.
Apply brake cleaner spray for a thorough clean. Let it dry completely before moving on. The hub must be smooth and free of residue. This helps the rotor sit flush on the hub.
Inspecting Rotor And Components
Look closely at the rotor surface for grooves or cracks. Light scoring is normal, but deep grooves need attention. Check both sides of the rotor for warping or bends.
Inspect the rotor edges for chipping or rust buildup. Examine the brake pads and caliper parts too. Replace any worn or damaged components before reassembly.

Credit: www.reddit.com
Reassembly Basics
Reassembly is a key step after removing the brake rotor. It puts everything back in place and makes your vehicle safe to drive. Taking care during reassembly prevents future problems and saves money.
Follow each step carefully. Do not rush. Check all parts for wear or damage before putting them back. Clean any dirt or rust to help parts fit well.
Reattaching Caliper
Start by placing the brake caliper over the new rotor. Align it with the mounting bracket carefully. Insert the caliper bolts and tighten them by hand first. Use a torque wrench to secure bolts to the correct tightness. This keeps the caliper stable and stops brake noise. Check the brake pads fit well inside the caliper. Make sure the brake hose is not twisted or pinched.
Securing The Wheel
Put the wheel back onto the hub. Line up the wheel holes with the lug studs. Hand-tighten the lug nuts in a star pattern. This helps the wheel sit evenly on the hub. Lower the vehicle so the tire touches the ground lightly. Use a torque wrench to tighten the lug nuts fully, again in a star pattern. Proper tightening prevents wheel wobble or loss while driving.
Credit: www.myautorepairadvice.com
Frequently Asked Questions
How Do You Safely Remove A Brake Rotor?
First, lift the car and remove the wheel. Then, detach the caliper and bracket. Finally, slide the rotor off the hub carefully.
What Tools Are Needed To Take Off A Brake Rotor?
You need a jack, lug wrench, socket set, screwdriver, and possibly a rubber mallet for stubborn rotors.
Can Rust Prevent Brake Rotor Removal?
Yes, rust can cause the rotor to stick. Use a penetrating oil and tap gently with a mallet to loosen it.
How Long Does It Take To Remove A Brake Rotor?
Removing a brake rotor typically takes 20 to 30 minutes with proper tools and experience.
Conclusion
Removing a brake rotor takes care and the right steps. Follow safety rules and use the proper tools. Take your time to avoid damage or injury. Clean and inspect parts before putting new rotors on. Practice makes this process easier and faster.
Keep your brakes working well for safe driving. You can do this with patience and care.


