
Have you ever tried to remove your wheel nut covers but found them stuck or tricky to get off? You’re not alone.
Whether you need to change a tire or just want to clean your wheels, knowing the right way to take off wheel nut covers can save you time and frustration. In this guide, you’ll discover simple, effective steps to remove them safely without damaging your wheels or covers.
Keep reading, and you’ll be able to handle this task like a pro in no time.
Tools Needed
Removing wheel nut covers requires the right tools. Having these tools ready makes the job easier and safer. Some covers come off easily with basic tools. Others need special tools to avoid damage.
Common Tools For Removal
A flathead screwdriver helps pry off simple wheel nut covers. Use it gently to avoid scratching the wheel. A pair of pliers can also grip and pull off covers. Sometimes, a plastic trim removal tool works best. It prevents marks on the wheel surface. These tools are easy to find at home or in a car kit.
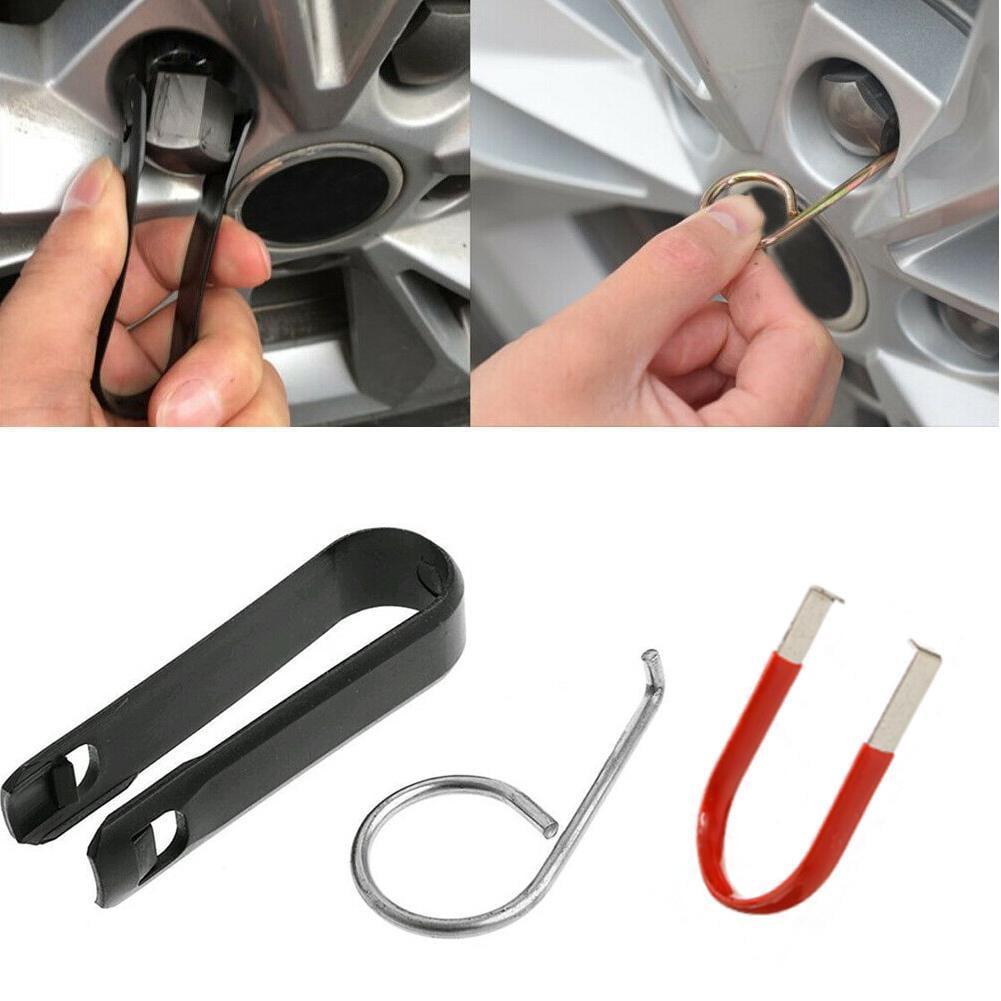
Specialized Tools For Stubborn Covers
Some wheel nut covers fit tightly and resist removal. A wheel nut cover remover tool fits around the cover. It provides better grip and control. This tool reduces the risk of damage. Another option is a rubber mallet. It helps tap the cover loose without harm. Specialized tools cost more but protect your wheels well.

Credit: www.youtube.com
Preparing The Vehicle
Preparing the vehicle is the first step to safely remove wheel nut covers. Proper preparation ensures the process is smooth and risk-free. Take time to get your vehicle ready before starting.
Ensuring Safety
Safety is the top priority. Park your vehicle on a flat, stable surface. Avoid slopes or uneven ground to prevent rolling. Engage the parking brake firmly. Wear gloves to protect your hands from sharp edges. Keep children and pets away from the work area.
Positioning The Vehicle
Position the vehicle so you can easily access the wheel nut covers. Turn the steering wheel to expose the front wheels if needed. Make sure there is enough space around the car to move freely. Place wheel chocks behind the tires for added stability. This setup prevents accidental movement while you work.
Locating The Nut Covers
Knowing where to find the wheel nut covers is the first step in removing them. These covers protect the wheel nuts from dirt and damage. They often blend with the wheel design, so spotting them can be tricky. Understanding their location helps avoid damage during removal.
Look closely at the wheel’s center area. The nut covers sit right over the nuts that hold the wheel in place. Different vehicles have different styles, so knowing the types and attachment points helps a lot.
Types Of Wheel Nut Covers
Wheel nut covers come in various shapes and materials. Some are plastic caps that snap on. Others are metal and screw into place. Some covers are part of the wheel’s design and need special tools to remove. Knowing the type helps to apply the right method.
Identifying Attachment Points
Check where the cover meets the wheel. Snap-on covers have small gaps around edges. Screw-in types show tiny slots or holes for a tool. Some covers hide clips underneath. These clips hold the cover tight. Spotting these points guides a safe removal process.
Credit: www.walmart.com
Step-by-step Removal Process
Removing wheel nut covers is easier than most people think. Follow these clear steps to take them off safely. You only need a few simple tools and some patience. This process will help you avoid damage to your wheels and covers.
Using A Screwdriver Or Pry Tool
Start by finding a flat screwdriver or a plastic pry tool. Insert it gently between the wheel nut cover and the wheel. Make sure the tool does not scratch the wheel surface. Work slowly around the cover’s edge. This will help loosen it evenly.
Applying Gentle Pressure
Press the tool carefully to lift the cover slightly. Avoid using too much force to prevent breaking the cover. Move the tool around the cover while lifting. This spreads out the pressure and makes removal easier. Keep your hands steady throughout the process.
Handling Stuck Covers
Some covers might be stuck due to dirt or rust. Spray a little water or lubricant around the edges to loosen grime. Let it sit for a few minutes. Use the pry tool again, applying gentle pressure. Repeat if necessary until the cover pops off easily.
Tips For Avoiding Damage
Removing wheel nut covers without damage takes care and the right method. Small mistakes can scratch your wheels or crack the covers. Follow simple tips to keep both safe and in good shape.
Protecting The Wheel Surface
Use a soft cloth or rubber pad between tools and the wheel. This stops scratches and dents on the wheel surface. Avoid using metal tools directly on the wheel. Work slowly and gently to prevent any marks.
Preventing Cover Breakage
Choose a tool designed for nut covers, like a plastic pry tool. Avoid using excessive force that can crack or bend the cover. Pull covers straight off instead of twisting. Check for clips or tabs and release them carefully.
After Removal Care
Taking off wheel nut covers is only part of the task. Proper care after removal keeps them in good shape. It helps the covers last longer and look better on your wheels.
Cleaning Nut Covers
Wash the nut covers with warm water and mild soap. Use a soft cloth or sponge to avoid scratches. Remove dirt, grease, and brake dust gently. Rinse with clean water and dry with a soft towel. Avoid harsh chemicals that can damage the finish.
Storing Covers Safely
Store the nut covers in a dry, cool place. Place them in a box or container to prevent loss. Wrap each cover in a soft cloth to avoid scratches. Keep them away from direct sunlight and moisture. Proper storage keeps covers ready for reuse.
When To Seek Professional Help
Removing wheel nut covers can be simple or tricky. Some covers fit tightly or get stuck due to rust. Trying too hard may damage the cover or wheel. Knowing when to ask for help saves time and avoids harm to your vehicle. Professionals have the right tools and skills for safe removal.
Signs Of Difficult Removal
Wheel nut covers that won’t budge after gentle pulling need care. Covers that bend or crack easily show they are fragile. Rust or dirt around the cover makes removal harder. Using too much force risks scratching or breaking parts. Strange noises or strong resistance signal a problem. These signs mean it’s best to stop and seek help.
Finding A Reliable Mechanic
Choose a mechanic with good reviews for wheel work. Check if they have experience with your vehicle type. Ask about their tools for removing wheel nut covers safely. A trustworthy mechanic explains the process clearly and answers questions. Getting help from a pro avoids costly damage and keeps your wheels safe.

Credit: www.reddit.com
Frequently Asked Questions
How Do I Safely Remove Wheel Nut Covers?
To safely remove wheel nut covers, use a flathead screwdriver or a wheel nut removal tool. Gently pry around the edges without applying excessive force to avoid damage. Work slowly and carefully to prevent scratching the wheel or the cover.
What Tools Are Needed To Take Off Wheel Nut Covers?
You typically need a flathead screwdriver or a special wheel nut cover remover tool. Some vehicles have clips that require a gentle pry. Avoid using sharp or heavy tools to prevent damage to the covers or wheels.
Can I Remove Wheel Nut Covers Without Damaging Them?
Yes, by using the right tools and gentle pressure, you can remove wheel nut covers without damage. Avoid forceful pulling or sharp objects. Working slowly and carefully helps preserve both the cover and the wheel’s finish.
Why Remove Wheel Nut Covers Before Changing Tires?
Removing wheel nut covers provides clear access to the lug nuts. This makes it easier and safer to loosen or tighten the nuts during tire changes. It also prevents damage to the covers while using tire-changing tools.
Conclusion
Removing wheel nut covers is simple with the right tools. Start by loosening the covers carefully to avoid damage. Use a flat tool or a special remover for better grip. Take your time and work gently around the edges. Once off, clean the area before putting covers back.
Regular practice helps you get faster and safer. Keep your tools handy for future use. This small skill saves time and keeps your wheels in good shape. Try these steps next time you need to remove wheel nut covers.

