Thinking about giving your car a fresh new look with a vinyl wrap? One of the first questions you probably have is: how much vinyl do you actually need to cover your car?
Getting the right amount is key—you don’t want to run short in the middle of the job, but buying too much can waste your money. You’ll find simple, clear answers to help you measure and calculate exactly how much vinyl wrap will fit your car perfectly.
Keep reading to avoid common mistakes and make your car transformation smooth and cost-effective.

Credit: carwrapsupplieraustralia.com
Calculate Your Car’s Surface Area
To wrap a car with vinyl, knowing the surface area is key. This helps you buy the right amount of vinyl without waste. Measuring the car’s surface area takes some care and basic math. It ensures the wrap fits well and covers every part.
Start by measuring the main parts of your car. Then, adjust for curves and edges. This method gives a clear picture of how much vinyl you need.
Measure Car Dimensions
Use a tape measure to find length, width, and height of the car. Measure each section separately, like doors, hood, and roof. Write down every number. Add all the areas together to get the total flat surface size. This step builds the base for your vinyl calculation.
Consider Curves And Contours
Cars have many curves that affect vinyl size. Curves add extra surface that flat measurements miss. Add 10-15% more vinyl to cover these areas safely. Check for side mirrors, bumpers, and wheel arches. These parts need extra vinyl too. Including curves prevents running short during the wrap.
Credit: www.clearpro.com
Types Of Vinyl Wrap Materials
Choosing the right vinyl wrap material affects the look and durability of your car wrap. Different vinyl types offer various finishes and qualities. Knowing these types helps you decide how much vinyl to buy and what suits your car best.
Standard Vs. Premium Vinyl
Standard vinyl is the common choice for many car wraps. It is affordable and works well for basic designs. This vinyl usually lasts around five years. It has a smooth finish but may not handle extreme weather as well.
Premium vinyl costs more but offers better quality. It lasts longer, often up to seven or ten years. The material is thicker and resists fading and damage. Premium vinyl wraps look smoother and maintain their shine longer.
Specialty Finishes
Specialty vinyl wraps create unique looks with different textures and colors. Options include matte, satin, chrome, and carbon fiber finishes. These finishes add style but may cost more than standard vinyl.
Matte finishes give a flat, non-shiny look. Satin wraps offer a soft sheen between matte and gloss. Chrome wraps shine like metal and attract attention. Carbon fiber vinyl mimics the look of real carbon fiber with a textured feel.
Estimating Vinyl Quantity
Estimating the right amount of vinyl for a car wrap is key to a smooth project. Too little vinyl means stopping midway, while too much leads to waste. You need a clear idea of your vehicle’s size and shape. Measure the length, height, and width of each part you want to wrap. These numbers help calculate how many square feet of vinyl you will need. Keep in mind, vinyl comes in rolls with fixed widths, often 50 or 60 inches wide. This affects how much you will use for each section.
Allowing For Waste And Errors
Cutting vinyl perfectly on the first try is rare. Mistakes happen, so add extra vinyl to cover slips. Plan for about 10% to 15% more than your exact measurements. This extra material covers trimming errors, bubbles, or misalignments. Wrapping a car involves curves and edges that can cause small tears or folds. Having spare vinyl means you don’t need to buy more mid-project. It saves time and stress.
Extra Vinyl For Complex Areas
Some car parts need more vinyl than flat surfaces. Mirrors, bumpers, and door handles have curves and tight spaces. These sections need larger vinyl pieces for proper wrapping. Add about 20% extra vinyl for complex areas. This allows for stretching and fitting vinyl without damage. Plan carefully for these spots to avoid running short. More vinyl here means a cleaner, smoother wrap overall.
Tools Needed For Wrapping
Wrapping a car with vinyl requires specific tools to get the best result. Having the right tools makes the process easier and avoids mistakes. These tools help cut, smooth, and safely handle the vinyl wrap.
Cutting And Smoothing Tools
Sharp cutting tools are essential for clean edges. Use a utility knife or a precision blade to cut the vinyl. Scissors can help with smaller pieces but may not give a smooth finish.
Squeegees help smooth the vinyl onto the car surface. A felt edge squeegee prevents scratches on the vinyl. Heat guns soften the vinyl, making it easier to stretch and shape.
Safety Equipment
Safety gear protects you during the wrapping process. Wear gloves to avoid cuts from sharp tools. Gloves also prevent fingerprints and dirt on the vinyl.
Use safety glasses to protect eyes from flying debris or sharp edges. A mask helps avoid inhaling fumes from the adhesive or heat gun. These simple items keep the work safe and clean.
Step-by-step Wrapping Process
Wrapping a car with vinyl is a detailed task that needs care and focus. Each step matters to get a smooth, lasting finish. The process starts with preparing the car’s surface. Then comes the careful application of the vinyl. Finally, trimming the extra material creates clean edges. Follow these steps to wrap your car well.
Surface Preparation
Clean the car thoroughly. Remove dirt, grease, and wax from all areas. Use soap and water first, then wipe with alcohol. Dry the surface fully before applying vinyl. Small scratches or dents can affect the wrap’s look. Fix these issues if possible. Smooth surfaces help the vinyl stick better.
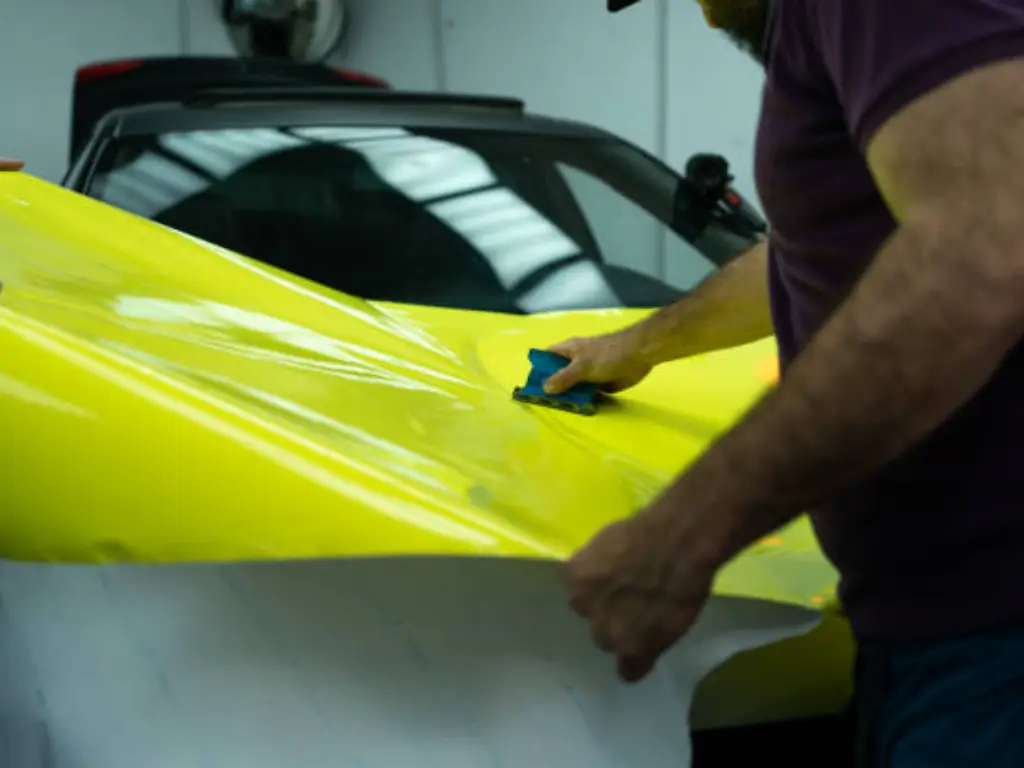
Applying The Vinyl
Measure and cut the vinyl to fit each car part. Peel the backing paper slowly, exposing the adhesive side. Start from one edge, pressing the vinyl gently onto the surface. Use a squeegee to push out air bubbles and wrinkles. Work in small sections to avoid mistakes. Heat the vinyl slightly to make it more flexible around curves.
Trimming Excess Material
After applying the vinyl, trim the extra edges carefully. Use a sharp blade and steady hands. Cut close to the car’s edges and seams for a neat look. Avoid cutting too deep to prevent damage to the paint. Check all edges to ensure the vinyl is secure. Proper trimming improves the wrap’s appearance and durability.

Credit: raxtify.com
Common Wrapping Challenges
Wrapping a car with vinyl is a popular way to change its look. The process can be fun but also tricky. Many people face common problems during the wrap. These issues can affect the final result and the time it takes to finish. Understanding these challenges helps you prepare and get better results.
Dealing With Bubbles And Wrinkles
Bubbles and wrinkles often appear after applying vinyl. They happen when air gets trapped under the film. Small bubbles can be popped with a pin and smoothed out. Larger wrinkles might need reheating the vinyl to stretch it. Use a squeegee to push air out from the center. Work slowly to avoid new bubbles forming. Good lighting helps spot these issues early.
Handling Difficult Sections
Curves and edges are the hardest parts to wrap. Vinyl does not stretch well on sharp bends. Heat helps soften the film and makes it flexible. Use a heat gun carefully to avoid damage. Stretch the vinyl gently and press it into corners. Cutting the vinyl may be necessary for tight spots. Take your time for a smooth, clean finish.
Maintaining Your Vinyl Wrap
Maintaining your vinyl wrap keeps your car looking fresh and new. Proper care helps the wrap last longer and stay bright. Small efforts daily prevent damage and fading. Follow simple steps to clean and repair your wrap.
Cleaning Tips
Use a soft cloth or sponge to clean the wrap. Avoid rough brushes that can scratch the surface. Wash the car with mild soap and water only. Rinse thoroughly to remove all soap residue. Dry with a clean microfiber towel. Do not use harsh chemicals or solvents. Clean your wrap every two weeks for best results.
Repairing Damages
Check your wrap regularly for small tears or bubbles. Fix minor damage quickly to stop it from spreading. Use vinyl wrap repair kits for small cuts or peeling areas. For large damage, seek professional help. Avoid driving on rough roads to reduce risks of damage. Proper care helps your wrap stay smooth and intact.
Frequently Asked Questions
How Much Vinyl Do I Need To Wrap A Car?
Typically, 50 to 75 feet of vinyl wrap is needed to cover an average car. This amount accounts for full coverage and some extra for mistakes or complex curves.
Can I Use Less Vinyl For Smaller Cars?
Yes, smaller cars require less vinyl, usually around 30 to 50 feet. Always buy extra to cover windows, trims, and errors during installation.
Does Vinyl Wrap Coverage Depend On Car Shape?
Yes, complex shapes or cars with many curves may need more vinyl. Extra material ensures proper wrapping without gaps or bubbles.
How To Measure Vinyl For A Full Car Wrap?
Measure the car’s length, width, and height. Add extra footage for doors, mirrors, and curves to ensure complete coverage.
Conclusion
Knowing how much vinyl to wrap your car saves time and money. Measure your vehicle carefully to avoid buying too little or too much. Remember to add extra vinyl for mistakes or trimming. Choosing the right amount helps the wrap look smooth and neat.
Take your time planning, and the wrap will last longer. A well-wrapped car changes its look without damage. Trust your measurements and enjoy the new style. Simple steps lead to great results every time.


