
If you want your car to shine like new and stay protected for months, waxing is a must. But did you know that using an orbital buffer can make this job faster, easier, and give you a professional finish?
You might be wondering how to use an orbital buffer to wax your car without making mistakes or damaging the paint. This guide will walk you through simple steps that anyone can follow, even if you’ve never tried it before.
By the end, you’ll feel confident and ready to give your car a showroom-worthy glow. Keep reading to discover the secrets to perfect waxing with an orbital buffer!

Credit: www.youtube.com
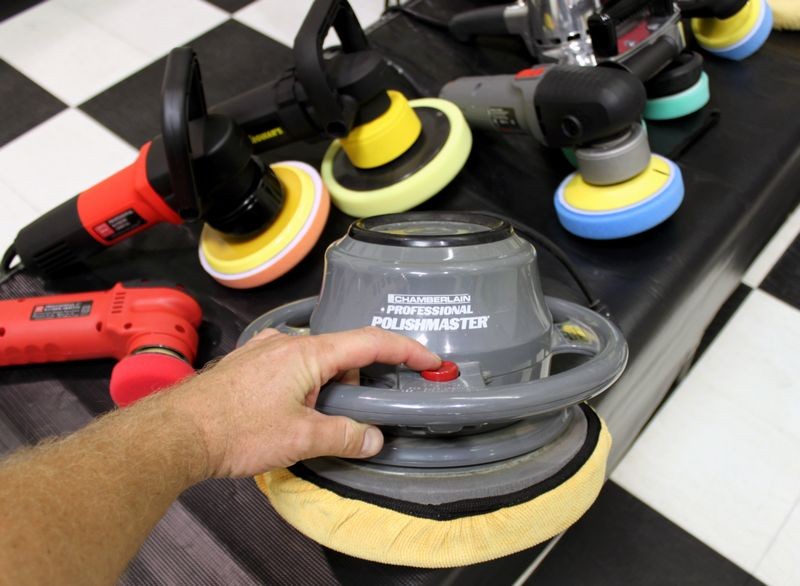
Choosing The Right Orbital Buffer
Choosing the right orbital buffer is important for waxing your car well. The right tool makes the job easier and gives better results. It helps protect your car’s paint and saves time. Different buffers suit different needs and skill levels. Understanding the types and features helps you pick the best one.
Types Of Orbital Buffers
There are mainly two types of orbital buffers: dual-action and random orbital. Dual-action buffers move in a fixed pattern and are good for beginners. Random orbital buffers move in a random pattern and give a smoother finish. They are often used by professionals for better results. Each type offers different control and power.
Key Features To Consider
Look for a buffer with adjustable speed settings. This helps control the polish or wax application. A lightweight design reduces hand fatigue during long use. A comfortable grip adds better control and safety. Power source matters too: corded models offer steady power, while cordless ones give freedom of movement. Check the pad size to match your car’s surface area.
Recommended Buffers For Beginners
Beginners should choose a dual-action orbital buffer. These models are easy to handle and less likely to damage paint. Look for buffers with simple controls and good customer reviews. Brands like Porter-Cable and Meguiar’s offer reliable beginner options. Starting with the right buffer helps build confidence and skills quickly.
Selecting The Best Wax
Selecting the best wax is key to achieving a smooth and shiny finish with an orbital buffer. The right wax works well with the buffer and protects your car’s paint. Choosing the correct wax helps you get the best results quickly and keeps your vehicle looking great longer.
Consider the type of wax and how it fits your car’s needs. Also, think about how the wax works with the orbital buffer. Using the right wax keeps your car’s surface safe and shiny.
Types Of Car Wax
Car wax comes in several forms. Paste wax gives a thick, durable coat. Liquid wax spreads easily and dries fast. Spray wax is quick to apply but lasts less time. Each type suits different needs and skill levels.
Natural waxes, like carnauba, give a deep shine. Synthetic waxes last longer and resist water better. Choose wax based on your desired finish and how often you want to apply it.
Wax Compatibility With Orbital Buffers
Not all waxes work well with orbital buffers. Paste wax is harder to spread but buffs nicely. Liquid wax pairs well with buffers for even coats. Spray wax can be tricky to use with machines.
Check the wax label for machine use instructions. Use a soft foam pad to avoid scratching. Proper wax choice prevents damage and helps the buffer work smoothly.
Tips For Long-lasting Shine
Apply wax in thin, even layers. Let the wax dry to a haze before buffing. Use slow, gentle motions with the orbital buffer. Avoid pressing too hard on the surface.
Wash your car regularly to keep the wax fresh. Park in shaded areas to reduce sun damage. Reapply wax every few months for lasting protection and shine.
Preparing The Car Surface
Preparing the car surface is an important step before waxing with an orbital buffer. A clean and dry surface helps the wax stick better. This process also removes dirt and grime that can scratch the paint. Taking time to prepare the surface leads to a smooth and shiny finish.
Cleaning And Washing
Start by washing the car thoroughly. Use a car shampoo and soft sponge to avoid scratches. Rinse with clean water to remove all soap. Dirt and dust must be removed completely before waxing.
Drying Techniques
Dry the car with a microfiber towel. These towels absorb water without scratching the paint. Pat the surface instead of rubbing. Make sure no water spots remain, as they affect waxing results.
Surface Inspection
Look closely for any remaining dirt or damage. Check for scratches, bird droppings, or sap. Fix minor issues before waxing. A smooth surface helps the wax spread evenly and last longer.
Credit: autogeekonline.net
Setting Up The Orbital Buffer
Setting up the orbital buffer correctly is key to a smooth waxing process. Take your time to prepare the tool before starting. This helps avoid damage to your car’s paint and gets the best shine.
Below are steps to get your orbital buffer ready. Follow each carefully for safe and effective waxing.
Attaching The Right Pad
Choose a soft foam pad for waxing. It spreads wax evenly and avoids scratches. Align the pad with the buffer’s backing plate. Press firmly so it sticks well. Check that the pad spins freely without wobbling.
Adjusting Speed Settings
Set the buffer to a low or medium speed. High speeds can cause damage or uneven wax. Start slow and increase speed if needed. Keep the buffer moving steadily over the surface. Avoid staying too long in one spot.
Safety Precautions
Wear gloves and eye protection. Keep the power cord away from the buffer’s path. Work in a well-ventilated area. Do not force the buffer onto the car surface. Always turn off and unplug before changing pads.
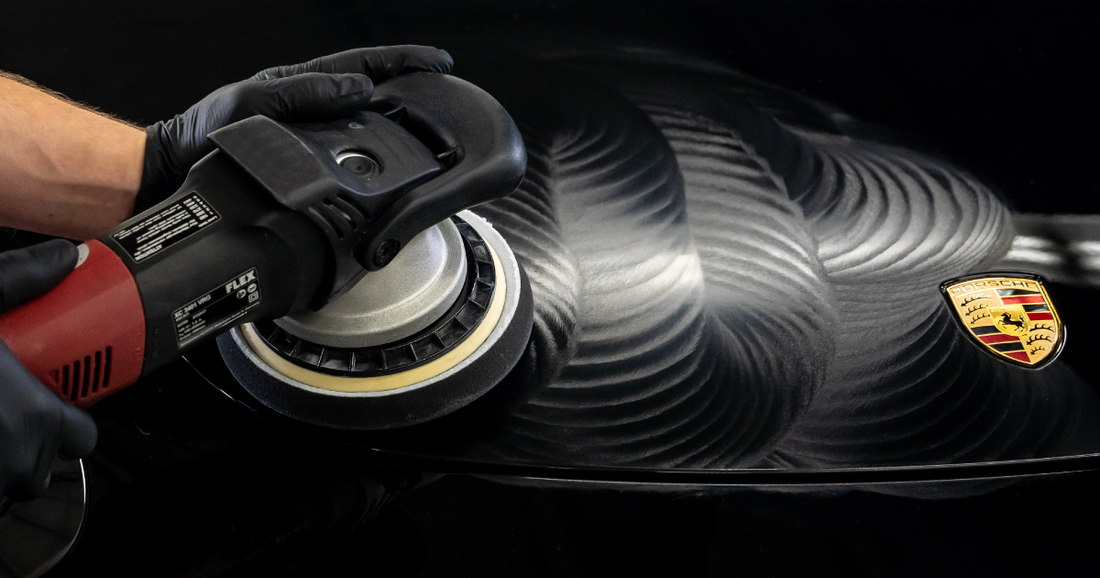
Applying Wax With The Orbital Buffer
Applying wax with an orbital buffer makes the process faster and more even. This tool spreads the wax smoothly over your car’s surface. It helps protect the paint and brings out a shiny finish. Using the right method ensures the wax bonds well and lasts longer.
Proper Wax Application Techniques
Start by cleaning the car thoroughly. Use a small amount of wax on the buffer pad. Work on one section at a time. Move the buffer in slow, overlapping circles. Avoid pressing too hard. Let the buffer do the work. This method covers the surface evenly and avoids streaks.
Maintaining Consistent Pressure
Keep steady pressure on the buffer. Too much force can damage paint or cause uneven wax layers. Too little pressure won’t spread wax properly. Hold the buffer flat against the car surface. Move it gently and steadily. Consistent pressure helps the wax bond well and shine bright.
Avoiding Common Mistakes
Do not apply wax on a hot or dirty car. This causes uneven finish and stains. Avoid using too much wax at once. It creates buildup and streaks. Do not keep the buffer in one spot too long. It can burn the paint. Clean the buffer pad regularly to prevent dirt scratches.
Credit: malcoautomotive.com
Buffing For A Perfect Shine
Buffing is the key step for a perfect shine on your car after waxing. It removes extra wax and smooths the surface. Using an orbital buffer makes this process easier and more even. The right technique brings out a deep, glossy finish that lasts longer.
Focus on gentle, steady movements. Too much pressure can damage the paint. The goal is to polish the wax, not remove it. Follow the right patterns and timing for the best results. Small details at the end make a big difference.
Optimal Buffing Patterns
Use slow, circular motions with the orbital buffer. Avoid staying too long in one spot. Move in overlapping circles to cover the entire panel. This pattern helps spread wax evenly and avoids streaks. Work section by section for control and precision.
Timing And Duration
Buff each section for about 30 to 60 seconds. Watch the wax shine up and start to clear. Too much buffing can thin the wax layer. Too little leaves a dull finish. Find a balance to enhance the shine without overworking the surface.
Final Touches
After buffing, wipe the car with a clean microfiber cloth. This removes any leftover residue or haze. Check the surface in bright light to spot missed areas. Add a light hand buff if needed to perfect the shine. Your car should look smooth and glossy.
Post-wax Care
After waxing your car with an orbital buffer, taking care of your tools and the wax finish is important. Proper post-wax care helps keep your car shiny longer. It also keeps your orbital buffer working well for future use.
Cleaning The Orbital Buffer
Remove any leftover wax from the buffer pad right after use. Use a soft brush or cloth to clean the pad. Avoid harsh chemicals that can damage the pad surface. Wash the pads with warm water and mild soap if needed. Let the pads dry completely before storing. Clean the buffer machine’s exterior with a dry cloth. This prevents dust build-up and keeps it ready for the next job.
Wax Maintenance Tips
Wash your car gently after waxing to protect the finish. Use mild car shampoo and avoid strong detergents. Dry the car with a soft towel or microfiber cloth. Apply a quick detailer spray to keep the wax fresh between waxings. Avoid parking under direct sunlight for long periods. This helps the wax last longer and protects the paint.
Storage Recommendations
Store your orbital buffer in a dry, cool place. Keep it away from direct sunlight and moisture. Use a clean, sealed container or bag for the pads to keep them dust-free. Check the power cord regularly for any damage. Proper storage ensures your buffer stays in good condition. It also makes your next waxing job easier and faster.
Frequently Asked Questions
What Is An Orbital Buffer For Car Waxing?
An orbital buffer is a power tool that spins a pad in a random orbit. It evenly applies wax and polish on car surfaces without causing swirl marks.
How Do You Prepare A Car For Waxing?
Wash and dry the car thoroughly to remove dirt. Clay bar the surface if needed. This ensures the wax bonds properly and lasts longer.
Can I Use Any Wax With An Orbital Buffer?
Most car waxes work well with orbital buffers, but use ones labeled for machine application. Avoid abrasive compounds that can damage the paint finish.
What Speed Setting Is Best For Waxing With A Buffer?
Use a low to medium speed, typically between 3,000 to 4,000 OPM. Higher speeds can cause overheating and uneven wax application.
Conclusion
Using an orbital buffer makes waxing your car easier and faster. It helps spread wax evenly for a smooth finish. You save time and get a shiny, protected surface. Remember to work in small sections and keep the buffer moving.
This prevents streaks and damage. With practice, your car will look clean and polished every time. Give your vehicle the care it deserves with this simple tool. Waxing with an orbital buffer is a smart choice for good results.

