
Have you ever wanted to give your car, laptop, or furniture a fresh new look without spending a fortune? Vinyl wrapping is the perfect solution, and it’s easier than you might think.
In this guide, you’ll learn step-by-step how to vinyl wrap like a pro, saving money and unlocking endless creative possibilities. Whether you want to protect your surfaces or make a bold statement, mastering vinyl wrap will give you the power to transform everyday items into something truly unique.
Ready to get started? Let’s dive in and make your vision come to life!
Preparing Your Vehicle
Preparing your vehicle is the first important step in vinyl wrapping. A clean, smooth surface helps the vinyl stick better. It also makes the wrap look neat and last longer. Taking time to prepare the vehicle prevents bubbles and peeling later.
Cleaning And Degreasing
Start by washing your vehicle thoroughly. Use soap and water to remove dirt and dust. Then, dry the surface completely with a clean cloth. Next, use a degreaser to wipe the area. This removes oils and wax that block vinyl from sticking.
Use a lint-free cloth with the degreaser. Wipe every panel you plan to wrap. Avoid touching the surface after cleaning. Oils from your hands can reduce adhesion.
Removing Accessories
Remove parts like mirrors, badges, and antennae. These get in the way of the wrap. Taking them off creates smooth edges for the vinyl. Use the right tools to avoid damage. Keep screws and parts safe for reassembly later.
Also, check inside door handles and trims. Vinyl needs to fit under edges for a clean look. Removing these small pieces is worth the effort.
Repairing Surface Imperfections
Look closely for scratches, dents, or rust spots. These can show through the vinyl or cause it to peel. Fix dents with a body filler or take the car to a professional. Sand rough spots smooth before wrapping.
Rust must be treated and removed fully. Vinyl won’t stick to rusty or flaky areas. A smooth, even surface helps the wrap last longer and look better.
Credit: www.youtube.com
Choosing The Right Vinyl
Choosing the right vinyl is the first step in a successful vinyl wrap project. The vinyl you select affects how the wrap looks and lasts over time. Picking the best type and quality ensures your vehicle or item stays protected and stylish. Understanding the options helps you make a smart choice.
Types Of Vinyl Wraps
There are several types of vinyl wraps. Cast vinyl is thin and flexible. It molds well to curves and lasts longer. Calendered vinyl is thicker and less flexible. It is cheaper but best for flat surfaces. For vehicles, cast vinyl is usually the better choice.
Colors And Finishes
Vinyl wraps come in many colors and finishes. Glossy finishes shine bright and look like paint. Matte finishes have no shine and give a modern look. Satin finishes offer a soft glow. Choose a color and finish that fits your style and purpose.
Quality And Durability
High-quality vinyl wraps resist fading and cracking. Look for vinyl with strong adhesive that holds well. Durable vinyl protects surfaces from scratches and weather. Investing in quality means your wrap stays fresh and lasts longer.
Tools Needed
Before starting a vinyl wrap project, gather all necessary tools. The right tools make the process easier and improve results. This section lists the basic tools needed for a smooth vinyl wrap application.
Essential Application Tools
A squeegee is vital for pressing vinyl onto surfaces without bubbles. Use a sharp utility knife to cut vinyl cleanly. A heat gun helps soften the vinyl for bending around curves. Measuring tape ensures precise cuts. A microfiber cloth cleans the surface before wrapping.
Safety Equipment
Wear gloves to protect your hands from cuts and chemicals. Safety glasses shield your eyes from flying debris. A mask prevents inhaling fumes from the adhesive or heat gun. Work in a well-ventilated area for better air quality.
Maintenance Supplies
Keep isopropyl alcohol handy to clean surfaces before application. Use a lint-free cloth for wiping down the vinyl. A plastic scraper helps remove any air bubbles after application. Store leftover vinyl properly to avoid dust and damage.
Measuring And Cutting Vinyl
Measuring and cutting vinyl are key steps in vinyl wrapping. Precise measurements ensure the vinyl fits perfectly. Cutting with care prevents waste and mistakes. Handling large sheets requires attention and technique. These steps set a solid base for a smooth wrap.
Accurate Measurements
Start by cleaning the surface before measuring. Use a tape measure or ruler. Measure each section carefully, twice for accuracy. Add extra inches for edges and curves. Mark the vinyl lightly with a pencil or chalk. This avoids cutting too short or too long.
Cutting Techniques
Use a sharp utility knife or vinyl cutter. Cut on a flat, clean surface to avoid mistakes. Follow your marks slowly and steadily. Straight lines work best with a ruler as a guide. Keep your blade fresh to prevent jagged edges. Always cut slightly outside the marked line for safety.
Handling Large Sheets
Large vinyl sheets can be tricky to manage. Roll out the vinyl on a clean, dry floor. Use weights or tape to hold the vinyl in place. Work with a helper for better control. Fold or roll the vinyl gently to avoid creases. Keep the vinyl away from dust and dirt at all times.
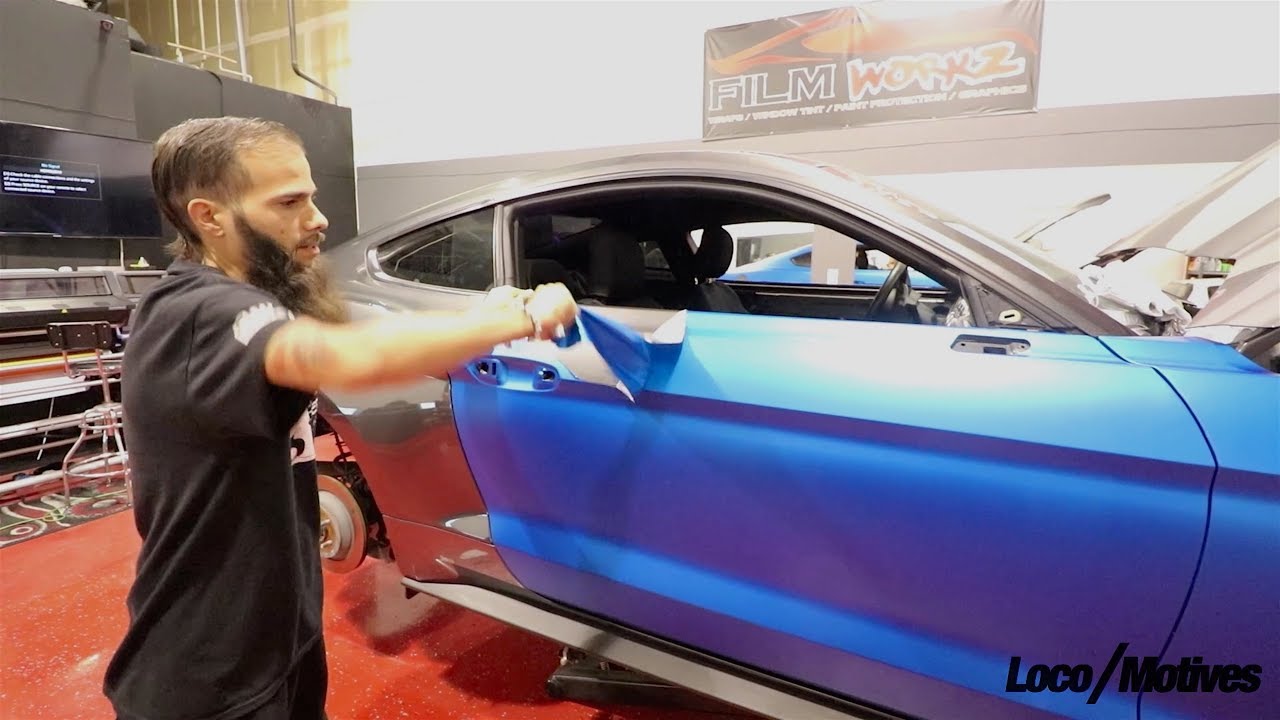
Applying The Vinyl Wrap
Applying vinyl wrap requires care and patience. This step is crucial to get a smooth, professional look. The vinyl must be placed correctly and firmly attached.
Follow clear steps to avoid wrinkles and bubbles. The right technique makes the wrap last longer and look better.
Positioning The Vinyl
Start by cleaning the surface thoroughly. Dirt or dust will cause bumps under the vinyl. Peel back a small part of the vinyl backing. Align the vinyl carefully with the surface edges. Hold the vinyl loosely at first. Check the fit and adjust as needed. Avoid stretching the vinyl at this stage.
Using Heat And Pressure
Use a heat gun or hairdryer to warm the vinyl. Warm vinyl becomes soft and flexible. Apply gentle heat evenly across the surface. Use a squeegee or soft cloth to press the vinyl down. Work from the center out to the edges. Pressure helps the vinyl stick well and removes air pockets. Do not overheat or burn the vinyl.
Smoothing Out Bubbles
Air bubbles can ruin the finish. Push bubbles toward the edges with a squeegee. For small bubbles, use a pin to release trapped air. Press down firmly after popping bubbles. Work slowly to avoid new bubbles forming. Check the wrap in good light to spot any issues.
Trimming And Finishing
Trimming and finishing are the final steps in the vinyl wrapping process. They make the wrap look clean and professional. Careful work here ensures the vinyl stays in place and lasts longer.
These steps require attention to detail and the right tools. Small cuts and sealing edges prevent peeling and damage. A good finish shows off your hard work beautifully.
Precise Edge Trimming
Use a sharp blade for clean cuts along the edges. Cut slowly to avoid mistakes and jagged lines. Trim excess vinyl close to the surface without cutting the base material. Keep your hand steady and follow the natural lines of the wrap. Proper trimming creates a smooth transition between the wrap and the vehicle.
Sealing Edges
Seal all edges with heat to secure the vinyl. Use a heat gun or hairdryer to warm the edges gently. Press the vinyl down with a squeegee or cloth while warm. This step prevents lifting and water damage. Make sure every edge is firmly stuck down for a neat finish.
Final Inspection
Check the entire wrap for bubbles, wrinkles, or loose spots. Smooth out any imperfections with a squeegee or heat. Look closely at corners and seams for tight adhesion. Ensure the wrap looks even and flawless from all angles. A final inspection guarantees a polished and durable wrap.
Common Challenges
Vinyl wrapping a car looks simple but has common challenges. These problems can affect how the wrap looks and lasts. Knowing these challenges helps prepare and fix them fast. This section talks about three main issues that people face during vinyl wrap.
Dealing With Curves And Contours
Cars have many curves and shapes. Vinyl wrap is flat and can stretch only so much. Stretching too much can cause tears or bubbles. Use heat with a heat gun to soften the vinyl. This helps to bend it around curves smoothly. Work slowly and pull the vinyl gently. Small cuts in the vinyl can help fit sharp corners without wrinkles.
Fixing Air Bubbles
Air bubbles happen when air gets trapped under the vinyl. They look like small bumps and spoil the smooth finish. Use a pin to prick the bubble gently. Press the air out with a squeegee or your fingers. Work from the center of the bubble to the edges. For big bubbles, lift the vinyl slightly and smooth it again. Good cleaning before applying prevents most bubbles.
Handling Wrinkles
Wrinkles appear when the vinyl folds or creases. They often happen on edges or curves. Heat the area to make the vinyl soft. Stretch and smooth it carefully with a squeegee. Avoid pressing too hard to stop tearing. If wrinkles stay, lift the vinyl and reapply slowly. Patience and steady hands reduce wrinkles significantly.

Credit: wrapguys.com
Maintaining Your Vinyl Wrap
Maintaining your vinyl wrap keeps it looking fresh and new. Proper care stops dirt and damage from ruining the wrap. With simple steps, you can extend the life of your vinyl wrap. This section covers easy cleaning tips, ways to avoid damage, and advice for long-lasting results.
Cleaning Tips
Use a soft cloth or sponge for cleaning. Avoid harsh brushes that can scratch the surface. Wash the wrap with mild soap and water only. Rinse well to remove all soap residue. Dry with a microfiber towel to prevent streaks. Clean your wrap regularly to stop dirt buildup. Avoid automatic car washes with strong brushes.
Avoiding Damage
Keep sharp objects away from the wrap. Park in shaded areas to reduce sun damage. Do not use abrasive cleaners or solvents. Avoid high-pressure water sprays near edges. Be careful with fuel spills and chemicals. Fix small tears or bubbles quickly to stop spreading. Avoid parking near trees to prevent sap and debris.
Longevity Advice
Apply a vinyl protectant every few months. Store the vehicle in a garage when possible. Avoid prolonged exposure to extreme weather. Regularly inspect the wrap for signs of wear. Address minor issues before they get worse. Follow manufacturer guidelines for care and maintenance. Proper care helps your vinyl wrap last longer and stay vibrant.

Credit: www.wikihow.com
Frequently Asked Questions
What Tools Do I Need To Vinyl Wrap A Car?
You need a squeegee, heat gun, utility knife, and microfiber cloth. These tools help apply vinyl smoothly and remove air bubbles effectively.
How Long Does A Vinyl Wrap Last On A Vehicle?
A vinyl wrap typically lasts 5 to 7 years with proper care. Exposure to sunlight and harsh weather can affect its durability.
Can I Vinyl Wrap My Car Myself?
Yes, beginners can vinyl wrap their cars with patience and practice. Watching tutorials and preparing the surface properly is essential for success.
How Do I Prepare The Surface Before Vinyl Wrapping?
Clean the surface thoroughly to remove dirt and grease. Use isopropyl alcohol for best results and ensure the surface is dry before application.
Conclusion
Vinyl wrapping can change the look of your car quickly. It protects the paint and adds style. Take your time and follow each step carefully. Use the right tools for better results. Small bubbles or wrinkles can be fixed with heat.
Practice on small areas before wrapping the whole vehicle. Enjoy your new design and keep the wrap clean. With patience, vinyl wrapping becomes easier and fun. Try it yourself and see the difference it makes.


