If you want to protect your Honda’s doors from dings and scratches while adding a sleek, finished look, installing body side molding is a smart choice. But how do you get it right without spending a fortune on a professional?
You’re in the right place. This guide will walk you through every step of installing Honda body side molding quickly and easily. By the end, you’ll have the confidence to upgrade your car yourself, saving money and boosting your ride’s style.
Keep reading to discover the simple tricks that make this project a breeze!

Credit: www.hondaautomotiveparts.com
Tools And Materials Needed
Installing Honda body side molding requires the right tools and materials. Having everything ready makes the process smoother. It prevents mistakes and saves time. Below is a list of what you need before starting.
Basic Tools
You need simple tools to install the molding. A screwdriver helps remove old molding or clips. A plastic trim removal tool protects your car’s paint. A measuring tape ensures perfect alignment. A clean cloth helps wipe the area.
Adhesive And Cleaning Supplies
Use strong double-sided automotive tape for sticking the molding. Rubbing alcohol cleans the surface and removes dirt. Avoid oily or dusty spots for better adhesion. Clean the area thoroughly before applying the tape.
Replacement Parts
Get the correct Honda body side molding for your model. Use new clips or fasteners if needed. Old clips might break or not hold well. Check the molding for any defects before installation.
Safety Equipment
Wear gloves to protect your hands from sharp edges. Safety glasses shield your eyes from debris. Work in a well-lit area to see clearly. Take your time to avoid accidents.
Preparing The Vehicle Surface
Preparing the vehicle surface is the first step in installing Honda body side molding. This step ensures the molding sticks well and looks good. Proper preparation avoids peeling and uneven fitting. Take time to prepare the surface carefully for the best results.
Cleaning The Area
Start by washing the area where the molding will go. Use soap and water to remove dirt and grime. Dry the surface with a clean towel. Any dust or oil can stop the molding from sticking well. Use rubbing alcohol on a cloth to wipe the surface. This removes leftover grease and ensures a clean base.
Removing Old Molding
If old molding is still on the vehicle, remove it carefully. Use a plastic trim tool to lift the edges gently. Avoid scratching the paint. Peel the molding slowly to prevent damage. Clean any leftover adhesive with a sticky residue remover. Make sure the surface is smooth and ready for the new molding.
Aligning The New Body Side Molding
Aligning the new body side molding is a key step in the installation process. Proper alignment ensures the molding fits well and looks neat on your Honda. Taking time to position it correctly prevents future problems like peeling or uneven gaps.
Marking Placement
Start by holding the new molding against the car’s side. Check the edges and curves carefully. Use a pencil or masking tape to mark where the molding will sit. These marks guide you during final installation. Take your time to avoid mistakes. Small adjustments here save trouble later.
Checking Fit
Next, test the molding’s fit before fixing it permanently. Align it with your marks and press gently along the length. Ensure it follows the car’s body shape smoothly. Look for any gaps or overlaps. If needed, adjust the position slightly. A perfect fit means better protection and a clean look.
Credit: www.youtube.com
Attaching The Molding
Attaching the Honda body side molding is a crucial step. It ensures a secure fit that lasts. Proper attachment prevents peeling or damage while driving. Follow the steps carefully for the best results.
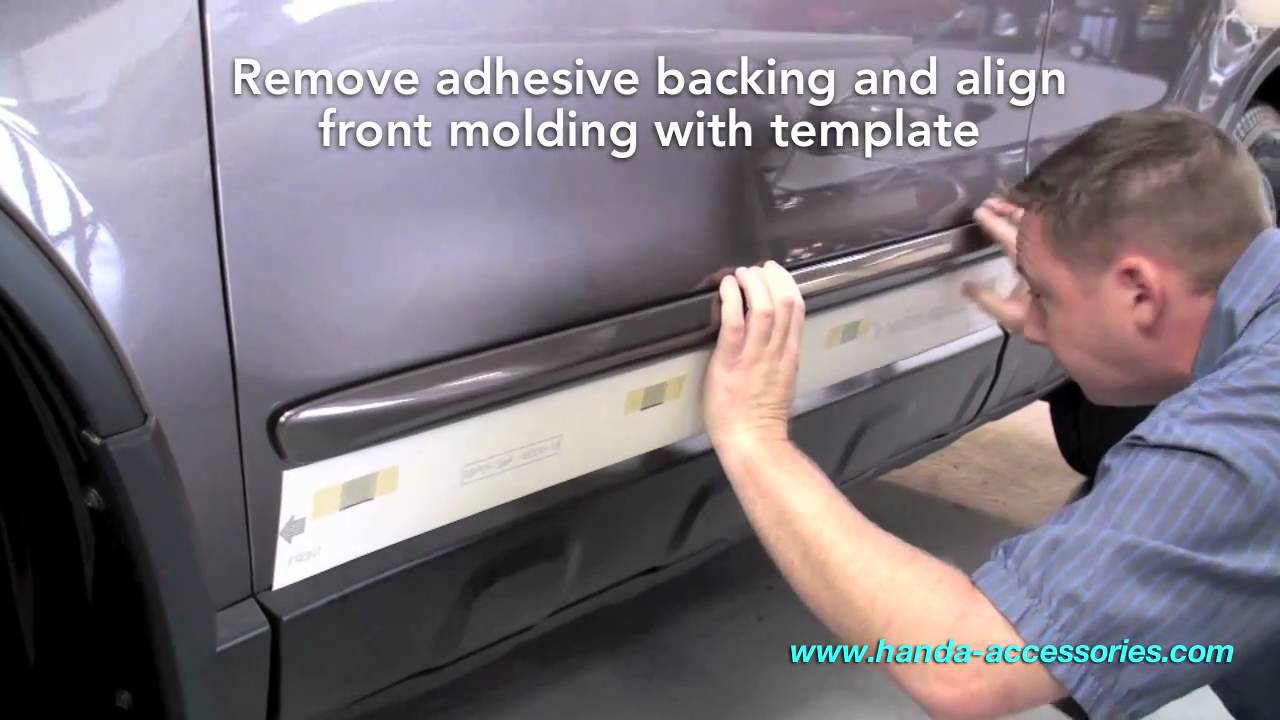
Peeling Adhesive Backing
Start by holding the molding at one end. Slowly peel off the adhesive backing strip. Avoid touching the sticky side to keep it clean. Peel a small section at first. This helps control the placement better. Do not remove all backing at once.
Pressing Molding Firmly
Place the molding on the car’s side gently. Align it carefully along the panel. Press the molding firmly against the surface. Use even pressure along the entire length. Hold for a few seconds to secure adhesion. Recheck the molding to avoid any gaps.
Final Touches
After carefully placing the Honda body side molding, the final touches are crucial. These steps ensure the molding stays secure and looks great for a long time. Taking time with these last details helps avoid future problems like peeling or gaps.
Securing Edges
Press down firmly along all edges of the molding. This action helps the adhesive bond tightly to the car’s surface. Use a soft cloth or roller to avoid scratching the paint. Check each edge to confirm it sits flat without lifting. Secure edges prevent dirt and water from getting underneath.
Allowing Adhesive To Set
Let the adhesive dry fully before driving or washing the car. This process can take 24 to 48 hours, depending on weather and adhesive type. Avoid touching or moving the molding during this time. Proper setting ensures a strong hold and long-lasting fit.
Maintenance Tips For Longevity
Maintaining your Honda body side molding helps keep it looking new. Regular care stops damage and wear. Simple steps can extend its life and preserve your car’s appearance.
Follow these tips to protect the molding from dirt, sun, and scratches. Proper maintenance saves money on repairs or replacements later.
Cleaning With Mild Soap And Water
Use a soft cloth or sponge. Mix mild soap with warm water. Gently wipe the molding to remove dirt and grime. Avoid harsh chemicals that can damage the surface. Rinse well and dry with a clean towel.
Protecting From Sun Damage
Park in shaded areas or use a car cover. UV rays cause fading and cracking. Applying a UV protectant spray can help keep the molding flexible and vibrant. Reapply the protectant every few months for best results.
Inspecting For Loose Or Damaged Parts
Check the molding regularly for any loose spots or cracks. Tighten clips or screws if needed. Replace damaged sections quickly to avoid further issues. Early repairs keep the molding secure and functional.
Avoiding Harsh Impacts
Be careful when parking near curbs or other vehicles. Avoid hitting the molding with doors or shopping carts. Minor impacts can cause dents or scratches. Drive carefully to maintain the molding’s shape and look.

Credit: www.sportwing.com
Frequently Asked Questions
How Do I Prepare The Car Surface For Molding Installation?
Clean the car surface thoroughly to remove dirt and grease. Use rubbing alcohol for best results. Ensure the surface is dry before applying the molding.
What Tools Are Needed To Install Honda Body Side Molding?
You need a heat gun or hairdryer, adhesive promoter, cleaning cloth, and the molding itself. Optional tools include a plastic trim remover and masking tape.
How Long Does The Installation Of Body Side Molding Take?
Installation usually takes about 30 to 45 minutes. Proper surface prep and careful alignment can affect the timing.
Can I Remove And Reinstall The Body Side Molding?
Yes, but removal must be done carefully to avoid paint damage. Use heat and plastic tools to loosen adhesive safely.
Conclusion
Installing Honda body side molding can protect your car and improve its look. Follow each step carefully for the best fit. Take your time and check the alignment often. Use the right tools to avoid damage. This simple upgrade adds style and guards against scratches.
Keep your car looking fresh with regular care. Enjoy the new look and added protection. A small effort brings big benefits to your Honda.