
Want your car to shine like new without spending hours by hand? Learning how to wax your car with a drill can save you time and give you professional-looking results.
You might think this sounds complicated, but it’s easier than you expect—and your car will thank you for it. In this guide, you’ll discover simple steps to make waxing faster, smoother, and more effective. Ready to transform your car’s finish and turn heads wherever you go?
Keep reading to unlock the secrets of waxing with a drill.
Tools And Materials Needed
Waxing your car with a drill makes the job faster and easier. Having the right tools and materials is important. It helps you get a smooth and shiny finish without damaging the paint. Prepare everything before you start for the best results.
Choosing The Right Drill
Select a drill with variable speed control. Too fast can harm the car’s surface. A cordless drill gives more freedom to move around. Make sure the drill has enough power to spin the pad evenly. Avoid drills with too much torque or uneven speed.
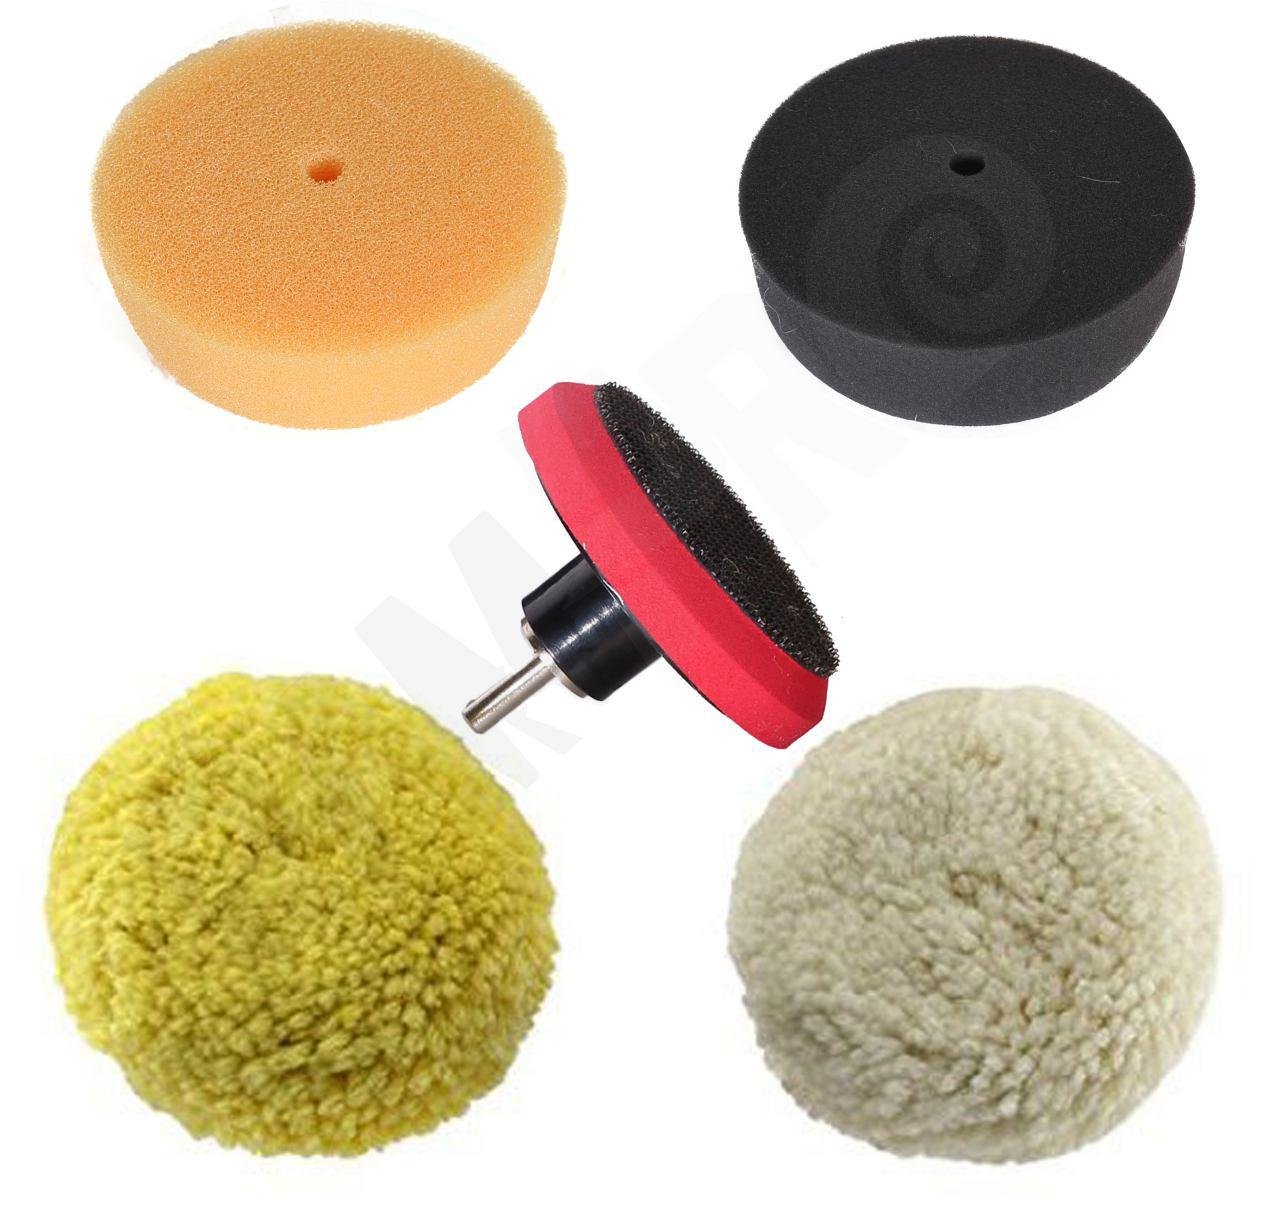
Selecting Wax And Pads
Choose a car wax designed for machine application. Paste or liquid wax works well with a drill. Pick soft foam or microfiber pads to prevent scratches. Different pads serve different purposes—polishing, waxing, or buffing. Match the pad type with the wax for a smooth finish.
Safety Gear Essentials
Wear safety glasses to protect your eyes from splashes. Use gloves to keep your hands clean and safe. A mask helps avoid inhaling wax dust or fumes. Keep a clean cloth nearby to wipe off excess wax. Safety gear keeps the process safe and comfortable.

Credit: www.ebay.com
Preparing Your Car
Preparing your car before waxing with a drill is very important. It helps the wax stick better and protects your paint. A clean, dry surface gives the best results. Follow these steps carefully for a smooth waxing process.
Washing And Drying
Start by washing your car thoroughly. Use car shampoo and a soft sponge. Rinse off all dirt and grime. Dirt can scratch your paint if left on. After washing, dry the car completely. Use a clean microfiber towel for drying. Avoid air drying, which leaves water spots.
Removing Surface Contaminants
Even after washing, some contaminants remain. These include tar, tree sap, and brake dust. Use a clay bar or a detailer spray. Rub gently to remove these particles. This step makes the surface smooth and clean. A smooth surface helps the wax last longer.
Taping Off Sensitive Areas
Protect parts that should not get wax on them. Use painter’s tape to cover trim, rubber seals, and plastic parts. This prevents damage and keeps those areas clean. Take time to tape carefully. It saves effort during cleanup later.
Setting Up The Drill
Setting up the drill correctly is key to waxing your car smoothly and safely. This step prepares your tool for the best performance. It ensures the wax spreads evenly without damaging the paint. Follow these steps carefully for a perfect start.
Attaching The Waxing Pad
Choose a waxing pad that fits your drill. Most pads attach with a hook-and-loop system. Press the pad firmly onto the drill’s backing plate. Make sure it is centered and secure. A loose pad can cause uneven waxing or accidents.
Adjusting Drill Speed
Set your drill to a low speed before waxing. High speed can create heat and damage the car’s surface. Look for a speed setting between 600 and 1200 RPM. This range helps spread wax without splattering. Use the drill’s speed control to adjust gently.
Testing The Setup
Test the drill setup on a small, hidden area of your car. Turn it on and let the pad spin slowly. Check for wobbling or noise. If the pad is stable, you are ready to wax. If not, stop and reattach the pad correctly.
Wax Application Process
The wax application process is a key step in waxing your car with a drill. It ensures the wax spreads evenly and protects your car’s surface. Proper application helps avoid streaks and uneven spots. Follow the steps carefully for the best finish.
Applying Wax To The Pad
Start by attaching a foam or microfiber pad to your drill. Apply a small amount of wax to the pad’s surface. Too much wax can cause mess and waste. Spread the wax evenly on the pad before starting the drill. This helps the wax distribute smoothly on the car.
Starting With Small Sections
Work on small sections of your car at a time. About two feet by two feet is a good size. This allows you to control the waxing and avoid drying too fast. Complete one section before moving to the next. This method gives a more consistent shine.
Using Proper Motion Techniques
Use slow, circular motions with the drill. Keep light pressure to avoid damaging the paint. Overlapping each pass ensures full coverage. Move the drill steadily and avoid staying in one spot too long. This prevents heat buildup and uneven wax layers.
Buffing And Finishing
Buffing and finishing are key steps to get a smooth, shiny car surface after waxing with a drill. This part removes leftover wax and polishes the paint to a bright shine. Proper buffing protects your car and makes it look fresh. Follow these steps carefully to avoid marks and achieve a perfect finish.
Removing Excess Wax
Start by wiping off extra wax with a clean microfiber cloth. Use gentle pressure to avoid scratching the paint. Focus on small areas at a time to make sure no wax remains. Removing all excess wax prevents streaks and dull spots. Take your time for the best result.
Buffing For Extra Shine
Attach a soft buffing pad to your drill. Set the drill to a low speed to avoid heat damage. Move the drill in slow, circular motions over the waxed surface. This action smooths the wax and brings out a deep shine. Keep the pad clean by wiping it often. Buff until the surface feels smooth and looks glossy.
Final Inspection
Check your car in bright light for any missed spots or streaks. Run your hand over the surface to feel for rough patches. Re-buff any dull areas gently with the drill. Make sure all wax residue is gone for a clean finish. A careful inspection ensures your car shines evenly everywhere.

Credit: www.walmart.com
Common Mistakes To Avoid
Waxing your car with a drill is a fast and effective method. Yet, many make simple mistakes that harm the paint or reduce shine. Avoiding these errors ensures a smooth, glossy finish. Here are common pitfalls to watch for during the process.
Overloading The Pad
Putting too much wax on the pad causes uneven application. Wax may spill or clump on the car’s surface. This creates streaks and wastes product. Apply a small, even amount to the pad. You can always add more wax if needed.
Using Incorrect Speed
Drill speed matters for good waxing results. Too fast can damage the paint or cause splatter. Too slow wastes time and effort. Set your drill to a medium speed. This gives steady pressure and smooth coverage.
Neglecting Surface Preparation
Wax sticks better on a clean, dry surface. Dirt or dust under the wax causes scratches. Wash and dry your car before waxing. Removing old wax layers also helps the new coat bond well. Take time to prepare the surface properly.
Maintenance Tips For Lasting Shine
Maintaining your car’s wax finish ensures a bright, smooth shine that lasts longer. Proper care after waxing keeps the paint safe from dirt, water spots, and sun damage. Follow these simple tips to protect your car’s look and keep it shining beautifully.
Regular Washing Routine
Wash your car often to remove dust and grime. Use a gentle car shampoo and soft sponge or cloth. Avoid harsh detergents that strip away the wax layer. Rinse with clean water and dry with a microfiber towel. Regular washing helps maintain the wax’s protection and shine.
Reapplying Wax
Wax wears off over time. Apply a new layer every 2 to 3 months. Clean the surface before waxing for the best results. Use a drill with a soft foam pad for even application. Reapplying wax keeps the car’s paint safe and the shine fresh.
Storing Tools Properly
Keep your waxing tools clean and dry after use. Store pads and cloths in a cool, dry place. Avoid exposure to dust and moisture. Proper storage extends the life of your tools and helps maintain quality wax jobs.
Credit: www.clickair.ma
Frequently Asked Questions
How Do I Prepare My Car Before Waxing With A Drill?
Before waxing, wash and dry your car thoroughly to remove dirt. Ensure the surface is cool and shaded for best results. Remove any wax residues to avoid uneven application during drilling.
What Drill Attachment Is Best For Car Waxing?
Use a foam or microfiber polishing pad attachment designed for drills. These pads distribute wax evenly and prevent paint damage. Avoid abrasive or rough attachments to protect your car’s finish.
Can I Wax My Car With A Regular Drill?
Yes, a regular drill can be used if it has variable speed control. Use low to medium speed to avoid overheating and damaging the paint. Always attach a proper waxing pad for safe application.
How Much Wax Should I Apply When Using A Drill?
Apply a small amount of wax evenly on the pad. Too much wax can cause uneven spreading and waste product. Start with a thin layer and add more if needed during polishing.
Conclusion
Waxing your car with a drill saves time and effort. It helps spread wax evenly and quickly. Always use the right pad and speed for best results. Take your time and work in small sections. Clean the car before waxing for a smooth finish.
Regular waxing keeps your car shiny and protected. Try this method to make waxing easier and more fun. Your car will look great and last longer. Simple steps, great results.


