
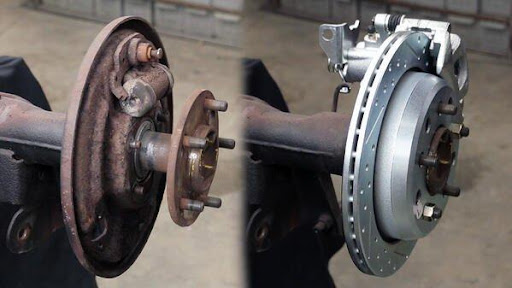
Are your drum brakes causing trouble or making noise? Switching to rotor brakes could give your vehicle better stopping power and smoother rides.
But you might be wondering, “Can I do this myself? ” The good news is, you can. This guide will walk you through every step to change your drum brakes to rotors, using simple instructions that anyone can follow. By the end, you’ll feel confident and ready to upgrade your braking system for safer, more reliable driving.
Keep reading to discover how easy it really is to make this important switch.
Tools And Materials Needed
Changing drum brakes to rotors requires specific tools and parts. Having the right materials makes the job easier and safer. Prepare everything before starting the work.
Essential Tools
You need a jack and jack stands to lift and hold the car. A lug wrench helps remove the wheel nuts. Use a socket set for bolts and screws. A brake caliper tool or C-clamp presses the brake pads. A screwdriver and pliers help remove springs and clips. A rubber mallet may loosen stuck parts without damage.
Required Parts
New brake rotors are the main parts to install. You need brake calipers designed for rotors. Brake pads must fit the new calipers. New brake lines or hoses might be necessary. Use new hardware kits with clips, bolts, and springs. Brake fluid is essential for the hydraulic system.
Safety Gear
Wear safety goggles to protect your eyes from dust and debris. Use gloves to keep your hands clean and safe. Wear a dust mask to avoid brake dust inhalation. Closed-toe shoes protect your feet from heavy objects. Have a fire extinguisher nearby for emergencies.

Credit: www.jegs.com
Preparing Your Vehicle
Preparing your vehicle is the first step to change drum brakes to rotors. It ensures safety and makes the job easier. You need to lift the car, remove the wheels, and clean the brake area. Each task sets the stage for smooth brake replacement.
Lifting And Securing The Car
Park your car on a flat surface. Use wheel chocks to stop it from moving. Place a jack under the car’s frame. Lift the car slowly until the wheels clear the ground. Put jack stands under the car for support. Never work under a car only held by a jack.
Removing The Wheels
Loosen the lug nuts before lifting the car. Turn them counterclockwise with a wrench. After the car is lifted, remove the lug nuts completely. Pull the wheels off carefully. Set them aside in a safe place. This gives clear access to the brake parts.
Cleaning The Brake Assembly
Use a brush to remove dirt and dust from the brake area. Spray brake cleaner to get rid of grease and grime. Wipe the parts with a clean cloth. Clean brakes help you see all components clearly. This helps in a precise and safe brake change.
Removing Drum Brakes
Removing drum brakes is the first step in converting to disc rotors. This process requires care to avoid damage to the brake system. Follow each step to remove the drum brakes safely and prepare your vehicle for rotor installation.
Detaching Brake Components
Start by loosening the wheel nuts and removing the wheel. Next, disconnect the brake cable or hydraulic line from the drum brake assembly. Remove the springs and clips holding the brake shoes in place. Use pliers or a brake spring tool for better grip. Keep all parts organized for reassembly or replacement.
Removing The Drum
The drum may stick due to rust or dirt. Tap around the drum edge gently with a hammer to loosen it. If the drum still won’t come off, try turning the adjuster inside the brake assembly to retract the shoes. Pull the drum straight off once it moves freely. Avoid using excessive force to prevent damage.
Inspecting Brake Hardware
Check the condition of the brake shoes, springs, and wheel cylinder. Look for wear, cracks, or leaks in the hardware. Replace any parts that show damage or heavy wear. Cleaning the backing plate and other components helps ensure a smooth rotor installation. Proper inspection saves time and improves brake performance.
Installing Brake Rotors
Installing brake rotors is a key step in upgrading your vehicle’s braking system. This process improves brake performance and safety. Each step must be done carefully to ensure proper fit and function.
Preparing The Hub
Start by cleaning the hub surface thoroughly. Remove rust, dirt, and old grease. Use a wire brush or sandpaper for best results. A clean hub helps the rotor sit flat and prevents vibrations. Check the hub for damage or warping. Replace any parts if needed before moving on.
Mounting The Rotor
Place the rotor onto the hub carefully. Align the holes on the rotor with the wheel studs. The rotor should fit snugly without forcing. Hold the rotor in place by hand. This step ensures correct positioning before securing it fully.
Securing The Rotor
Use lug nuts or screws to secure the rotor. Tighten them by hand first to avoid cross-threading. Then, use a wrench to tighten in a star pattern. This ensures even pressure and proper seating. Double-check all fasteners for tightness before reassembling other brake parts.
Installing Calipers And Pads
Installing calipers and pads is a key step in changing drum brakes to rotors. It ensures your new braking system works safely and smoothly. Proper installation helps the brakes stop the car effectively and prevents damage to parts.
Focus on three main tasks: attaching the caliper bracket, installing the brake pads, and mounting the caliper. Each step must be done carefully to avoid issues later.
Attaching The Caliper Bracket
Start by placing the caliper bracket over the rotor. Align it with the mounting holes on the wheel hub. Use the correct bolts to secure the bracket tightly. Tighten bolts to the manufacturer’s recommended torque. This keeps the bracket stable and prevents movement during braking.
Installing Brake Pads
Next, insert the brake pads into the caliper bracket. Make sure the pads face the rotor correctly. Some pads have clips or shims; install them as needed. Check that the pads slide smoothly but fit snugly. Proper pad placement avoids noise and uneven wear.
Mounting The Caliper
Finally, position the caliper over the brake pads and bracket. Align the caliper bolts with their holes. Tighten the bolts firmly to hold the caliper in place. Check that the caliper moves slightly to allow pad movement. This step is vital for smooth brake function and safety.
Final Adjustments And Checks
After installing rotors, final adjustments and checks are essential. These steps ensure your brakes work safely and properly. Skipping these checks can cause poor brake performance or damage. Take your time to complete each step carefully.
Bleeding The Brakes
Bleeding removes air from the brake lines. Air in the lines causes soft or spongy brake pedals. Use a clear tube and a container to catch brake fluid. Open the bleeder valve and pump the brake pedal. Close the valve before releasing the pedal. Repeat until no air bubbles appear in the fluid.
Checking Brake Fluid
Brake fluid level must be between the minimum and maximum marks. Use the correct type of fluid for your vehicle. Low fluid can cause brake failure. Add fluid slowly to avoid spills. Clean any spills immediately to protect paint and parts.
Testing Brake Operation
Start the vehicle and press the brake pedal gently. The pedal should feel firm and steady. Test brakes at low speed in a safe area. Listen for noises and notice any pulling to one side. Ensure the vehicle stops smoothly and evenly before driving normally.
Tips For Long-term Maintenance
Maintaining your new disc brake system is key for safety and performance. Proper care helps the brakes last longer and work better. Simple steps keep your braking smooth and reliable over time.
Regular Inspections
Check your brakes often for wear and damage. Look at the pads and rotors for cracks or thinning. Listen for unusual noises when braking. Early spotting of problems avoids costly repairs later.
Brake Pad Replacement
Replace brake pads before they wear too thin. Thin pads reduce stopping power and can damage rotors. Follow your vehicle’s guide for replacement timing. Use quality pads to ensure good brake response.
Rotor Care
Keep rotors clean and free from rust. Avoid harsh chemicals that can damage the metal. If rotors get warped, have them resurfaced or replaced. Proper rotor care prevents brake vibration and noise.
Credit: mpbrakes.com

Credit: www.youtube.com
Frequently Asked Questions
What Are The Benefits Of Changing Drum Brakes To Rotors?
Switching to rotors improves braking performance, heat dissipation, and maintenance ease. Rotors offer better stopping power and reduce brake fade in high-demand situations.
How Long Does It Take To Convert Drum Brakes To Rotors?
Typically, the conversion takes 2 to 4 hours depending on experience and tools. Proper preparation and following steps carefully ensure a smooth and safe process.
What Tools Are Needed To Change Drum Brakes To Rotors?
Essential tools include a jack, wrenches, socket set, brake cleaner, and rotor-specific hardware. Having the right tools ensures accurate fitting and safe brake operation.
Can I Convert Drum Brakes To Rotors Myself Safely?
Yes, with mechanical knowledge and proper tools, you can convert brakes safely. Follow instructions carefully and take safety precautions during the entire process.
Conclusion
Changing drum brakes to rotors improves your vehicle’s braking power. It also makes maintenance easier. Follow each step carefully for safety and best results. Take your time and use the right tools. This upgrade can boost your driving confidence on the road.
Keep checking your brakes regularly after the change. A smooth brake system means safer trips for you and others. Trust your skills and enjoy the benefits of rotor brakes.


