
Have you ever wondered if your brake rotors are safe to use? Cracks on brake rotors can be dangerous and affect your car’s stopping power.
Knowing how to check for these cracks can save you from costly repairs and keep you safe on the road. You’ll learn simple steps to spot cracks on your brake rotors before they become a serious problem. Keep reading to protect yourself and your vehicle with easy, effective tips.

Credit: www.essexparts.com
Signs Of Rotor Cracks
Brake rotors are a key part of your vehicle’s braking system. Cracks in rotors can cause serious problems. Knowing the signs of rotor cracks helps you stay safe on the road. Early detection can prevent accidents and costly repairs.
Signs of rotor cracks can show up in different ways. You might see them or feel them while driving. Paying attention to these signs keeps your brakes working well.
Visual Indicators
Look closely at the brake rotors for any cracks. Small hairline cracks can appear on the surface. These cracks often run from the center to the edge. Rust or discoloration can highlight these cracks. Deep grooves or uneven wear may also indicate damage. Any visible crack means the rotor needs checking by a mechanic.
Symptoms While Driving
Notice how your car feels when braking. A vibrating pedal or steering wheel often signals rotor cracks. You may hear a squealing or grinding noise. Brakes that feel less responsive or soft are a warning. The car might pull to one side during braking. These symptoms mean the rotors could be cracked and unsafe.
Tools Needed For Inspection
Inspecting brake rotors for cracks requires the right tools. Using proper tools helps find problems early. It keeps your car safe and running well. Tools range from simple to advanced. Each tool plays a key role in a thorough check.
Basic Tools
A flashlight is essential to see cracks clearly. It lights up dark spaces around the rotor. A magnifying glass helps spot small cracks. Clean rags remove dirt and brake dust. This cleaning makes cracks easier to find. A straight edge or ruler checks for warping. Warped rotors often crack under stress. Gloves protect your hands during inspection.
Advanced Equipment
A dial indicator measures rotor runout precisely. Runout means how much the rotor wobbles. Excessive wobble may cause cracks. A borescope or inspection camera shows inside hard-to-see areas. This tool finds hidden cracks without removing the rotor. Ultrasonic testers detect internal flaws not visible outside. They send sound waves through the rotor. Cracks reflect waves differently. Using these tools gives a deeper and more accurate inspection.
Step-by-step Inspection Process
Checking for cracks on a brake rotor is important for safe driving. Follow these simple steps to inspect your brake rotors carefully. This process helps find problems early and keeps your vehicle in good shape.
Preparing The Vehicle
Park your vehicle on a flat surface. Turn off the engine and apply the parking brake. Make sure the wheels do not move during inspection. Wear gloves to protect your hands. Gather tools like a jack, lug wrench, and flashlight.
Removing The Wheel
Loosen the lug nuts while the car is on the ground. Use a jack to lift the vehicle. Place jack stands for safety before removing the wheel. Take off the lug nuts completely. Remove the wheel to see the brake rotor clearly.
Examining The Rotor Surface
Use a flashlight to check the rotor surface closely. Look for any cracks, lines, or damage on the metal. Small cracks might be on the edges or near the center. Check both sides of the rotor. Note any rough spots or discoloration.
Checking Rotor Thickness
Use a micrometer or caliper to measure rotor thickness. Find the minimum thickness number stamped on the rotor. Measure at several points around the rotor edge. Compare your measurements to the minimum thickness. Replace the rotor if it is too thin.
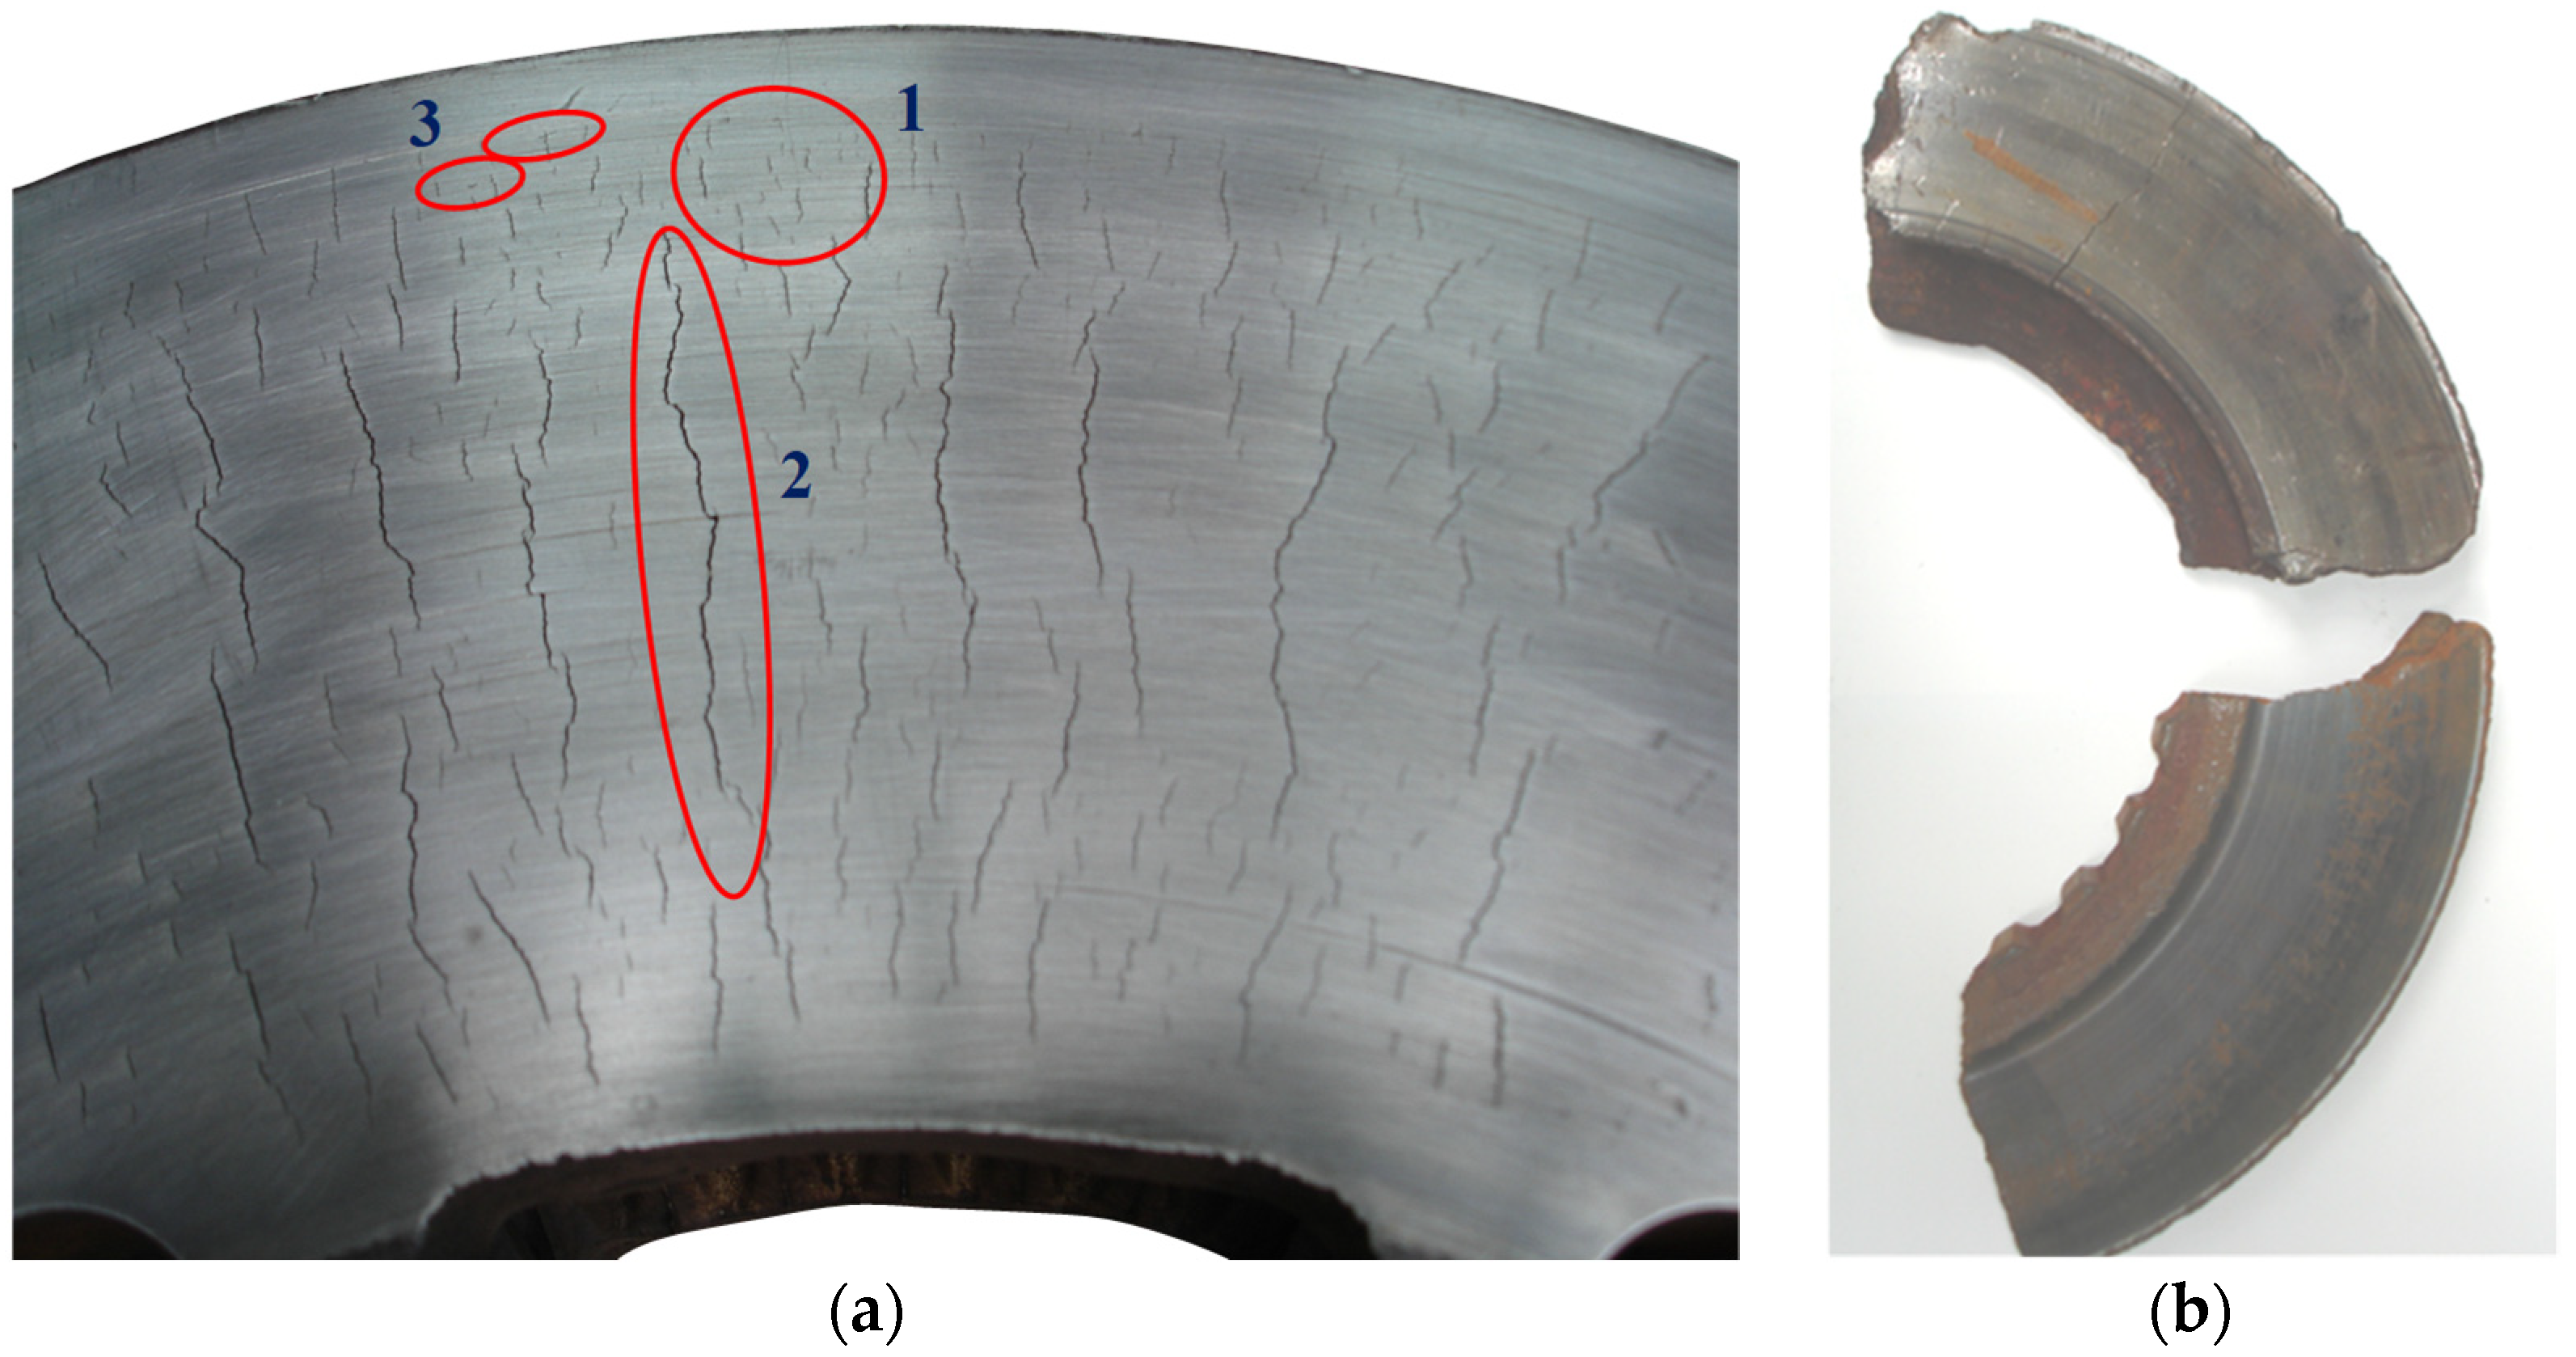
Credit: www.mdpi.com
Common Crack Types
Brake rotors face a lot of stress from heat and friction. Over time, this stress causes cracks to appear. Knowing the common crack types helps you spot problems early. This keeps your brakes safe and reliable.
Hairline Cracks
Hairline cracks are thin and small. They often show up near the rotor’s edge or surface. These cracks form due to repeated heating and cooling. They may not cause immediate trouble but can grow over time. Check for fine lines that look like tiny scratches.
Heat Spots And Warping
Heat spots are dark patches on the rotor surface. They happen because of uneven heat during braking. These spots can make the metal brittle and prone to cracks. Warping changes the rotor’s shape, causing vibrations. Look for areas that seem raised or uneven on the rotor.
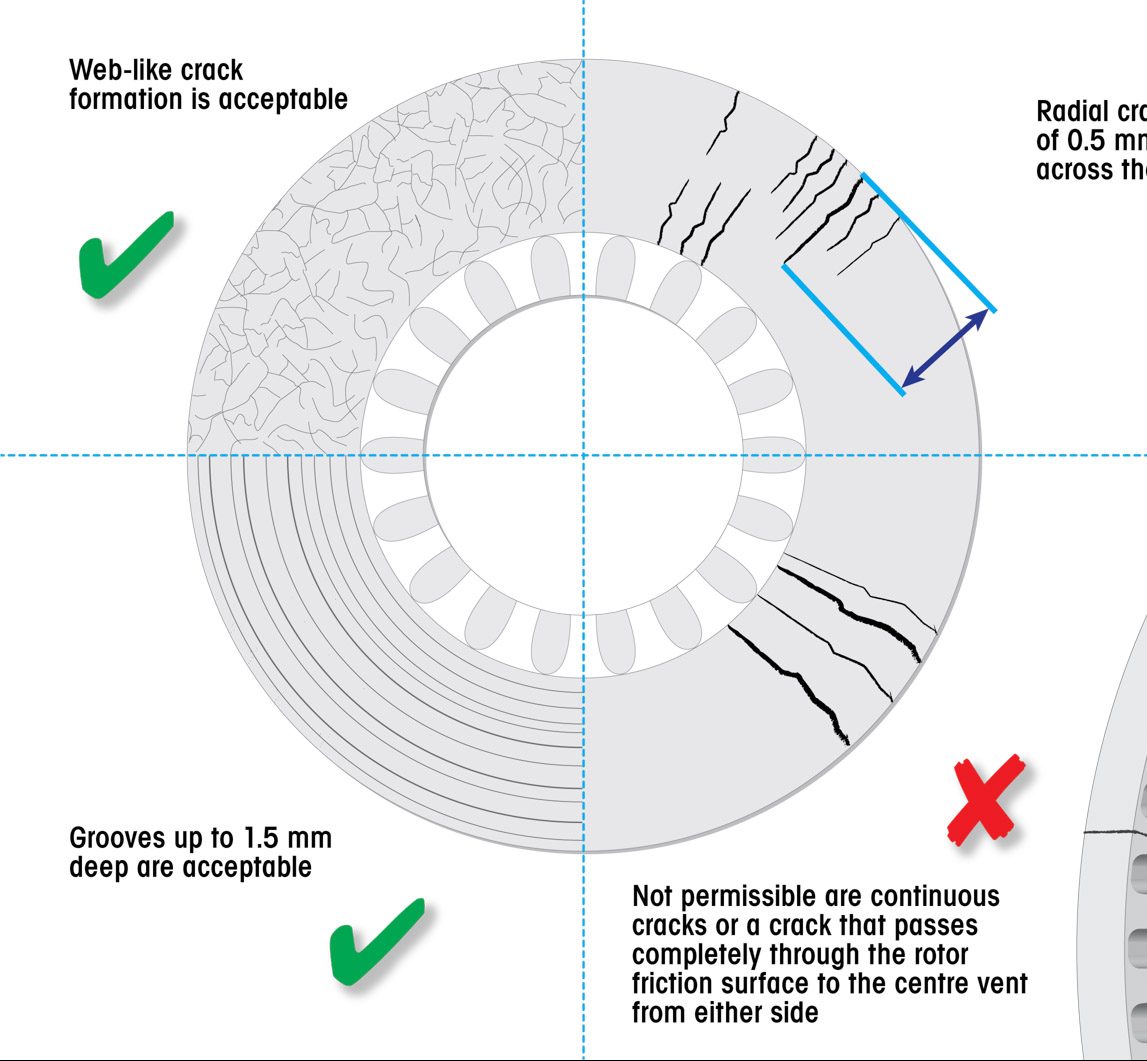
When To Replace Vs. Repair
Deciding between replacing or repairing a brake rotor depends on the damage. Small cracks might be fixed, but large cracks need replacement. Knowing the difference keeps your car safe and working well.
Assessing Damage Severity
Look closely at the brake rotor. Tiny surface cracks may only need repair. Deep or long cracks weaken the rotor. Warped or heavily scored rotors must be replaced. Measure the rotor thickness too. If it is below the limit, replacement is necessary.
Safety Considerations
Brake rotors handle high stress and heat. Cracks can cause sudden failure while driving. Repairing minor cracks is possible but risky with severe damage. Replacing a cracked rotor is the safest choice. Always prioritize safety over saving money.
Credit: powertorque.com.au
Preventing Rotor Cracks
Preventing rotor cracks is key to keeping your brakes safe and working well. Cracks can cause brake failure and costly repairs. Taking simple steps helps extend rotor life and avoid damage.
Driving Habits
Drive smoothly to reduce stress on brake rotors. Avoid sudden stops and hard braking. Slow down gradually instead of slamming the brakes. High speeds combined with quick stops heat rotors fast, causing cracks. Give your brakes time to cool after heavy use, like descending hills. Gentle driving lowers the chance of rotor damage.
Routine Maintenance
Check your brake system often for signs of wear or damage. Inspect rotors regularly for thin spots or rough surfaces. Replace brake pads before they wear out completely. Thin pads cause metal-to-metal contact, which can crack rotors. Have a professional measure rotor thickness and surface condition. Regular maintenance helps catch problems early and keeps rotors strong.
Frequently Asked Questions
How Can I Visually Inspect Brake Rotors For Cracks?
Check the rotor surface closely for hairline cracks or grooves. Use good lighting and a magnifying glass if needed. Cracks often appear near the edges or around the drilled holes. Early detection prevents brake failure and costly repairs.
What Tools Help Detect Cracks On Brake Rotors?
A flashlight and magnifying glass are ideal for visual checks. For deeper inspection, use dye penetrant or magnetic particle testing. These tools reveal cracks invisible to the naked eye, ensuring safety and rotor longevity.
When Should I Replace A Cracked Brake Rotor?
Replace rotors immediately if cracks are deep or widespread. Small surface cracks may be safe temporarily but can worsen quickly. Prioritize safety by consulting a mechanic for a professional assessment.
Can I Drive With A Cracked Brake Rotor?
Driving with a cracked rotor is risky and not recommended. Cracks reduce braking efficiency and can cause rotor failure. Always repair or replace damaged rotors to maintain safe vehicle operation.
Conclusion
Checking brake rotors for cracks keeps your car safe on the road. Small cracks can grow and cause serious problems. Use good lighting and a clean surface to spot any damage. Look closely for thin lines or rough edges on the rotor.
Catching cracks early helps you fix or replace parts before accidents happen. Regular checks save money and give peace of mind. Stay alert and inspect your brakes often to protect yourself and others. Safe driving starts with good brake care.


