
Have you ever looked at a car and wondered how it got that flawless, eye-catching finish? Vinyl wrapping is the secret behind those stunning transformations.
If you want to give your car a fresh new look without the cost of a paint job, vinyl wrapping is the way to go. But how do you vinyl wrap a car yourself? This guide will walk you through every step, making the process simple and doable.
By the end, you’ll have the confidence to turn your car into a head-turner with your own hands. Ready to get started? Let’s dive in!
Preparing The Car
Preparing the car is a crucial step before applying vinyl wrap. It ensures the wrap sticks well and lasts longer. This process involves cleaning, removing some parts, and fixing any surface problems. Proper preparation helps avoid bubbles and wrinkles in the wrap.
Cleaning The Surface
Start by washing the car thoroughly. Use soap and water to remove dirt and dust. After washing, dry the car completely with a clean cloth. Next, use rubbing alcohol or a special cleaner to remove grease or wax. This step creates a clean surface for the vinyl to stick to.
Removing Parts
Take off parts like mirrors, badges, and door handles. Removing these parts makes it easier to wrap the car smoothly. It also prevents damage to the vinyl around edges and corners. Keep all screws and parts safe for reinstallation.
Repairing Imperfections
Check the car for dents, scratches, or rust. Small dents and scratches should be fixed before wrapping. Use filler or touch-up paint for best results. Smooth surfaces help the vinyl lay flat and look better after wrapping.
Gathering Materials
Before starting a vinyl car wrap, gathering the right materials is important. This step prepares you for a smooth and successful wrap. Knowing what to buy saves time and effort.
Each material plays a key role in the process. Choose carefully to avoid mistakes and extra costs.
Choosing Vinyl Wrap
Select vinyl wrap based on your car’s size and style. Look for high-quality, durable vinyl with strong adhesive. Matte, gloss, or satin finishes offer different looks. Pick a color or pattern that suits your taste. Ensure the wrap is thick enough to last long. Check if the vinyl is easy to handle and stretch.
Essential Tools
Gather tools for a clean and smooth application. You need a squeegee to remove air bubbles. A heat gun helps stretch the vinyl over curves. Use a sharp utility knife for precise cuts. A cleaning solution and microfiber cloth prepare the car surface. Tape measure and masking tape assist in alignment. Keep a plastic scraper handy for tough spots.
Safety Gear
Protect yourself during the wrap process. Wear gloves to avoid cuts from sharp tools. Use safety glasses to guard your eyes from flying debris. Work in a well-ventilated area to avoid inhaling fumes. Dress in comfortable clothes that cover your skin. Keep a first-aid kit nearby for minor injuries.
Measuring And Cutting
Measuring and cutting are key steps in vinyl wrapping a car. Accurate measurements ensure the vinyl fits perfectly. Cutting the vinyl correctly prevents waste and mistakes. This section guides you through measuring panels, cutting vinyl, and marking guidelines for a smooth wrap.
Measuring Panels
Start by cleaning the car surface. Use a tape measure to get exact panel sizes. Measure the height and width of each car section. Add a few extra inches to each measurement. These extra inches help cover edges and curves. Write down all measurements carefully. Double-check them to avoid errors.
Cutting The Vinyl
Place the vinyl on a flat surface. Use sharp scissors or a utility knife for cutting. Cut the vinyl slightly larger than your measurements. This allows room for adjustments during wrapping. Cut slowly and steadily for clean edges. Avoid jagged or uneven cuts. Keep the vinyl flat to prevent wrinkles.
Marking Guidelines
Mark the vinyl with a pencil or chalk. Draw light lines where you will fold or align. These lines help position the vinyl on the car. Use masking tape to hold the vinyl in place. Make sure markings do not damage the vinyl surface. Follow the lines carefully when applying the wrap. This step keeps the wrap neat and precise.
Credit: www.tintingchicago.com
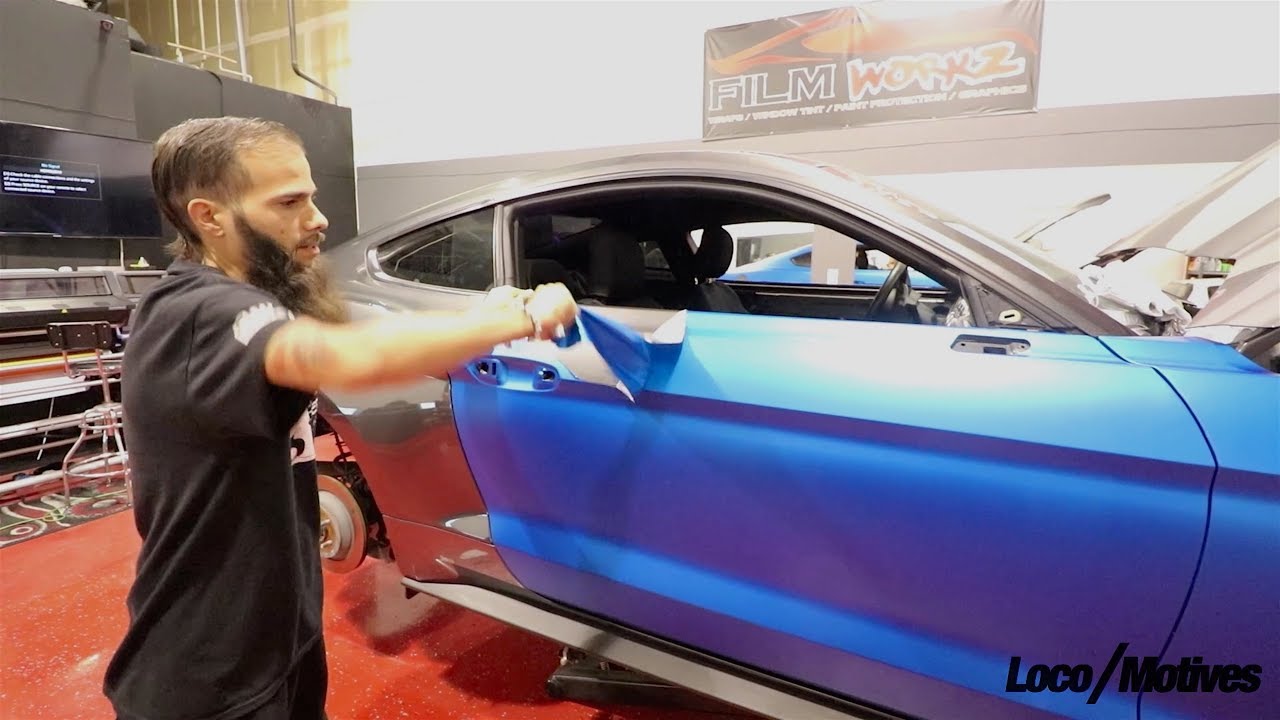
Applying The Vinyl
Applying vinyl wrap to a car is a key step in the wrapping process. It requires careful handling to avoid wrinkles and bubbles. This stage sets the base for a smooth, professional finish.
Start by preparing the surface. Clean it well to remove dust and grease. Dry the surface fully before placing the vinyl. Cleanliness helps the vinyl stick better and last longer.
Positioning The Wrap
Place the vinyl sheet gently on the car panel. Align it carefully to cover the area fully. Use magnets or tape to hold the vinyl in place.
Work slowly to avoid stretching the vinyl too much. Check the edges to make sure they match the panel shape. Correct any misalignment before sticking the vinyl firmly.
Using Heat For Flexibility
Heat the vinyl with a heat gun or hair dryer. Warm vinyl becomes soft and easier to shape around curves.
Apply heat evenly but avoid overheating. Too much heat can damage the vinyl or car paint. Use gentle, sweeping motions to warm the surface.
Smoothing Out Bubbles
Use a squeegee to press the vinyl down firmly. Start from the center and push towards the edges. This removes trapped air and avoids bubbles.
For small bubbles, prick them with a pin and press again. Work patiently to get a flat, smooth finish. Proper smoothing improves the vinyl’s look and durability.
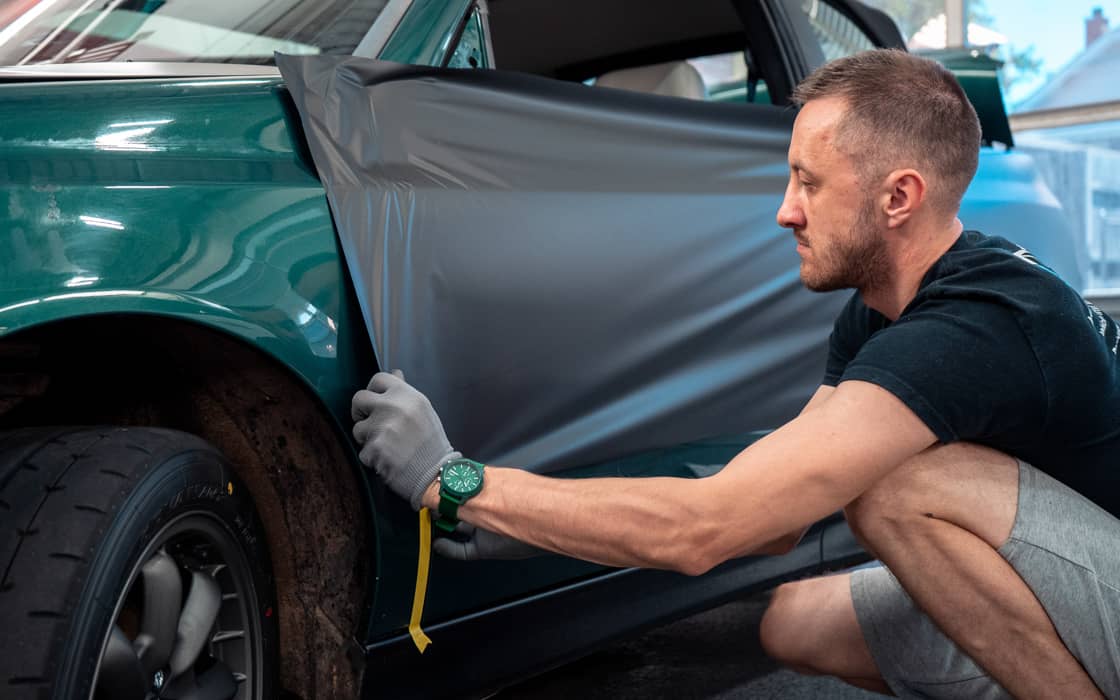
Handling Edges And Curves
Handling edges and curves is a key part of vinyl wrapping a car. These areas need careful attention to avoid wrinkles or bubbles. Proper technique ensures the vinyl looks smooth and fits perfectly. Below are tips on stretching vinyl, tucking edges, and managing complex shapes.
Stretching Vinyl Safely
Stretch vinyl gently to avoid tearing or stretching too much. Use a heat gun to warm the vinyl slightly. Warm vinyl becomes softer and easier to stretch. Pull the vinyl slowly and evenly over curves. Avoid sharp pulls that can cause damage or distortion.
Tucking And Wrapping Edges
Edges need to be tucked neatly for a clean finish. Use a squeegee to press the vinyl tight along edges. Lift edges slightly to tuck the vinyl under trims or moldings. Cut excess vinyl carefully to avoid visible seams. Proper edge work prevents peeling and lifts over time.
Dealing With Complex Shapes
Complex shapes require patience and precision. Heat the vinyl more on sharp curves to increase flexibility. Use small cuts or relief cuts behind curves to help the vinyl lay flat. Work slowly, pressing the vinyl into place as you go. This avoids wrinkles and creates a smooth finish.
Credit: www.youtube.com
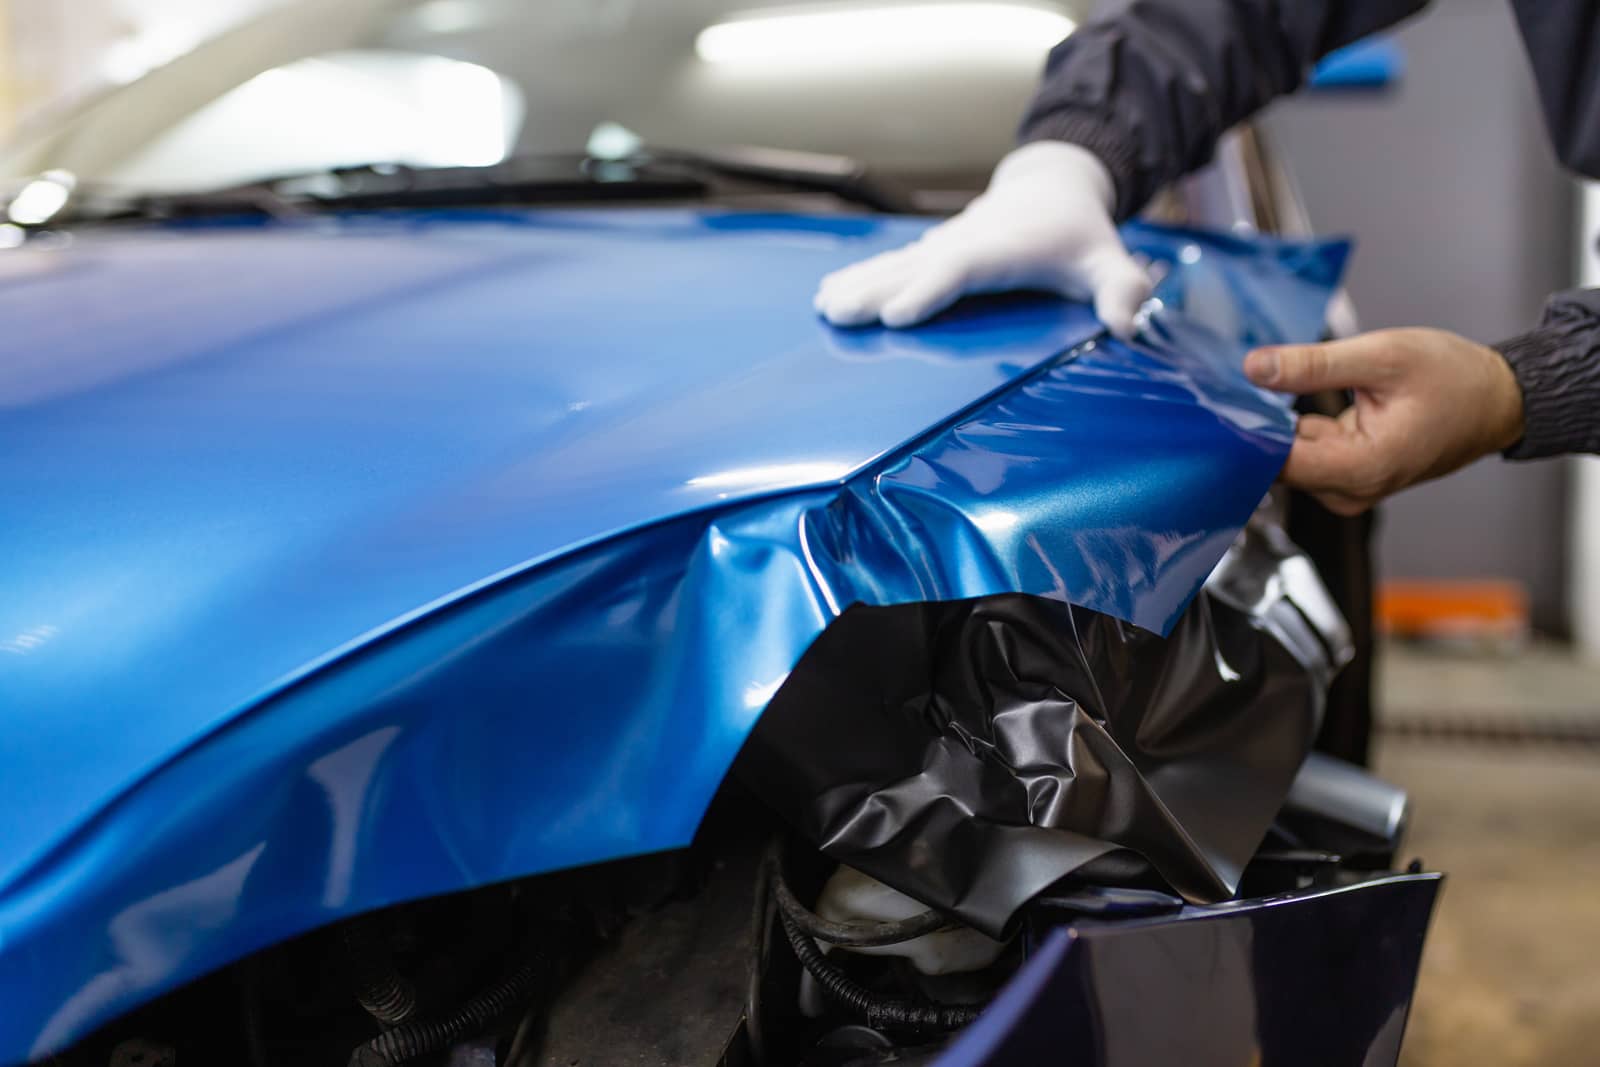
Trimming Excess Vinyl
Trimming excess vinyl is a key step in vinyl wrapping a car. It shapes the wrap to the car’s curves and edges. Proper trimming ensures a smooth, neat finish. It also prevents peeling or lifting later.
Using Precision Blades
Use sharp precision blades for clean cuts. Dull blades can tear the vinyl or leave jagged edges. Cut slowly and carefully along the edges. Keep the blade at a shallow angle to avoid deep cuts.
Always change blades often for the best results. Use a new blade for tricky areas or detailed work. This helps keep cuts smooth and straight.
Avoiding Damage To Paint
Protect the car’s paint during trimming. Do not press the blade too hard. Use a plastic or metal edge to lift vinyl slightly. Cut just the vinyl, not the paint underneath.
Take extra care near curves and corners. Use light, controlled movements. Avoid rushing to prevent scratching or dents.
Final Touches
After trimming, check all edges carefully. Use your hand or a soft cloth to press vinyl down. Smooth out any bubbles or wrinkles gently.
Heat small areas with a heat gun for better adhesion. Be careful not to overheat the vinyl. Finish by cleaning the surface to remove dust or debris.
Post-application Care
Taking care of your car’s vinyl wrap after application is very important. Proper care helps keep the wrap smooth and bright. It also stops damage and extends the wrap’s life. Follow simple steps for the best results.
Curing Time
After applying the wrap, let it cure. This means waiting before washing or touching it too much. Usually, curing takes about 24 to 48 hours. The vinyl needs time to stick fully to the car’s surface. Avoid parking in direct sunlight during this time. Keep the car in a cool, dry place if possible.
Cleaning Wrapped Surfaces
Clean the wrapped car gently. Use water and a mild soap. Do not use strong chemicals or harsh brushes. These can damage the vinyl. Use a soft cloth or sponge to wipe the surface. Rinse well with clean water. Dry the car with a soft towel. Wash your car regularly to keep the wrap looking fresh.
Maintenance Tips
Protect the wrap from scratches and dirt. Avoid parking near trees or construction sites. Keep the car away from sharp objects. Use a UV protectant spray to guard against sun damage. Check the wrap often for bubbles or loose edges. Fix small problems quickly to stop bigger damage. Proper care keeps your wrap beautiful for years.
Common Challenges
Vinyl wrapping a car is a detailed task with a few common challenges. These issues can affect the final look if not handled well. Knowing how to fix these problems helps get a smooth, clean finish. Here are some frequent challenges and how to solve them.
Fixing Wrinkles
Wrinkles often appear when the vinyl does not stretch evenly. Use a heat gun to warm the vinyl. Warm vinyl becomes soft and easier to smooth out. Gently pull the vinyl and press the wrinkles away with a squeegee. Work slowly to avoid tearing the wrap.
Removing Air Bubbles
Air bubbles can trap under the vinyl during installation. Use a needle or pin to prick the bubble carefully. Press the air out from the hole with a squeegee. Large bubbles may need several small holes. Always handle the vinyl gently to avoid damage.
Repairing Tears
Tears happen when the vinyl stretches too much or catches on edges. Small tears can be fixed with vinyl adhesive and a patch from the same material. Clean the area first, then apply glue beneath the torn edges. Press the patch firmly and let it dry well before continuing.
Credit: theartworks.com
Frequently Asked Questions
What Tools Do I Need To Vinyl Wrap A Car?
You need a vinyl wrap film, squeegee, heat gun, utility knife, and cleaning supplies. These tools help ensure smooth, precise application and a professional finish.
How Long Does It Take To Vinyl Wrap A Car?
Wrapping a car usually takes 1 to 3 days depending on car size and experience. Proper prep and careful installation affect the total time.
Can I Vinyl Wrap My Car Myself?
Yes, you can DIY vinyl wrap with patience and practice. However, professional skills often yield better, longer-lasting results and fewer mistakes.
How Do I Prepare My Car For Vinyl Wrapping?
Clean the car thoroughly, remove dirt, wax, and grease. Smooth surfaces improve vinyl adhesion and prevent bubbles or peeling.
Conclusion
Vinyl wrapping a car takes patience and care. Clean the surface well before starting. Use the right tools to avoid bubbles and wrinkles. Stretch the vinyl gently around curves for a smooth look. Take your time and work section by section.
Practice helps improve your wrapping skills. A good wrap can protect your car’s paint. It also gives your car a fresh, new look. Try vinyl wrapping to personalize your vehicle easily.


