
You’ve chosen vinyl wrap to give your car, furniture, or gadget a fresh new look. But there’s one thing that can ruin the smooth finish you want: bubbles.
Those tiny air pockets can make your wrap look messy and unprofessional. The good news? You don’t have to struggle with this. In this guide, you’ll learn simple, proven steps to apply vinyl wrap without bubbles—so your project turns out flawless every time.
Ready to master the trick that makes your wrap look like it was done by a pro? Let’s dive in.
Choosing The Right Vinyl
Choosing the right vinyl is key to a smooth wrap without bubbles. The type and quality of vinyl affect how easy it is to apply and how well it sticks. Matching the vinyl to the surface also helps avoid air pockets and wrinkles. Understanding these points ensures a clean, lasting finish.
Types Of Vinyl Wraps
There are several types of vinyl wraps. Cast vinyl is thin and flexible. It molds easily around curves and edges. Calendered vinyl is thicker and less flexible. It works well on flat surfaces. Air-release vinyl has tiny channels to let air escape. This feature helps prevent bubbles during application. Choose vinyl type based on your project shape and detail.
Quality Matters
High-quality vinyl sticks better and lasts longer. Cheap vinyl can peel or fade quickly. Quality vinyl also has better air-release technology. This helps push out bubbles easily. It feels smoother and is easier to handle. Investing in good vinyl saves time and effort in the long run.
Surface Compatibility
Not all vinyl works on every surface. Smooth, clean surfaces give the best results. Some vinyls are made for automotive paint, metal, or plastic. Check if the vinyl suits the surface type. This prevents poor adhesion and bubbling. Proper surface prep is also crucial for a bubble-free wrap.
Preparing The Surface
Preparing the surface is the first and most important step for a smooth vinyl wrap. A clean, smooth base helps the vinyl stick well. It also prevents bubbles and wrinkles. Taking time to prepare the surface carefully saves effort later.
Focus on removing dirt, old wrap, and dust. Make sure the area is dry and free of any particles. This creates the best conditions for applying vinyl wrap.
Cleaning Techniques
Start by washing the surface with soap and water. Use a soft cloth or sponge to avoid scratches. Clean every corner, especially edges and crevices. Avoid oily or waxy cleaners. These can stop the vinyl from sticking properly.
After washing, use isopropyl alcohol on a clean cloth. Wipe the surface to remove any leftover grease. This step ensures the surface is fully clean and ready.
Removing Old Wraps And Residue
Old vinyl must be removed completely before applying new wrap. Peel off old wrap slowly to avoid damage. Use a heat gun to soften stubborn areas. This makes removal easier.
After peeling, clean any sticky residue with adhesive remover. Do not skip this step. Leftover glue can cause bubbles and poor adhesion.
Drying And Dust-free Environment
Dry the surface fully with a clean, dry cloth. Moisture can trap air under the vinyl, causing bubbles. Choose a dust-free area for wrapping. Dust particles under the vinyl create bumps and lumps.
Work in a calm place without wind or strong air flow. This helps keep the surface clean. A tidy workspace leads to a smooth, bubble-free wrap.
Tools You’ll Need
Applying vinyl wrap smoothly means using the right tools. These tools help you avoid bubbles and wrinkles. They make the process easier and faster. Getting the correct equipment prepares you well for wrapping.
Squeegees And Applicators
Squeegees help push air out from under the vinyl. Use soft, felt-edged squeegees to avoid scratches. Hard plastic squeegees work for tougher surfaces. Applicators come in different sizes for small or large areas. They help smooth the vinyl evenly and firmly.
Heat Guns And Hair Dryers
Heat guns soften the vinyl for better stretching. Hair dryers work well for small jobs or delicate spots. Warm vinyl sticks better to curves and corners. Use heat carefully to prevent damage. Heat helps remove bubbles by making the vinyl flexible.
Cutting Tools And Tape
Sharp cutting tools trim excess vinyl precisely. Use a fresh blade to avoid rough edges. Masking tape holds the vinyl in place while you adjust it. Tape helps mark cutting lines and secure corners. Proper cutting tools ensure a clean, professional finish.
Credit: metrorestyling.com
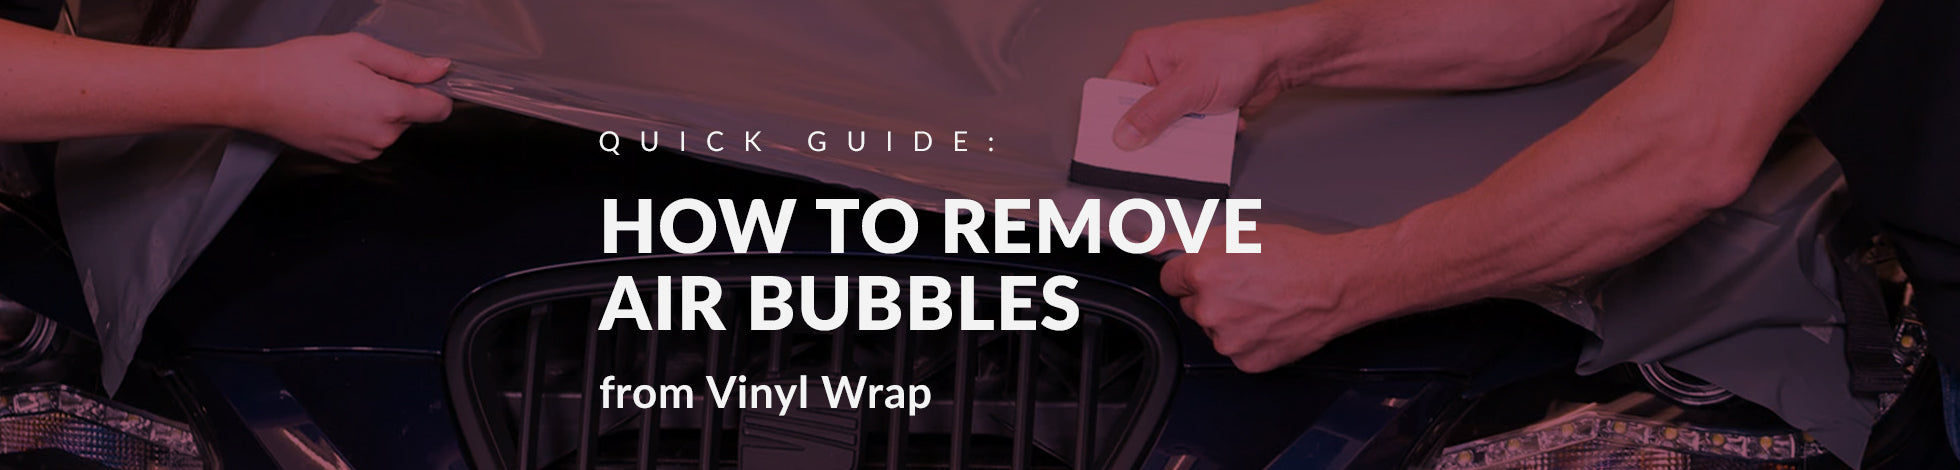
Applying The Vinyl Wrap
Applying vinyl wrap correctly is key to a smooth, bubble-free finish. This process needs patience and careful handling. Follow these steps closely to get the best results.
Positioning And Aligning
Start by placing the vinyl wrap gently on the surface. Check the alignment carefully. Make sure the edges line up with the area you want to cover. Small adjustments at this stage save time later.
Hold the wrap loosely to avoid stretching it. Use light pressure to keep it in place. Confirm the position before moving on.
Peeling Backing Slowly
Peel the backing paper away slowly from one corner. Do this step by step, not all at once. This helps prevent the wrap from sticking in the wrong spots.
Keep the vinyl flat as you peel the backing. Avoid pulling or stretching the material. Work with small sections to control the application better.
Using The Squeegee For Smooth Application
Use a squeegee to press the vinyl down firmly. Start from the center and move toward the edges. This pushes out air bubbles and wrinkles.
Apply steady, even pressure. Work slowly and carefully. Check your progress often to catch any bubbles early.
Avoiding Bubbles
Applying vinyl wrap smoothly means avoiding bubbles. Bubbles spoil the look and make the wrap less sticky. Careful steps help keep the surface flat and clean. Focus on simple, steady techniques to keep bubbles out. This section explains key ways to avoid bubbles for a neat finish.
Applying Even Pressure
Use a soft squeegee or cloth to press the vinyl. Press evenly across the surface to push out air. Start with light pressure and increase slowly. Avoid pressing too hard in one spot. This spreads the vinyl smoothly and stops bubbles.
Working From Center Outwards
Place the vinyl in the center of the area first. Push the wrap outward toward the edges. This method helps air escape under the vinyl. It prevents trapping air in the middle. Work slowly and check for bubbles as you go.
Using Heat To Remove Air Pockets
Heat softens the vinyl and makes it easier to stretch. Use a heat gun or hair dryer on low heat. Warm the vinyl gently over bubbles to release air. Smooth the surface with a squeegee while warm. Heat helps vinyl stick better and look smooth.

Credit: teckwrap.com
Fixing Existing Bubbles
Fixing existing bubbles in vinyl wrap is essential for a smooth finish. Bubbles spoil the look and can cause peeling later. Fixing them quickly keeps your wrap neat and lasts longer.
Puncturing And Releasing Air
Use a sharp pin or needle to gently puncture the bubble. Just a tiny hole lets trapped air escape. Press the bubble from the edges toward the hole. This pushes out the air and flattens the vinyl. Work slowly to avoid making the hole bigger.
Reapplying Heat And Pressure
After releasing air, warm the area with a heat gun or hair dryer. Warm vinyl becomes soft and easier to smooth. Use a soft cloth or squeegee to press down the bubble. Apply firm, even pressure from the center outward. Heat and pressure help the vinyl stick to the surface.
Preventing Future Bubbles
Clean the surface before applying the vinyl. Dirt or dust causes bubbles under the wrap. Apply the vinyl slowly and use a squeegee while wrapping. Work from the center toward the edges. Use heat during application to keep the vinyl flexible. Check for bubbles often and smooth them out immediately.
Post-application Care
Post-application care is important to keep your vinyl wrap smooth and bubble-free. Proper care helps the wrap last longer and look better. Follow simple steps after applying the wrap to protect your investment.
Curing Time
Let the vinyl wrap cure for at least 24 to 48 hours. Avoid washing or exposing it to heavy rain during this time. This allows the adhesive to bond fully to the surface. Curing time is key to prevent bubbles and peeling.
Cleaning Wrapped Surfaces
Use a soft cloth and mild soap to clean the wrap. Avoid harsh chemicals or abrasive tools. Clean gently to protect the vinyl and keep it smooth. Frequent cleaning stops dirt buildup, which can cause damage over time.
Long-term Maintenance Tips
Park your vehicle in the shade to reduce sun damage. Avoid automatic car washes with brushes that may scratch the wrap. Inspect the wrap regularly for edges that lift or bubbles. Fix small issues early to prevent bigger problems.
Credit: jeewaplastic.com
Frequently Asked Questions
How Do You Prevent Bubbles When Applying Vinyl Wrap?
To prevent bubbles, clean the surface thoroughly before application. Use a squeegee to smooth out air pockets. Apply the vinyl slowly and evenly, working from the center outwards. Using a heat gun helps to soften the vinyl and remove bubbles effectively.
What Tools Are Essential For Bubble-free Vinyl Wrapping?
Essential tools include a squeegee, heat gun, utility knife, and cleaning solution. A microfiber cloth helps clean surfaces. These tools ensure smooth application and help remove air bubbles for a professional finish. Proper tools make the wrapping process easier and more precise.
Can Temperature Affect Vinyl Wrap Application Success?
Yes, temperature greatly affects vinyl wrap application. Ideal temperatures range between 60°F and 80°F. Cold conditions make vinyl stiff and prone to bubbles. Heat softens the material, allowing better adhesion and bubble removal. Always apply vinyl wrap in a controlled temperature environment.
How Do You Fix Bubbles After Vinyl Wrap Application?
To fix bubbles, gently lift the vinyl near the bubble. Use a pin to puncture the bubble and release trapped air. Then, smooth the area with a squeegee or heat gun. This method prevents damage and restores a smooth, bubble-free finish.
Conclusion
Applying vinyl wrap without bubbles takes patience and careful steps. Clean the surface well before starting. Use a squeegee to press the vinyl firmly. Work slowly and check for air pockets often. Small bubbles can be pushed out gently. Avoid rushing to get smooth results.
Practice helps you get better each time. Follow these tips to enjoy a neat, bubble-free wrap. Your project will look professional and last longer. Keep trying and learn from each wrap you do.


