
Are you stuck with a 3M vinyl wrap that’s peeling, outdated, or just not your style anymore? Removing it might seem tricky or even damaging to your surface, but it doesn’t have to be that way.
What if you could take it off smoothly without stress or hassle? In this guide, you’ll discover simple, step-by-step tips to remove your 3M vinyl wrap cleanly and safely. Keep reading, and you’ll soon have your surface looking fresh and ready for whatever comes next.
Credit: www.reddit.com
Tools Needed
Removing 3M vinyl wrap requires specific tools. Having the right tools makes the process easier and safer. Prepare all your supplies before starting. It saves time and reduces frustration.
Essential Supplies
- Heat gun or hair dryer – softens the adhesive.
- Plastic scraper or squeegee – lifts the vinyl without scratching.
- Gloves – protect your hands from heat and sharp edges.
- Microfiber cloth – cleans residue and protects surfaces.
- Adhesive remover – removes leftover glue after peeling.
- Masking tape – holds edges for easier peeling.
Optional Accessories
- Isopropyl alcohol – helps clean sticky spots.
- Spray bottle with water – aids gentle removal.
- Plastic razor blade – for stubborn glue patches.
- Protective eyewear – guards eyes from debris and heat.
- Work apron – keeps clothes safe from stains and glue.

Credit: www.youtube.com
Preparing The Surface
Preparing the surface is a key step before removing 3M vinyl wrap. It makes the process easier and protects your vehicle’s paint. Taking time to prepare reduces damage and speeds up removal. This section explains how to clean the area and protect the surroundings.
Cleaning The Area
Start by washing the wrapped surface with soap and water. Remove dirt, dust, and grease gently using a soft cloth. Dry the area completely with a clean towel. Clean surfaces help the vinyl loosen faster during removal. Avoid using harsh chemicals that might damage the paint.
Protecting Surroundings
Cover nearby parts that you do not want to damage. Use painter’s tape or plastic sheets to shield windows and trim. Protecting surroundings prevents scratches and accidental glue residue. Keep tools and cleaning liquids away from these protected areas.
Heating The Vinyl
Heating the vinyl wrap softens the adhesive, making removal easier. Warm vinyl peels off smoothly without tearing. Heating reduces the risk of damage to the surface beneath.
Applying heat slowly and evenly is key. Too much heat can harm the paint or vinyl. Use gentle warmth to loosen the wrap.
Using A Heat Gun
A heat gun is a popular tool for heating vinyl wrap. It blows hot air that warms the wrap quickly. Hold the heat gun about 6 to 8 inches away.
Move the heat gun constantly in small circles. Avoid staying in one spot for too long. This prevents overheating and damage.
Heat the vinyl until it feels soft and flexible. Test by gently lifting a corner. If it peels easily, you are ready to remove it.
Alternative Heating Methods
A hair dryer is a safe alternative to a heat gun. It offers lower heat but still softens the adhesive. Hold the dryer close and move it steadily.
Sunlight also helps heat the vinyl on warm days. Park the vehicle in direct sun for a few hours. Check the vinyl’s temperature before peeling.
Warm towels can add extra heat after using other methods. Place a warm, damp cloth over the vinyl for a minute. This can soften the wrap further.
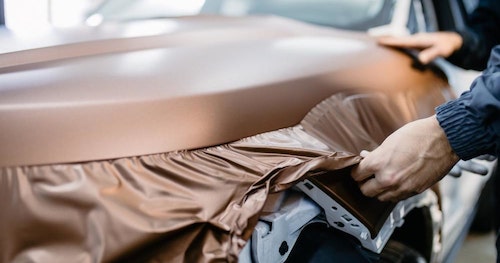
Credit: www.housecallpro.com
Peeling The Wrap
Peeling the 3M vinyl wrap off your vehicle requires patience and care. Doing it the right way helps avoid damage to the paint underneath. This section guides you through the peeling process step by step. Follow these tips to remove the wrap cleanly and safely.
Starting At The Edges
Begin peeling at a corner or edge of the wrap. Gently lift the wrap using your fingers or a plastic tool. Avoid sharp objects that can scratch the paint. Slowly pull up enough film to get a good grip. Take your time. The edges are the easiest place to begin.
Pulling Techniques
Pull the wrap back at a low angle, close to the surface. This helps reduce stress on the paint and adhesive. Use steady, even pressure as you peel. Avoid yanking or pulling too fast. If the wrap resists, warm it slightly with a heat gun. Warmth softens the adhesive, making removal smoother.
Removing Adhesive Residue
Removing adhesive residue after taking off a 3M vinyl wrap can be tricky. Sticky glue may stay on your surface. It can look messy and attract dirt. Cleaning this residue is important for a smooth, clean finish. Using the right solvents and methods helps avoid damage. The goal is to remove glue without harming paint or material underneath.
Recommended Solvents
Choose solvents designed to break down adhesive safely. Goo Gone and rubbing alcohol are common options. Citrus-based cleaners work well on many surfaces. Use a small amount at first. Test the solvent on a hidden spot. Check for any damage before full use. Avoid harsh chemicals like acetone. They can strip paint or leave marks. Warm soapy water can also help loosen residue gently.
Safe Application Tips
Apply solvents with a soft cloth or sponge. Do not pour solvents directly on the surface. Gently rub the sticky area in a circular motion. Let the solvent sit for a few minutes. This softens the glue for easier removal. Wipe away residue with a clean cloth. Avoid using sharp tools that scratch paint. Work in a well-ventilated space. Wear gloves to protect your skin from chemicals.
Post-removal Cleanup
After removing the 3M vinyl wrap, cleaning the surface is essential. This step restores the original look of your vehicle or object. Proper post-removal cleanup prevents damage and prepares the area for any new applications. It also removes leftover adhesive and dirt, making the surface smooth and clean.
Surface Washing
Start by washing the surface with warm, soapy water. Use a soft cloth or sponge to avoid scratches. Gently scrub any sticky residue left from the wrap. Rinse the area with clean water to remove soap and loosened dirt. Dry the surface with a microfiber towel for a clear view of the next steps.
Final Inspection
Check the surface carefully for any leftover adhesive or damage. Look for scratches, dirt spots, or uneven areas. Use a magnifying glass if needed for a close look. If you find residue, apply adhesive remover sparingly and wipe again. Ensure the surface is spotless and smooth before finishing the cleanup.
Common Mistakes To Avoid
Removing 3M vinyl wrap can be tricky. Many people make mistakes that damage the surface or the vinyl. Knowing what to avoid helps you get better results. This section highlights common errors to steer clear of during removal.
Peeling Too Fast
Pulling the vinyl off quickly can cause tears and leave residue. Slow, steady peeling protects the wrap and surface. It also reduces stretching or ripping of the vinyl. Take your time to avoid extra work cleaning leftover glue.
Overheating The Vinyl
Using too much heat can warp or melt the vinyl. Heat helps soften the adhesive but excess heat damages the wrap. Keep the heat source moving and use moderate warmth. This keeps the vinyl flexible without causing harm.
Frequently Asked Questions
How Do I Safely Remove 3m Vinyl Wrap?
To safely remove 3M vinyl wrap, heat the surface with a heat gun or hair dryer. Gently peel the wrap from one corner, pulling slowly. Avoid using sharp tools to prevent damage to the paint underneath. Clean residue with adhesive remover afterward.
What Tools Are Needed To Remove 3m Vinyl Wrap?
Essential tools include a heat gun or hair dryer, plastic scraper, adhesive remover, and microfiber cloth. These tools help soften the adhesive, lift the wrap safely, and clean any leftover glue for a smooth finish.
Can I Remove 3m Vinyl Wrap Without Damaging Paint?
Yes, by heating the wrap and peeling slowly, you minimize paint damage. Avoid using metal tools or harsh chemicals. If done carefully, 3M vinyl wrap removal will not harm your vehicle’s paint.
How Long Does It Take To Remove 3m Vinyl Wrap?
Removing 3M vinyl wrap usually takes 1 to 3 hours, depending on the wrap size and complexity. Smaller areas are quicker, while full vehicle wraps require more time and patience for safe removal.
Conclusion
Removing 3M vinyl wrap takes patience and care. Heat the wrap gently to soften the adhesive. Peel the wrap slowly to avoid damage. Use adhesive remover for leftover sticky spots. Clean the surface well after removal. This process keeps your vehicle safe and looking good.
Take your time and follow these steps. You will get smooth, clean results every time.


