
If you own a diesel motorhome, keeping your engine running smoothly is essential. One simple but crucial task you can do yourself is changing the fuel filter.
Ignoring this small part can lead to costly repairs and poor performance. In this guide, you’ll learn exactly how to change the fuel filter step-by-step, saving you time and money. By the end, you’ll feel confident maintaining your motorhome’s fuel system and avoiding unexpected breakdowns.
Let’s get started!

Credit: blog.campingworld.com
Signs Of A Dirty Fuel Filter
A dirty fuel filter can cause many problems in your diesel motorhome. It stops fuel from flowing smoothly to the engine. This can affect how your motorhome runs. Recognizing the signs early helps you fix the issue fast.
Ignoring a clogged fuel filter may lead to engine trouble. You might notice your motorhome acting strange or losing power. Knowing these signs saves you time and money on repairs.
Reduced Engine Power
The engine may feel weak or slow. It will struggle to reach higher speeds. You might notice poor acceleration or difficulty climbing hills. A dirty fuel filter limits fuel flow, causing this power loss.
Hard Starting
Your motorhome might take longer to start. The engine may crank but not catch quickly. This happens because the fuel supply is weak. Dirty filters block fuel, making starting tough.
Engine Stalling
The engine can stop running without warning. This may happen while idling or driving. A clogged filter disrupts fuel flow, causing the engine to stall. It can be dangerous on the road.
Unusual Engine Sounds
You may hear sputtering or coughing noises from the engine. These sounds indicate fuel delivery problems. A dirty fuel filter causes the engine to misfire or run rough.
Increased Fuel Consumption
The motorhome may use more fuel than usual. Poor fuel flow makes the engine work harder. This reduces fuel efficiency and raises your fuel costs.
Tools And Materials Needed
Changing the fuel filter on a diesel motorhome needs the right tools and materials. Having everything ready helps the job go smoothly. It saves time and avoids frustration during the process.
This section lists the basic tools and materials needed. Each item plays a key role in completing the task safely and correctly.
Fuel Filter Replacement Kit
Start with a fuel filter replacement kit made for diesel engines. This kit usually includes the correct filter and seals. Using the right filter protects your engine from dirt and debris.
Wrenches And Sockets
You need wrenches and sockets to remove old fuel filter parts. A wrench set with different sizes works best. These tools help loosen bolts without damaging them.
Drain Pan
A drain pan catches fuel that spills during the filter change. It keeps your workspace clean and prevents fuel waste. Choose a pan large enough for the fuel volume.
Rags Or Paper Towels
Keep rags or paper towels nearby to wipe spills. They help maintain a tidy work area. Clean hands and tools improve safety and comfort.
Gloves And Safety Glasses
Wear gloves and safety glasses for protection. Fuel can irritate skin and eyes. Safety gear lowers the risk of injury during the job.
Hand Pump Or Siphon
A hand pump or siphon helps remove fuel from the filter housing. This tool makes the process cleaner and easier. It also prevents fuel from spilling on the ground.
Locating The Fuel Filter
Finding the fuel filter on a diesel motorhome is the first step to changing it. Knowing its exact location helps you work faster and safer. The fuel filter is usually easy to spot, but it can vary by model and engine type.
Most diesel motorhomes have the fuel filter near the engine or along the fuel line. It looks like a small canister or a clear bowl. Sometimes, it sits inside a metal bracket or housing.
Check Under The Hood
Open the hood and look around the engine area. The fuel filter often sits close to the engine block. Look for a round or cylindrical part connected to fuel lines. It may have a metal or plastic cover.
Follow The Fuel Line
Trace the fuel line from the fuel tank toward the engine. The fuel filter is usually on this path. It may be near the frame rail or mounted on the chassis. The filter cleans fuel before it reaches the engine.
Consult The Owner’s Manual
The owner’s manual gives exact details about the fuel filter location. It shows diagrams and pictures. This helps you avoid guesswork and find the filter quickly. Manuals often include safety tips too.

Credit: www.youtube.com
Preparing Your Motorhome
Before changing the fuel filter on your diesel motorhome, preparation is key. Proper preparation makes the process safer and smoother. It helps avoid damage and ensures the new filter works well. Follow these steps to get ready.
Ensure Safety Precautions
Park your motorhome on a flat surface. Turn off the engine and remove the key. Let the engine cool down completely. Wear gloves and safety glasses to protect your hands and eyes. Keep a fire extinguisher nearby in case of fuel spills. Avoid open flames or sparks near the work area.
Gather Necessary Tools
Collect all tools before starting. You will need a wrench set, screwdrivers, and a container for old fuel. Have new fuel filters ready. Use clean rags to wipe spills. A flashlight helps if the filter is in a dark spot. Organize tools to avoid interruptions during the job.
Relieve Fuel System Pressure
Relieving fuel pressure prevents fuel spray and spills. Locate the fuel pump fuse in the fuse box. Remove the fuse to stop the pump. Start the engine and let it run until it stalls. This uses up remaining fuel pressure. Turn off the ignition and disconnect the battery to be safe.
Removing The Old Fuel Filter
Removing the old fuel filter is the first step in changing a diesel motorhome’s fuel filter. This process helps avoid dirt and debris entering the fuel system. It also prepares the area for the new filter. Follow these clear steps to remove the old filter safely and correctly.
Disconnect Fuel Lines
Start by turning off the engine and fuel pump. This stops fuel flow. Next, find the fuel lines connected to the filter. Use a wrench or pliers to loosen the clamps. Carefully pull the fuel lines off the filter. Catch any spilled fuel with a rag or container.
Remove Mounting Brackets
Locate the brackets holding the fuel filter in place. Use a screwdriver or socket wrench to remove the bolts or screws. Keep the hardware safe for later use. Once loose, gently lift the brackets away. This frees the filter for removal.
Take Out The Filter
Hold the filter firmly and pull it out of the mounting area. Do this slowly to avoid spilling fuel. Check the filter housing for dirt or debris. Clean it with a cloth if needed. Dispose of the old filter properly following local rules.
Installing The New Fuel Filter
Installing the new fuel filter on your diesel motorhome is a key step. It helps keep the engine clean and running smoothly. Proper installation avoids leaks and engine problems. Follow these steps carefully for a safe and correct setup.
Check For Proper Orientation
Look at the new fuel filter for arrows or labels. They show the direction of fuel flow. The filter must face the correct way. Installing it backward can block fuel and damage the engine. Align the filter with the fuel flow direction clearly marked.
Attach Fuel Lines Securely
Connect the fuel lines tightly to the filter’s inlet and outlet. Use clamps or clips to hold the lines in place. Loose connections cause leaks and air entry. Double-check each connection to avoid fuel spills. Secure lines prevent engine stalling or poor performance.
Mount The Filter Properly
Fix the fuel filter to its bracket or holder firmly. Use the correct screws or bolts supplied. The filter should not move or vibrate during travel. A loose filter can cause damage or disconnections. Ensure it sits straight and stable for long-term use.
Bleeding Air From The Fuel System
Bleeding air from the fuel system is a key step after changing the fuel filter on your diesel motorhome. Air trapped inside the fuel lines can stop the engine from starting or cause it to run roughly. Removing this air helps the fuel flow smoothly and keeps the engine running well.
This process involves pushing out air bubbles and filling the system with clean diesel. Two common ways to bleed air are the manual pump method and using the priming pump. Both methods help restore proper fuel pressure and prevent engine problems.
Manual Pump Method
Locate the manual fuel pump on your motorhome’s engine. It often looks like a small lever or bulb. Press or pump it slowly to push fuel through the lines. Watch for air bubbles escaping from the fuel filter or bleed screw.
Keep pumping until only clear fuel flows out. This means all air is gone. Tighten any screws you loosened for bleeding. Check that the fuel filter is secure and there are no leaks.
Using The Priming Pump
Many diesel engines have a built-in priming pump near the fuel filter. This small hand pump helps move fuel quickly through the system. Press the priming pump several times to force air out.
Look for steady fuel flow without bubbles at the bleed point. Once the fuel runs smooth, close the bleed valve tightly. Test the engine by starting it to ensure it runs without stalling.
Testing And Final Checks
After replacing the fuel filter on your diesel motorhome, it is important to perform testing and final checks. These steps ensure the fuel system works properly and your engine runs smoothly. Skipping this part can cause engine problems or damage.
Start The Engine
Turn the key and start the engine. Listen carefully for any unusual sounds. The engine should run smoothly without hesitation. If it struggles or stalls, there might be air trapped in the fuel lines. Keep the engine running for a few minutes to allow the fuel to circulate fully.
Check For Leaks
Look closely around the new fuel filter and connections. Search for any fuel leaks or wet spots. Leaks can cause fuel loss and fire hazards. Tighten fittings gently if you see drips. Never ignore even small leaks. Safety first.
Monitor Engine Performance
Drive your motorhome slowly and pay attention to how the engine feels. The power should be steady without jerks or stalling. Notice if the engine idles smoothly or has rough spots. Good performance means the fuel filter change was successful. If problems persist, recheck the installation or consult a mechanic.
Maintenance Tips For Fuel Filters
Fuel filters play a key role in keeping a diesel motorhome running smoothly. Dirt and debris can clog the filter, causing engine problems. Regular care helps avoid breakdowns and keeps fuel flow steady. Follow these tips to maintain your fuel filter and protect your engine.
Check Fuel Filter Regularly
Inspect the fuel filter every few months. Look for signs of dirt or damage. A clogged filter reduces engine power and increases fuel use. Replace it if it looks dirty or old.
Use Clean Diesel Fuel
Always fill up with clean diesel fuel. Dirty fuel clogs the filter fast. Avoid filling from unknown or low-quality stations.
Drain Water From The Fuel Filter
Water can collect inside the fuel filter. Drain it often to prevent rust and engine damage. Use the drain valve if your filter has one.
Replace Fuel Filter On Schedule
Follow the motorhome maker’s recommended replacement intervals. Changing filters on time keeps the fuel system clean. Use the right filter model for your engine.
Keep Fuel Tank Clean
Clean the fuel tank when changing the filter. Dirt inside the tank can clog the new filter quickly. Regular tank cleaning improves fuel quality.
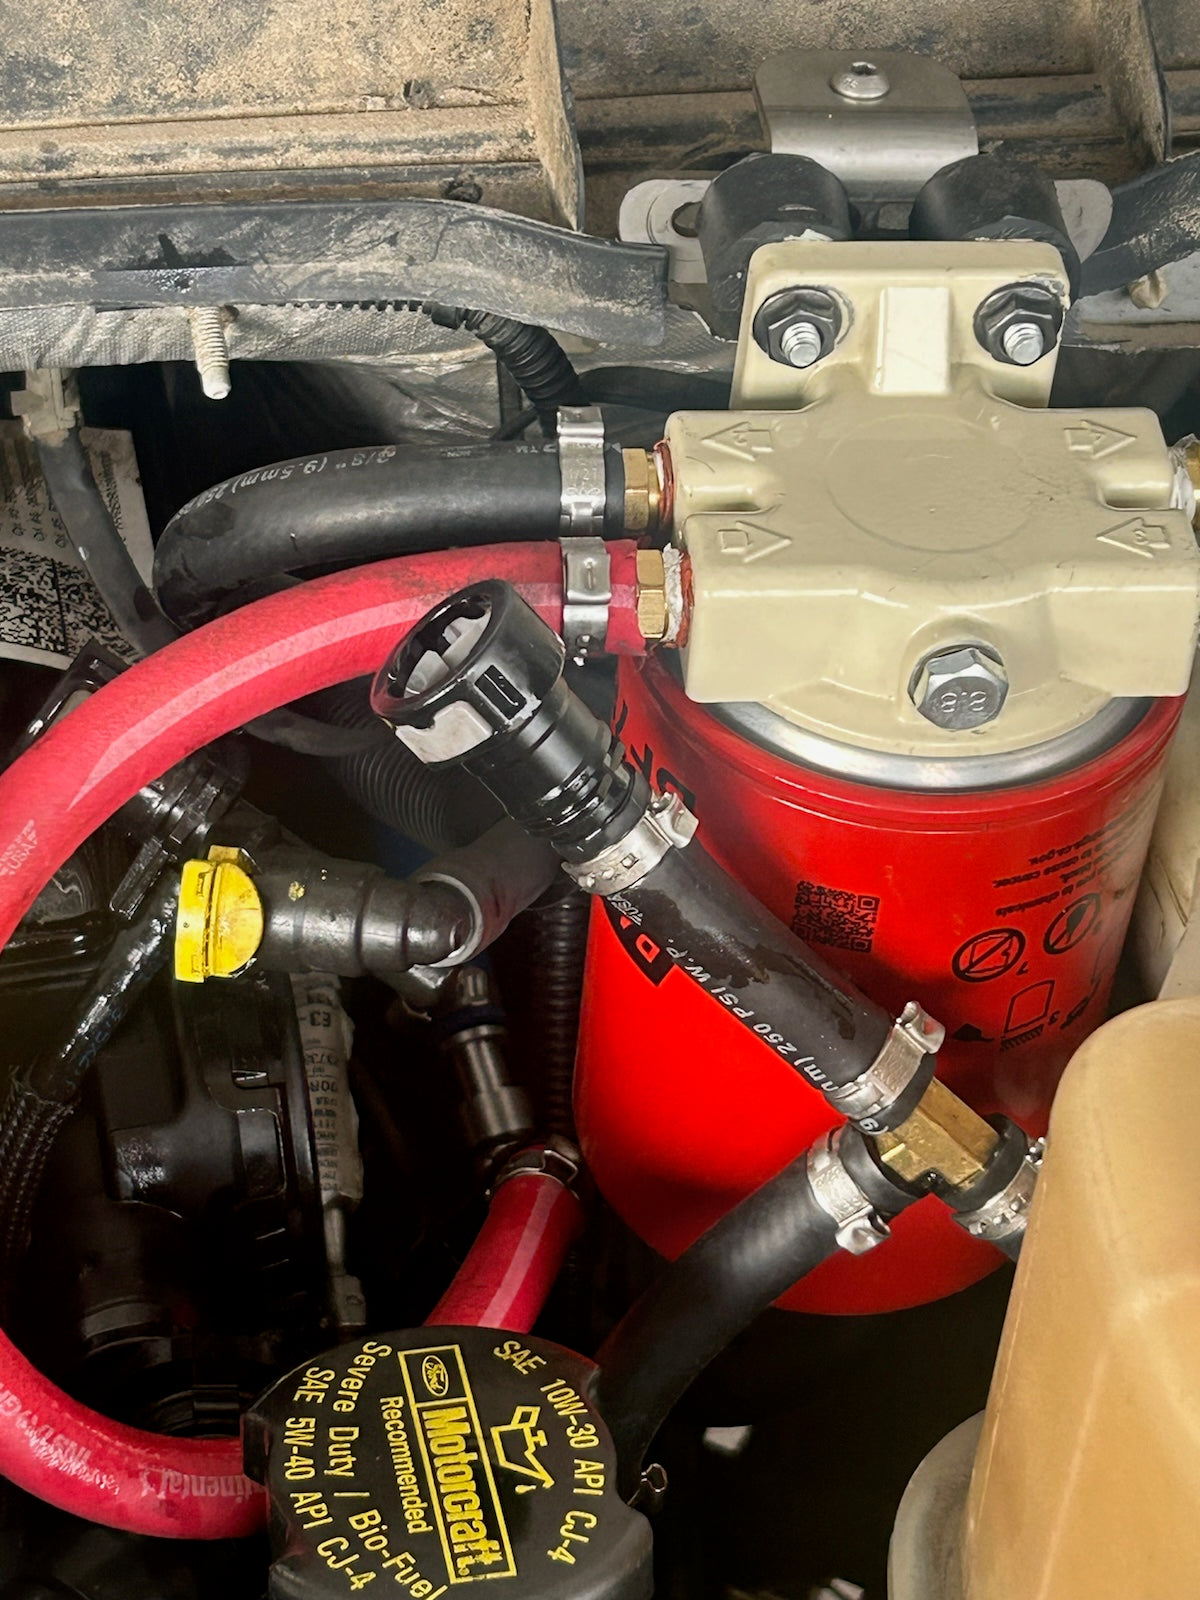
Credit: dfuser.com
Frequently Asked Questions
How Often Should I Change A Diesel Motorhome Fuel Filter?
Change the fuel filter every 10,000 to 15,000 miles or once a year. Regular changes keep fuel clean and engine efficient.
What Tools Are Needed To Change The Fuel Filter?
You need a wrench, screwdrivers, a drain pan, and a replacement fuel filter. Safety gloves and eye protection are also recommended.
Can I Change The Fuel Filter Myself Safely?
Yes, with proper tools and safety precautions, you can change it yourself. Follow your motorhome’s manual and work in a well-ventilated area.
What Are Signs Of A Clogged Diesel Fuel Filter?
Symptoms include engine hesitation, loss of power, rough idling, and hard starting. These indicate the filter needs immediate replacement.
Conclusion
Changing the fuel filter on your diesel motorhome keeps the engine running smooth. Clean fuel means better performance and fewer problems. Follow the steps carefully and take your time. Regular maintenance saves money and avoids breakdowns. Check the filter often to stay safe on the road.
You can handle this task with simple tools and patience. Keep your motorhome ready for every trip by caring for its fuel system. Simple actions make a big difference in vehicle health.


