
Are you feeling vibrations or hearing strange noises when you brake? Your brake rotors might be the cause.
Knowing how to check runout on brake rotors can save you from costly repairs and keep your car running smoothly. You’ll discover simple, step-by-step methods to measure rotor runout accurately. By the end, you’ll have the confidence to spot problems early and ensure your brakes work safely every time.
Keep reading to protect your ride and your peace of mind.
Credit: www.tomorrowstechnician.com
Tools Needed
Checking the runout on brake rotors requires a few basic tools. These tools help measure the rotor’s surface for any warping or unevenness. Having the right tools makes the process easier and more accurate.
Dial Indicator
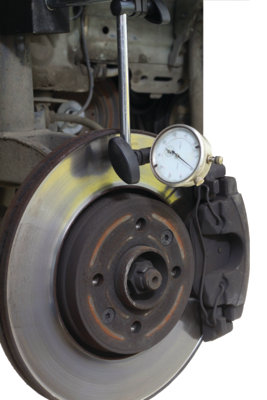
A dial indicator measures small movements on the rotor surface. It shows how much the rotor wobbles when it spins. This tool helps find the exact amount of runout in thousandths of an inch.
Magnetic Base
The magnetic base holds the dial indicator steady. It attaches to the car or a metal surface near the rotor. This keeps the dial indicator in place during measurement.
Jack And Jack Stands
A jack lifts the car off the ground safely. Jack stands hold the car up while you work on the brakes. These tools keep you safe and give clear access to the rotors.
Lug Wrench
The lug wrench removes the wheel nuts. Taking off the wheel lets you reach the brake rotor easily. It is a necessary tool for this job.
Preparing The Vehicle
Preparing the vehicle is the first step to check runout on brake rotors. Proper preparation ensures safety and accuracy during the process. Follow these simple steps before measuring runout.
Parking And Safety Measures
Park the vehicle on a flat surface to keep it stable. Engage the parking brake firmly to avoid movement. Place wheel chocks behind the wheels still on the ground. Wear safety gloves and eye protection before starting any work. Always work in a well-lit area to see clearly.
Removing The Wheel
Loosen the lug nuts slightly while the vehicle is still on the ground. Use a jack to lift the vehicle safely. Support the vehicle with jack stands for extra security. Remove the lug nuts completely and take off the wheel carefully. Set the wheel aside to access the brake rotor.
Cleaning The Rotor Surface
Wipe the rotor surface with a clean cloth to remove dust. Use brake cleaner spray to remove grease or oil. Avoid touching the rotor surface with bare hands after cleaning. A clean rotor surface ensures accurate runout measurements. Let the rotor dry completely before proceeding.
Setting Up The Dial Indicator
Setting up the dial indicator is the first step to check brake rotor runout. This tool helps measure how much the rotor surface moves as it spins. Proper setup ensures accurate readings and helps find problems early.
Attaching The Magnetic Base
Place the magnetic base on a solid, flat part of the vehicle or rotor hub. Make sure it sticks firmly. A stable base prevents movement during measurement. Avoid spots that might shake or shift.
Positioning The Indicator Tip
Move the dial indicator arm so the tip touches the rotor surface. Position it near the edge but not on the lip. The tip must be perpendicular to the rotor for correct contact. Lightly press the tip against the rotor.
Calibrating The Dial Indicator
Turn the dial face to set the needle at zero. This baseline shows no runout at the starting point. Slowly rotate the rotor by hand. Watch the needle move to measure how much the rotor surface moves side to side.

Credit: www.tomorrowstechnician.com
Measuring Rotor Runout
Measuring rotor runout is a key step in checking brake rotors. It helps find any uneven wear or warping. This process uses a dial indicator to measure how much the rotor surface moves side to side. Correct measurements show whether the rotor needs machining or replacement.
Rotating The Rotor Slowly
Start by placing the dial indicator tip against the rotor surface. Rotate the rotor slowly by hand. Move it through one full turn. Watch the dial indicator needle carefully. The needle will move if there is any runout.
Reading The Indicator
Look at the dial indicator needle’s highest and lowest points. Note the difference between these two points. This difference shows the amount of rotor runout. Usually, a runout over 0.003 to 0.005 inches is not good.
Recording The Measurements
Write down the runout measurement clearly. Check several spots around the rotor for accuracy. Compare your notes to the rotor’s allowed runout limit. This helps decide the rotor’s condition and next steps.
Interpreting Results
After measuring brake rotor runout, understanding the results is key. It helps decide if the rotor is safe or needs work. Runout measures how much the rotor surface wobbles. A small wobble is okay, but too much can cause brake problems. Let’s break down what the numbers mean and what to do next.
Acceptable Runout Limits
Most car makers say rotor runout should be below 0.003 inches. Some allow up to 0.005 inches on bigger rotors. If your measurement is within this range, the rotor is good. Slight runout won’t cause major brake issues. Check your vehicle’s manual for exact limits. Always use those numbers for best results.
Causes Of Excessive Runout
Runout above limits may come from several issues. Warped rotors from heat stress is common. Dirt or rust between the rotor and hub can raise runout. Loose or damaged wheel bearings also affect rotor alignment. Even poor installation can cause problems. Pinpointing the cause helps fix the brake safely.
When To Resurface Or Replace Rotors
Rotors with runout just above limits can often be resurfaced. This means removing a thin layer of metal to smooth the surface. But rotors with deep warping or cracks must be replaced. Resurfacing too many times weakens the rotor. Always check the rotor thickness before resurfacing. Follow safety rules to keep braking strong.
Tips For Accurate Measurement
Accurate measurement of brake rotor runout is key to safe driving. Small errors can lead to wrong conclusions. Follow these tips to get clear, reliable results.
Focus on careful steps. Use the right tools. Check twice to be sure.
Ensuring Proper Contact
Place the dial indicator’s tip firmly against the rotor surface. Avoid gaps or loose contact. The tool must touch the rotor at a right angle. This prevents false readings. Make sure the rotor is clean and dry before measuring. Dirt or grease can affect contact and accuracy.
Avoiding Common Mistakes
Do not touch the rotor while measuring. Hand pressure can move the rotor. Avoid measuring on worn or damaged areas of the rotor. Remove any rust or debris. Use a stable, flat surface to work on. Do not rush the process. Take your time for the best results.
Repeating Measurements For Consistency
Measure the runout multiple times at the same spot. Check different points around the rotor edge. Compare results to spot errors. Repeat measurements help confirm true rotor condition. If results vary, clean and reposition the tool before trying again.

Credit: www.youtube.com
Frequently Asked Questions
What Tools Do I Need To Check Brake Rotor Runout?
To check brake rotor runout, you need a dial indicator, a magnetic base, and a wrench. These tools help measure the rotor’s lateral movement accurately. A dial indicator provides precise readings, while the magnetic base holds the tool firmly in place during measurement.
How Do I Measure Runout On Brake Rotors?
Mount the dial indicator on the hub with the magnetic base. Rotate the rotor slowly and observe the dial. The runout is the maximum needle movement. Compare this value to the manufacturer’s specification to determine if the rotor is within acceptable limits.
What Causes Brake Rotor Runout Issues?
Brake rotor runout can be caused by uneven rotor thickness, warped rotors from overheating, or improper installation. Dirt or corrosion between the rotor and hub can also lead to runout. Regular maintenance and proper installation help prevent these problems.
What Is The Acceptable Runout Limit For Rotors?
Most manufacturers recommend a maximum runout of 0. 002 to 0. 005 inches. Values above this range can cause brake vibration and uneven pad wear. Always check your vehicle’s service manual for the specific acceptable runout limit.
Conclusion
Checking runout on brake rotors keeps your vehicle safe and smooth. Use a dial indicator to measure carefully and precisely. Small runout can cause vibrations and uneven brake wear. Fix any issues early to avoid costly repairs later. Regular checks help maintain brake performance and extend rotor life.
Take your time and follow steps closely for best results. Your brakes will thank you with better stopping power and less noise. Simple tools and patience make this task easy and effective. Stay safe on the road by keeping rotors in good condition.


