
Have you ever thought about adding a personal touch to your car’s interior? Imagine turning a plain steering wheel cover into a unique, colorful masterpiece—crafted by your own hands.
Cross stitching a steering wheel cover is not only a fun and creative way to do this, but it also makes your driving experience more enjoyable. In this guide, you’ll learn simple steps to create a beautiful, custom cover that fits perfectly and shows off your style.
Ready to transform your steering wheel and impress everyone who sees it? Keep reading to discover how easy and rewarding this craft can be for you.
Materials Needed
Gathering the right materials is the first step to cross stitch a steering wheel cover. Choosing good supplies ensures your project looks great and lasts long. Prepare everything before starting to avoid interruptions.
Choosing The Right Thread
Select thread that is strong and colorfast. Cotton embroidery floss works well for steering wheel covers. Pick colors that match your car interior or your personal style. Avoid cheap threads that may break or fade quickly.
Picking The Fabric
Use fabric that fits snugly around the steering wheel. Aida cloth is popular for cross stitch because of its easy-to-count holes. Choose fabric with a high thread count for durability. Make sure the fabric is flexible but sturdy.
Additional Tools
Besides thread and fabric, gather a sharp embroidery needle and scissors. A hoop helps keep the fabric tight while stitching. A measuring tape can ensure your cover fits perfectly. Keep a needle threader handy to save time.

Credit: www.amazon.com
Preparing The Steering Wheel Cover
Preparing the steering wheel cover is the first step in your cross stitch project. Proper preparation ensures a neat and lasting finish. It helps your design fit perfectly on the wheel. Follow these simple steps to get started.
Measuring Your Steering Wheel
Measure the steering wheel’s diameter using a tape measure. Wrap the tape around the wheel to find the circumference. Note the measurement carefully. This size helps you cut the fabric to fit well. Double-check the numbers before moving on.
Cutting The Fabric
Choose a fabric suitable for cross stitch, like Aida cloth. Cut the fabric slightly larger than your wheel measurement. Leave extra space for stitching and finishing. Use sharp scissors for clean edges. A well-cut fabric makes stitching easier and cleaner.
Setting Up The Base
Place the fabric on a flat surface. Use an embroidery hoop to keep it tight and smooth. Mark the center of the fabric to guide your design. This base helps keep your stitches even. A steady base improves the overall look of your cover.
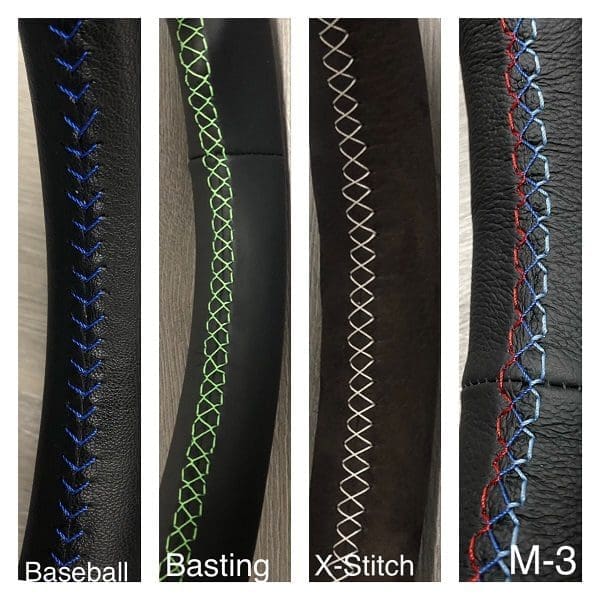
Selecting A Cross Stitch Pattern
Selecting the right cross stitch pattern is important for your steering wheel cover project. The pattern sets the tone and style of your finished cover. A good pattern fits the size of your steering wheel and matches your skill level. Choosing a pattern that excites you makes stitching more fun and motivates you to finish the project.
Patterns come in many styles and difficulties. Some are simple with basic shapes and colors. Others have detailed images or complex designs. Think about the time you want to spend and the look you want to create before picking a pattern. This helps you avoid frustration and ensures a smooth stitching process.
Simple Designs For Beginners
Simple patterns work best for beginners. They use fewer colors and easy stitches. Basic shapes like stars, hearts, or geometric patterns are great choices. These designs are quick to complete and help you practice your skills.
Start with small patterns that fit part of the steering wheel cover. This way, you can complete sections without feeling overwhelmed. Simple designs also allow mistakes without ruining the overall look. This builds confidence and keeps your project enjoyable.
Customizing Your Pattern
Customizing a pattern makes your steering wheel cover unique. You can change colors to match your car interior or personal style. Swapping thread colors is easy and adds a personal touch.
You might add initials, small symbols, or simple borders to a basic design. This customization helps your cover stand out and feel special. Adjust the size of the pattern to fit your steering wheel perfectly. Custom patterns let you express creativity and make the project truly yours.
Starting Your Cross Stitch
Starting your cross stitch project on a steering wheel cover is an exciting step. It sets the tone for your entire work. Proper preparation helps make stitching smooth and enjoyable. Focus on the basics first. This section guides you through the initial steps to start your cross stitch confidently.
Threading The Needle
Cut a length of embroidery thread about 18 inches long. Separate the strands; use two or three for stitching. Thread the needle carefully to avoid fraying. Pull the thread through the needle’s eye until both ends are even. Tie a small knot at one end to prevent slipping.
Basic Cross Stitch Technique
Begin by pulling the needle from the back of the fabric. Create a small diagonal stitch from bottom left to top right. Next, make another diagonal stitch crossing the first one, from bottom right to top left. This forms the classic “X” shape of cross stitch. Keep your stitches neat and even for a clean look.
Maintaining Tension
Hold the fabric gently but firmly while stitching. Avoid pulling the thread too tight; it can distort the fabric. Too loose stitches will look messy and may catch on the steering wheel. Aim for consistent tension with each stitch. This helps your design stay smooth and durable.
Stitching Around The Cover
Stitching around the steering wheel cover needs care and focus. This step shapes your design and keeps the cover strong. Follow these tips for neat and smooth stitches that fit well.
Keep your thread tight but not too tight. Loose stitches can look messy and tight ones can warp the fabric. Take your time for the best results.
Following The Pattern
Start by looking at your cross stitch pattern. Count the squares carefully. Each square shows where to put your stitches. Work slowly and check often. This helps you avoid mistakes and keeps your design clear.
Dealing With Curves
Steering wheels are round, so curves are tricky. Use small stitches to follow the shape smoothly. Move your needle gently along the curve. This keeps the cover fitting nicely and looks neat.
Adding Details
Details make your cover special. Use different colors or backstitch to show edges and shapes. Add small designs like dots or lines for texture. These little touches make your cover stand out.
Finishing Touches
Finishing touches bring your cross-stitched steering wheel cover to life. They make sure your work stays neat and fits perfectly. This step adds durability and style to your cover. Follow these simple tips to complete your project with care.
Securing The Threads
Start by tying off all loose threads on the back. Use small knots to keep them tight. Trim excess thread close to knots but not too close. This stops your stitches from coming undone. Keep the back neat to avoid bumps under the cover.
Attaching The Cover To The Wheel
Place the cover evenly over the steering wheel. Stretch it gently to fit snugly around the wheel. Use strong thread to sew the edges together if needed. Stitch carefully along the inside edge for a clean finish. Check the fit and adjust any loose spots.
Care And Maintenance
Clean your cover regularly to keep it fresh. Hand wash with mild soap and cold water. Avoid harsh chemicals or bleach that can damage stitches. Let it air dry flat to keep its shape. Store your cover away from direct sunlight to prevent fading.
Tips For Success
Cross stitching a steering wheel cover can be fun and rewarding. Simple tips help you avoid frustration and finish faster. Focus on these key points to keep your project smooth and enjoyable.
Common Mistakes To Avoid
Do not pull the thread too tight. This can warp the fabric and make your design uneven.
Avoid skipping stitches or counting errors. These mistakes change the pattern and look messy.
Do not use the wrong type of thread. Choose strong, durable thread made for cross stitch projects.
Do not forget to secure the thread ends properly. Loose ends can unravel your work over time.
Time-saving Tricks
Cut several threads at once to save time on threading needles.
Mark the fabric lightly with a washable pen to guide your stitching.
Work in small sections to avoid mistakes and stay organized.
Use a hoop or frame to keep your fabric tight and make stitching easier.

Credit: www.youtube.com
Credit: craftcustoms.com
Frequently Asked Questions
How Do I Choose Fabric For A Steering Wheel Cover?
Select a durable, non-slip fabric like cotton or faux leather. Choose materials that are comfortable and easy to stitch. Avoid slippery fabrics to ensure safety while driving.
What Basic Tools Are Needed For Cross Stitching?
You need embroidery floss, a needle, an embroidery hoop, scissors, and a pattern. These tools help create precise and neat stitches on the cover.
How Long Does It Take To Cross Stitch A Cover?
Time depends on design complexity and stitching speed. Simple patterns may take a few hours, while detailed ones can require several days.
Can I Customize The Design On My Steering Wheel Cover?
Yes, you can personalize with initials, logos, or unique patterns. Custom designs make your cover stylish and reflect your personality.
Conclusion
Cross stitching a steering wheel cover adds style and comfort to your car. It takes patience but feels rewarding. Choose colors and patterns that match your taste. The steps are simple and fun to follow. Your hands will enjoy the soft texture while driving.
Give yourself time and enjoy each stitch. Soon, you will see your handiwork come alive. A handmade cover makes your car feel special. Try it and enjoy the creative process today.


