Are you looking to give your Honda Accord a sleek, polished look while protecting it from dings and scratches? Installing body side molding is a simple and effective way to do just that.
In this guide, you’ll discover easy-to-follow steps that anyone can handle—even if you’re not a car expert. By the end, your Accord will not only look sharper but also stay safer from everyday bumps. Ready to transform your ride? Let’s get started.

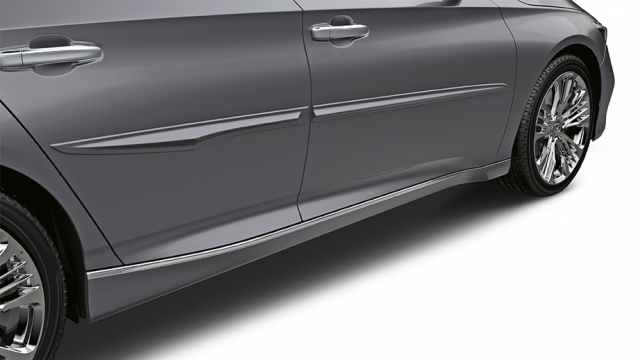
Credit: www.hondafactoryparts.com
Tools And Materials Needed
Before starting the installation of body side molding on your Honda Accord, gather all necessary tools and materials. Having everything ready makes the process smooth and faster. This step helps avoid interruptions and ensures a neat finish.
Choosing the right molding is also important. It must fit well and match your car’s style. Using the correct tools and materials will protect your car’s paint and keep the molding secure.
List Of Required Tools
- Body side molding kit designed for Honda Accord
- Measuring tape for precise alignment
- Masking tape to mark placement
- Cleaning cloth and rubbing alcohol to clean surface
- Plastic pry tool to remove old molding if needed
- Heat gun or hair dryer to soften adhesive
- Adhesive promoter for better bonding
- Rubber roller to press molding firmly
- Gloves to protect hands
Choosing The Right Molding
Select molding specifically made for your Honda Accord model year. Check the color and finish to match your car’s paint. OEM (Original Equipment Manufacturer) moldings fit best and last longer.
Consider flexible moldings that resist cracking and fading. Avoid generic types that may not fit well or hold firmly. Proper molding improves your car’s look and protects its sides from minor dents and scratches.
Credit: www.collegehillshonda.com
Preparing The Car Surface
Preparing the car surface is the first step to install body side molding on your Honda Accord. A clean and smooth surface helps the molding stick better. Dirt, dust, and old adhesive can stop the molding from attaching properly. Take time to prepare the surface well. This ensures a strong hold and a neat look.
Cleaning The Door Panels
Start by washing the door panels with soap and water. Use a soft cloth to remove dirt and grime. Dry the area fully with a clean towel. Avoid cleaning products with wax or oil. These can leave a slippery layer. The surface must be dry and free from any residue before you move on.
Removing Old Adhesive Residue
Old adhesive can block the new molding from sticking well. Use an adhesive remover or rubbing alcohol to clean it. Apply the remover with a soft cloth and rub gently. Avoid harsh scrubbing to protect the paint. Wipe the area again with a clean cloth and let it dry. The panel should feel smooth and clean to touch.
Measuring And Aligning The Molding
Measuring and aligning the body side molding on your Honda Accord is a key step. Proper measurement prevents mistakes and ensures the molding fits well. Take your time with this part. It helps the molding look smooth and professional.
Marking Placement Points
Start by cleaning the area where the molding will go. Use a soft cloth and mild cleaner. Dry the surface fully before marking. Use a measuring tape to find the exact spots for the molding. Measure from the front and back edges of the door. Make small marks with a pencil or masking tape. These marks guide where to place the molding. Double-check the marks for symmetry on both sides. Accurate marks make installation easier and more precise.
Ensuring Proper Fit
Before removing the backing, hold the molding against the car. Check if it lines up with the marks. Adjust the molding gently until it fits perfectly. Look for any gaps or misalignment. The molding should follow the car’s curves smoothly. If it does not fit, measure again. A good fit ensures the molding sticks well. Proper alignment also improves the car’s look and protects the paint.
Credit: www.youtube.com
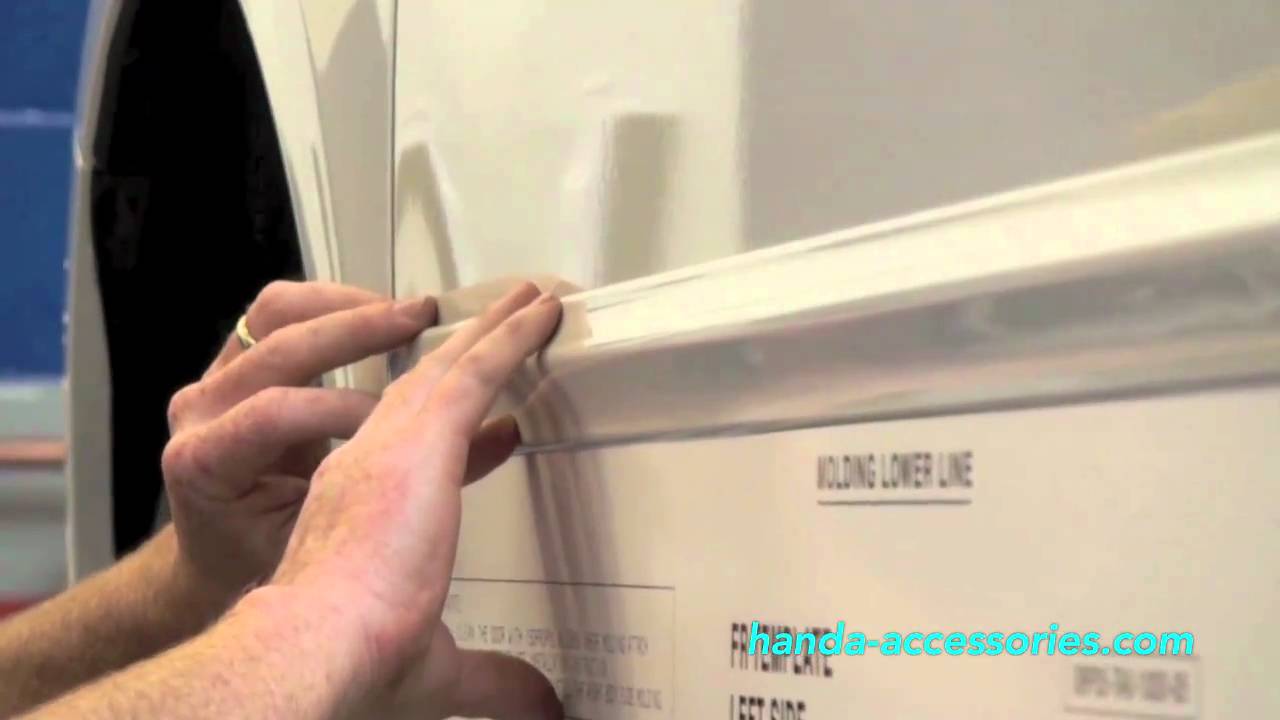
Applying The Body Side Molding
Applying the body side molding is a key step in upgrading your Honda Accord’s look. The molding adds protection and style to your car’s sides. It sticks firmly with a strong adhesive backing. Proper application ensures it stays in place through weather and washes. This part of the process requires care and precision.
Peeling Adhesive Backing
Start by carefully peeling the adhesive backing off the molding strip. Pull it slowly to avoid touching the sticky surface. Holding the molding by the edges helps keep it clean. Make sure the backing comes off smoothly without tearing. This keeps the adhesive fully effective.
Pressing Molding Into Place
Align the molding with the car’s body panel. Press it gently against the surface at first. Check that it fits perfectly along the side. Then, apply firm pressure along the entire length. Use your hand to press the molding tight. This ensures the adhesive bonds well with the paint.
Securing And Finishing Touches
Securing and finishing touches are the final steps in installing body side molding on your Honda Accord. These steps ensure the molding stays firmly attached and looks neat. Proper pressure and cleanup improve the molding’s appearance and durability.
Applying Pressure For Adhesion
Press the molding firmly against the car’s side. Use steady, even pressure along the entire length. This helps the adhesive stick well to the car’s surface. Hold the molding in place for at least 30 seconds. Avoid moving it during this time. This step prevents the molding from peeling off later.
Cleaning Up Excess Adhesive
Check for any glue that may have squeezed out. Use a clean cloth to wipe away extra adhesive gently. Avoid using harsh chemicals that might damage the paint. A little rubbing alcohol on a cloth works well. Cleaning keeps the car’s surface smooth and tidy. It also gives your Honda Accord a professional look.
Tips For Long-lasting Installation
Installing body side molding on your Honda Accord can improve its look and protect the doors. A strong, lasting installation keeps the molding secure and looking good for years. Follow simple tips to avoid damage and maintain the molding properly.
Avoiding Common Mistakes
Clean the car surface well before starting. Dirt or grease can stop the adhesive from sticking. Use rubbing alcohol to remove any residue. Align the molding carefully before pressing it down. Press firmly but do not stretch the molding. Avoid touching the adhesive area with your fingers. Work in a dry and warm place to help the glue set. Do not wash the car for at least 24 hours after installation.
Maintaining The Molding
Wash the molding gently with mild soap and water. Avoid harsh chemicals or strong brushes that can damage it. Check the molding regularly for any loose spots. Press them back down or use extra adhesive if needed. Keep your car parked in shade to protect the molding from sun damage. Remove snow or ice carefully to prevent cracks. Proper care extends the life of your molding and keeps your car looking fresh.
Frequently Asked Questions
How Do I Prepare The Honda Accord For Molding Installation?
Clean the car surface thoroughly using soap and water. Dry it completely to ensure strong adhesion. Remove any dirt, wax, or grease from the area before applying the molding.
What Tools Are Needed To Install Body Side Molding?
You will need a cleaning cloth, adhesive promoter, measuring tape, and a heat gun or hair dryer. These tools help ensure accurate placement and strong attachment of the molding.
Can I Install Body Side Molding Myself On My Honda Accord?
Yes, you can. With careful preparation and following instructions, DIY installation is possible. It saves money and allows you to customize your car easily.
How Long Does Body Side Molding Installation Take?
Typically, installation takes about 30 to 60 minutes. Time varies based on experience and preparation. Allow extra time for surface cleaning and adhesive curing.
Conclusion
Installing body side molding on your Honda Accord is simple and quick. Prepare the surface well to ensure strong adhesion. Align the molding carefully to avoid mistakes. Press firmly to secure the molding in place. This small upgrade protects your car and improves its look.
Follow these steps for a neat, lasting result. Enjoy your refreshed Honda Accord with added style and protection.


