Have you ever wanted to build your own covered wagon wheels but didn’t know where to start? Making these classic wheels might seem tricky, but with the right steps, you can create strong and authentic-looking wheels that bring your project to life.
In this guide, you’ll discover simple techniques and clear instructions to help you craft wheels that not only look great but also stand the test of time. Keep reading, and soon you’ll be ready to roll with confidence!
Credit: tinyhouseblog.com
Materials Needed
Gathering the right materials is the first step to making covered wagon wheels. Each material affects the wheel’s strength and appearance. Choose quality items to ensure your wheels last long and look authentic. Below are the main categories of materials needed for this project.
Wood Types
Hardwoods like oak or hickory work best for wagon wheels. They are strong and resist wear over time. Pine is softer but easier to shape for beginners. Select wood with straight grain to avoid cracks. Avoid wood with knots or splits, as it weakens the wheel structure.
Tools Required
Basic woodworking tools make wheel construction easier and safer. You will need a saw to cut wood pieces accurately. A drill helps create holes for bolts and pegs. Use a chisel to shape parts and smooth edges. Sandpaper or a sander finishes the wood for a clean look.
Additional Supplies
Metal bands strengthen the wheel rim and hold it together. Bolts, screws, and nails join the wood parts securely. Wood glue adds extra bonding strength to joints. Paint or stain protects the wood from weather and decay. A measuring tape and pencil help keep all parts precise.

Credit: www.wikihow.com
Designing The Wheel
Designing the wheel is a key step in making covered wagon wheels. It shapes the strength, balance, and look of the wheel. Careful planning helps the wheel hold up under heavy loads. The design must fit the size and style of the wagon. Each part of the wheel must work together well.
Start by setting the right size. Then decide how the spokes will be placed. Finally, plan the hub and rim carefully. These steps create a strong, lasting wheel.
Wheel Dimensions
Choose the wheel size based on the wagon’s use and weight. Larger wheels roll easier on rough ground. Smaller wheels are lighter and easier to build. Measure the diameter across the wheel’s circle. The width affects stability and strength. Write down the dimensions before cutting wood or metal.
Spoke Layout
Spokes connect the hub to the rim and hold the wheel’s shape. Even spacing keeps the wheel balanced. Count how many spokes the wheel will have. Plan angles so each spoke fits without crowding. The spoke length depends on the wheel size. Mark spoke positions on both the hub and rim.
Hub And Rim Planning
The hub is the wheel’s center, holding the axle. It must be strong and fit tightly on the axle. Decide the hub’s diameter and thickness. The rim holds the wheel together and supports the spokes. Plan the rim width and thickness to match the spokes. Both hub and rim need smooth edges for fitting parts.
Cutting The Wood
Cutting the wood is a key step in making covered wagon wheels. It sets the base for the wheel’s shape and strength. Careful cutting helps the wheel last long and look authentic. The process includes preparing the wood, shaping the rim, and crafting the spokes. Each part needs specific attention and tools.
Preparing The Wood
Start by choosing strong, dry wood. Oak and hickory work well for wagon wheels. Cut the wood into rough blocks slightly bigger than the final pieces. Check for cracks or knots and remove bad parts. Smooth the surface with sandpaper to avoid splinters. Proper preparation makes cutting easier and safer.
Shaping The Rim
Cut the wood blocks into curved pieces for the rim. Use a band saw or jigsaw for smooth cuts. Shape the outer edge round and the inner edge flat. Make sure all rim pieces fit together tightly in a circle. Sand edges carefully to remove rough spots. A well-shaped rim holds the wheel together firmly.
Crafting The Spokes
Cut long, straight pieces for the spokes. They connect the rim to the wheel’s center. Use a saw to cut spokes evenly, about the same length and thickness. Taper one end to fit into the hub. Sand each spoke smooth to avoid cracks. Strong spokes keep the wheel balanced and stable.
Assembling The Wheel
Assembling the wheel is the most important step in making covered wagon wheels. It brings all parts together for a strong, working wheel. Each part must fit correctly. Careful work ensures the wheel spins smoothly and holds weight well.
Follow each step to assemble the wheel with care. Precision and patience help create a durable wheel. The spokes, rim, and hub come together in this phase.
Joining The Spokes And Rim
Start by fitting the spokes into the rim holes. Each spoke must slide in firmly. Check that spokes spread evenly around the rim. This balance keeps the wheel steady. Use gentle taps to seat spokes fully. Avoid forcing spokes to prevent damage.
Attaching The Hub
Place the hub in the wheel center. Align spoke ends with slots on the hub. Push spokes into these slots carefully. The hub holds all spokes tight. Make sure the hub sits flush against spokes. A centered hub keeps the wheel balanced.
Securing With Fasteners
Fasten spokes and rim using nails or bolts. Tighten fasteners evenly around the wheel. This stops spokes from slipping out. Use a hammer or wrench as needed. Check all fasteners are secure but not too tight. Proper fastening adds strength and safety.
Sanding And Finishing
Sanding and finishing are important steps in making covered wagon wheels. These steps give the wood a smooth look and protect it. A smooth surface helps the wheel last longer and look better. Finishing adds a layer that guards against water and dirt. Both steps make the wheel strong and ready to use.
Smoothing The Surface
Start by sanding the wood with coarse sandpaper. This removes rough spots and splinters. Next, use medium-grit sandpaper to even out the surface. Finally, finish with fine sandpaper for a silky smooth feel. Sand in the direction of the wood grain to avoid scratches. Clean off dust with a soft cloth before moving to the next step.
Applying Protective Coating
Choose a protective finish like varnish or polyurethane. Apply the coating with a brush in thin, even layers. Let each layer dry completely before adding another. Sand lightly between coats to keep the surface smooth. The finish seals the wood and protects it from moisture and wear. This step helps the wheel stay strong and look good for years.
Attaching The Wheel To The Wagon
Attaching the wheel to the wagon is an important step in building covered wagon wheels. This stage ensures the wheel spins smoothly and stays firmly connected. A proper attachment helps the wagon move easily across different surfaces. Take your time to secure the wheel correctly for the best results.
Fitting The Axle
Start by placing the axle through the wheel’s center hole. The axle must fit tightly but still allow the wheel to turn. Use a hammer or mallet to gently tap the wheel into place if needed. Check that the wheel sits straight on the axle. A loose fit can cause wobbling and damage over time.
Ensuring Proper Rotation
Test the wheel by spinning it on the axle. It should rotate smoothly without sticking or grinding. Add grease or oil around the axle to reduce friction. Check for any tight spots or resistance. Adjust the fit if the wheel does not spin freely. Proper rotation makes the wagon easier to pull and extends wheel life.
Troubleshooting Common Issues
Troubleshooting common issues is key to making strong, reliable covered wagon wheels. Problems like wobbling or wood splitting can affect the wheel’s safety and performance. Fixing these issues early helps avoid bigger problems later. This guide covers simple tips to keep your wheels sturdy and lasting long.
Fixing Wobbly Wheels
Wobbly wheels often happen because the parts are loose or not aligned. Check the spokes and hub first. Tighten any loose spokes carefully with a spoke wrench. Make sure the wheel sits evenly on the axle. Use a level to test balance. If the rim is bent, gently bend it back with a rubber mallet. Repeat checking until the wheel spins smoothly without shaking.
Preventing Wood Splits
Wood splits weaken the wheel and cause damage. Use dry, well-seasoned wood to reduce cracks. Apply wood glue to any small cracks you see. Clamp the wood tightly until the glue dries. Avoid exposing the wood to extreme heat or moisture. Sand rough edges to stop cracks from growing. Regularly check for new splits and treat them fast. This keeps the wheel strong and safe.

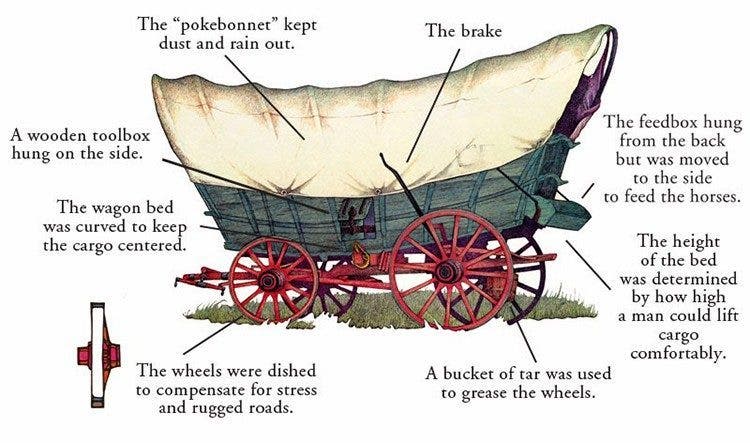
Credit: en.wikipedia.org
Frequently Asked Questions
What Materials Are Needed To Make Covered Wagon Wheels?
To make covered wagon wheels, you need wood, metal bands, nails, and glue. Hardwood like oak works best for durability. Metal bands secure the wheel rim. Basic carpentry tools such as saws and hammers are essential.
How Do You Assemble The Spokes And Hub Correctly?
Insert spokes evenly around the wooden hub, ensuring they fit tightly. The hub is the wheel’s center, supporting the spokes. Use glue and nails for extra strength. Proper alignment ensures the wheel spins smoothly without wobbling.
What Is The Best Wood Type For Wagon Wheels?
Oak and hickory are ideal for wagon wheels due to their strength. These hardwoods resist cracking and handle heavy loads well. Using quality wood increases wheel longevity and safety during use.
How Can I Ensure The Wheel Is Perfectly Round?
Use a compass or jig to mark the circle on wood before cutting. Sand edges smoothly to remove irregularities. Check roundness by spinning the wheel on a fixed axis, adjusting spokes if needed.
Conclusion
Making covered wagon wheels takes patience and simple tools. Follow each step carefully to build strong, sturdy wheels. Practice helps improve your skill and speed. Enjoy the process and learn from any mistakes. Soon, you will create wheels that look authentic and work well.
Crafting these wheels connects you to history and tradition. Keep trying, and your covered wagon will be ready for many adventures.